ZeusPOS is a Point of Sale software designed with advanced features to help in the daily operation of restaurants, coffee shops, bakeries, ice cream shops, fast food and general retail stores.
The graphic user interface allows easy and fast operation for most common activities of your business.
The following screen displays the main form of ZeusPOS in Restaurant/Fast Food Mode.
The following screen displays the main form of ZeusPOS in Retail Mode.
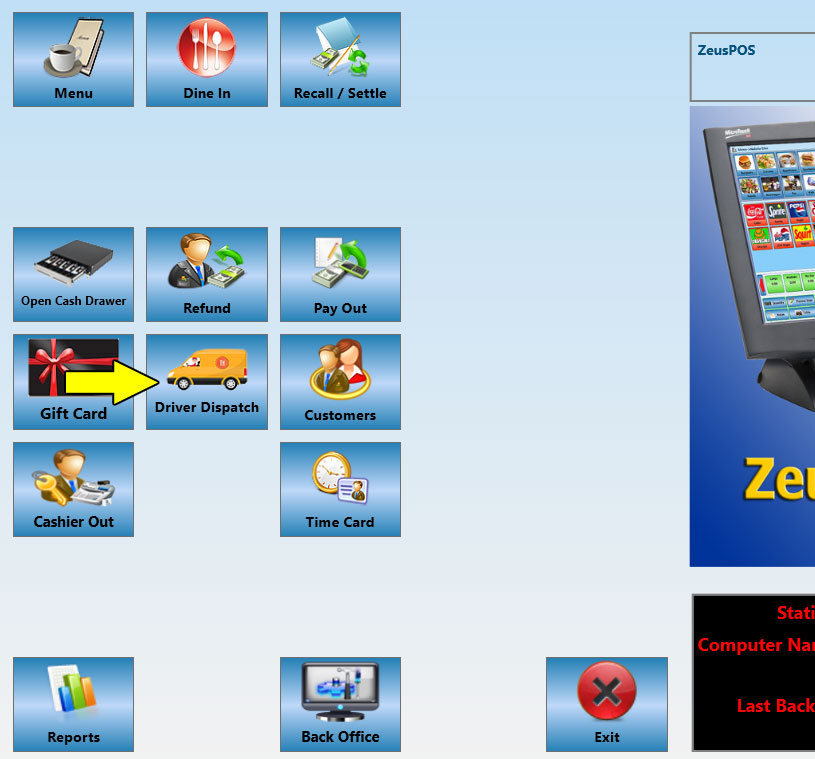
Menu (Restaurant Mode)
Allows to create orders from quick group-item button interface. Ideal for touch screen use in restaurant/fast food environments.
New Sale (Retail Mode)
Allows To create orders using a barcode scanner or quick search interface. Ideal for retail stores.
Dine In
To create orders for the dining room.
Recall/Settle
Allows manage current orders. Operations like reprint, split, combine, void or edit orders are easily made from here. To receive order payments, the "Cashier In" operation must be performed first.
Open Cash Drawer
Allows open the cash drawer for a no sale operation. Requires cashier privileges.
Refund and Payout
To perform a Refund and Payout.
Gift Card
On this module, you can create new gift cards, recharge (add balance) and void gift cards.
Customers
On this module, you can create new customers, and then create an order for the selected customer. The order will show the customer's name and address on the receipt. Create delivery or pick-up orders from this screen.
Cashier (In/Out)
"Cashier In" operation opens the cash register for operation and enable the system to receive payments. "Cashier Out" operation closes the register and the system won't accept payments until a new "Cashier In" operation is performed.
Time Card
Records employees work time.
Reports
Complete set of reports for sales, payments, employee activities, audit logs and more.
Back Office
Module for system administration and setup
Exit
Closes the ZeusPOS. There is a setting that can be set to require Manager or Owner authorization to close the ZeusPOS.
Right Side Image/Logo
The image at the right side can be changed for a custom image from the "Back Office->Station Settings".
Advanced Settings
Right clicking the gear icon at the right top corner opens an advanced setup screen for multi-station system setup, database tools for backup/restore database, import/export system configuration from previous of ZeusPOS.
Installation
Minimum Requirements
Computer with dual core processor or higher
4GB RAM or higher
Touch Screen with 1024x768 screen resolution or higher
80mm Thermal Printer for customer receipts
Cash Drawer with RJ interface
Windows 7 SP1, Windows 8.1, Windows 10 (Home or Pro)
Microsoft .NET Framework 4.6.2 or higher. (Already included with Windows 10)
ZeusPOS Setup
How to upgrade from version 4.x to version 5
If you currently own a ZeusPOS version 4.x license contact us to know how to upgrade to version 5 and get a special discount.
Open ZeusPOS v.4.x and close all outstanding orders and perform the Cashier Out procedure.
Install ZeusPOS v.5 (It can be installed in the same computer along with version 4.x without interfering each other.)
Open ZeusPOS v.5 and restore the backup file from version 4.x
Restart ZeusPOS v5.
Contact us to get a special discount to upgrade your license(s).
General Settings
The first time you launch your software, it is in trial mode for 35 days. There is a default user called "Store Owner" and the password is the number 1. All software configurations are made from the Back Office module.
Store Info
To enter your store information, click on "Back Office" button and enter the owner password
Fill out store name, address, city, State (or province), zip code and telephone number. This information will be printed on the customer receipts and reports.
Please be sure the store information is completely accurate; once activation is done, you can not change the information entered and may incur in a reactivation fee if the store information need to be modified after the software is activated.
Click on “Save” button.
Software Activation
If the trial time expires, the product registration window prompts you to enter your product activation code. To register your software and receive your activation code,
Click on “Request Activation Code” link from the store info screen or go online to
http://www.zeuspos.com/aform/activation.aspx
Provide your serial number, store name, street address, city, state (or province), zip code, and telephone number. Please be sure this information is completely accurate.
Once the information provided, serial number and payment confirmation is verified, you will receive in your email the activation code to unlock the software.
The activation code is valid only for the same computer and the serial number sent.
Is required to purchase a license for each computer if you plan to use a multi-station system.
The software license is based on the store name, address and phone number. Once the software is activated the store information cannot be changed. The license is not transferible to a different business name/address.
Please keep a copy of the setup file downloaded and the activation code received, in the case you need a reinstallation.
When you receive the activation code, copy it from your email and paste it into the activation box in the store info screen and click on “Activate” button
Employee Setup
Click on Back Office button, enter manager or owner password and click on "Employee Setup" button.
Click “New” button to add a new employee. Enter First name, Last name and password. Choose a security level: Employee, Cashier, Manager or Owner.
Optional, you can use magnetic cards for employee access. Standard swipe reader is required. Swipe the card in the "Access Card" field. When using employee access cards, assign a password to each employee and do not let the employee know the password.
Security Levels:
Employee: Is a regular employee with lowest level access on the system. Only is allowed to perform Clock in/out and sales (create orders). Use this level for cookers, drivers, dishwashers and employees that don’t have access to the cash drawer.
Cashier: Is an employee who can receive payments. This employee will be on charge of the cash drawer and also can create orders.
Manager: Is the employee that is in charge of the store. Has access to “Back Office” to change system configuration, add or edit groups, items, create discounts, add employees and generate some reports.
Owner: Highest level access. As owner, this person can do everything on the system. Has full access to “Back Office” and “Reports”.
All the other information is optional. Click on “Save” button when finished.
Other Settings
Report Tips: Check this option if the employees are required to report cash tips received. If enabled, a pop-up window will show to enter the cash tips received at the time the "Clock Out" is performed in the time card screen.
Use Staff Bank: This option enables this employee to use Staff Bank as the means of
taking and settling orders. If enabled, this employee will ALWAYS pay
to their staff bank when settling their orders. Use this option if your
employees carry money collected from customers until the end of the
shift.
Is Driver: Choose if this employee is a driver for delivery orders.
Time Card Edit
If employee forgets to clock-in or clock-out, manager or owner can modify the employee's time card.
If no clock-in was done, the manager/owner can initiate the clock-in manually and then modify the date/time from this screen. Click "Save" when finished.
Table Setup
Click on Back Office button, enter manager or owner password and click on table setup button.
Click on "New" to create a group, enter the group name and click "Save". Assign to the table groups descriptive names such as Dining Room, Patio, Bar, Private, etc.
The system allows up to 64 tables per group and you can customize the table layout to match the restaurant table distribution.
Select a group to add tables, then click on any blank button on the table layout to open the table details screen. Assign name or table number, for example, 1 or D1 for Dining Room tables, P1, P2 for patio tables, etc.
Optional, you can assign a picture, color to the table and total seats.
Click the button to finish the current table and add more tables if needed.
To modify an existing table, double click on the table to open the details screen and enter the desired changes and click the button to finish.
To delete a table, drag and drop the table to the trash can.
To change the position on the layout, drag the table and drop it in the new position.
Click on “Save” button when finished.
Categories
Click on Back Office button, enter manager or owner password and click on Categories button.
Each item is assigned to a Category for reporting purposes. These categories have nothing to do with the display in the "Order Entry" or "New Sale" screen.
These categories display when you create a sales report. For example, when you run a “Sales by Category” report, you see the summary total of the sales by each category that you defined.
Categories are also used to create groups of options by activating the checkbox "Is option category". Having these categories will allow to group several options (modifiers) by category and recall them easily while the user is creating orders.
To create a new category, click "New" button and enter the category name. Click the “Save” button when finished.
To delete a category, click on the delete button.
Note: A category cannot be deleted if is in use by any menu item and the delete button will appear disabled.
Groups
Click on Back Office button, enter manager or owner password and click on "Group Setup" button.
First create Groups and then add items to it. For example, Appetizers, Beverages, Burgers, Electronics, Shoes, etc.
Click on “New” from the group section to add a new group. Type the group name and click on “Save”. Is recommended to add a picture for the button to have a nice looking Entry Screen in Restaurant/Fast Food mode.
To do this, click on the picture button and navigate through your folders to find a picture.
By default, there are some pictures in ZeusPOS folder C:\ZeusPOS5.0\Images
The numeric field next to the Group name and Item name, is the display order that the group/item will show in the Entry Screen
Once the groups are created, you can start creating the items from the item setup screen under each group.
To set the display order for each item, enter the corresponding index number. The items will display in the order entry screen according to the display index.
The checkbox "Available only in retail screen", is useful for restaurants that also have retail items. Having a lot of items in a single group is not efficient to find the desired item in the button based screen.
Having this checkbox enabled, will prevent the group to show up in the order entry screen and the items only will be available in the retail screen and can be recalled using scanner or onscreen keyboard searching by name.
Item Setup
Click on Back Office button, enter manager or owner password and click on "Item Setup" button.
Select a group from the drop-down list and then click "New" button to create a new item, and enter the item information
Type the item name and choose a category from the drop down list
Assign a picture and/or a color for the button (optional)
Set the item price
If the item needs to be printed on the kitchen (Auxiliary printer), select the desired printer from “Print To” list. ZeusPOS supports up to 4 auxiliary printers. Some common applications of auxiliary printers are for kitchen, bar, salad bar, warehouse, etc.
Internal Name: This field is used to assign a secondary name to the item, it can be also a name in another language. If internal name is assigned, and the setting "Use Internal Language for Kitchen" under the "Printing Settings" is set, the auxiliary printer (kitchen) will print out the item's internal name instead of the default name.
Note: If Asian names (Chinese, Korean, Etc,.) are set for internal name, some printers don't support Asian fonts and won't print. Recommended printers for this feature: EPSON TM-T20, EPSON TM-T88IV or TM-T88V, Star TSP-143
The printer type on "Printing Settings" must be set to TM SMALL FONT AUTOCUT, TM MEDIUM FONT AUTOCUT or TM LARGE FONT AUTOCUT.
Order Item By Weight: If this option is checked, the item price will be calculated by the entered weight x item price. When the item is selected in a new sale, the system will pop-up a numeric keypad where the user can enter the weight previously read from the scale, then price will be calculated based on the weight entered.
Price: Set the default item price
If multiple prices are needed depending of the order type, use the button to enable the multi-price control and enter each price for each order type.
Prompt for Price: This option will pop-up a screen to enter the item price when a sale is been made.
Prompt for Quantity: This option will pop-up a screen to enter the quantity when a sale is been made.
Tax: The default tax is added to the item automatically. Click the button to open the tax list and add another tax to the item.
Print To: Sets the item to be printed in the specified auxiliary printer.
Countable Item: If this option is checked, then you can assign the current quantity on hand for the item, and the system will reduce the inventory on each sale of the item.
Quantity On Hand: Allows to set the current quantity on hand of each item.
Is Bar Drink Item: This option indicates that this item is a Bar Drink Item. Use this option in conjunction with the Bar Tabs if bar drinks are tax exempt in the specific station.
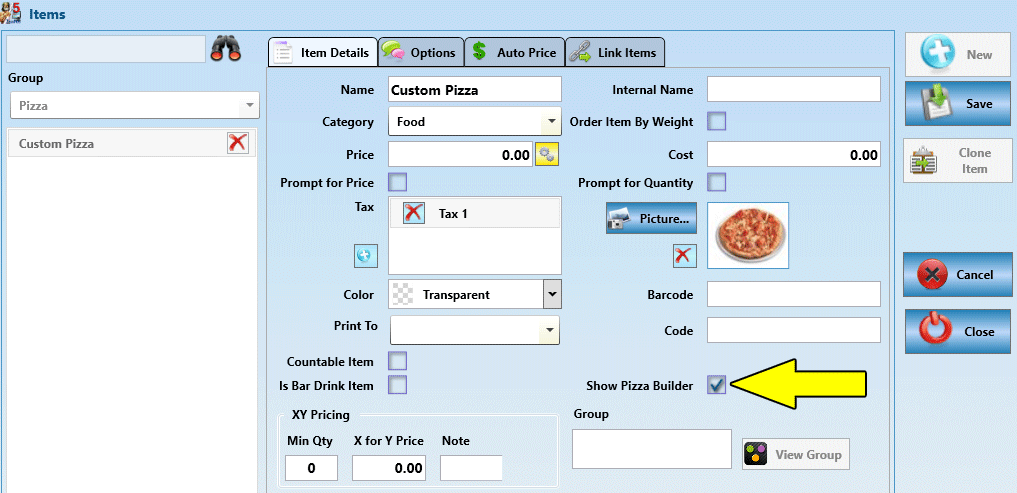
Show Pizza Builder: This shows the Pizza Builder Screen when this item is selected in Order Entry. When you select this option, a special screen appears to select pizza size, crust style, and add toppings to the whole pizza, first half or second half.
Use the options tab to configure the pizza size, crust and toppings. Refer to pizza builder section for detailed instructions.
Show In Display: When using ZeusPOS in conjunction with the kitchen display software, select the kitchen display where the item will be displayed when an order is created.
XY Pricing: XY Pricing is used to define price breaks for items when a customer buys more than one of an item. For example, an item is discounted if the customer buys two of them (2 for 1 pricing)
Example
An item's price is $1.25 and you want to have this promotion: buy 2 for $2.00, set the minimum quantity to 2 and the price to $2.00. Enter a Note like "PROMO" to identify the items sold at this price.
When this item sold, if 1 is added to the order the price will be $1.25, adding a second item, the price now will be $2.00 for 2 items.
Options
Allows to add options (modifiers) to items to include such things as included side dishes, preparation instructions and recipe modifications.
This feature will be explained in more detail in the next section Item Options .
Auto Price
Auto price to lets you specify your menu item's automatic price adjustment based on the day of the week, and the time of day. This is useful for example to set happy hours.
Click the button to add a new autoprice rule and set the day,
start time, end time, new price and a note.
Link Items
Link items lets you specify additional products to associate with an item that will also be sold when the item is sold. The associated product will automatically display at POS after
the original item is added to the receipt.
Example
This feature can be used with CRV (California Refund Value); for example, you could create a product called Auto Deposit that is linked with a glass milk bottle so that gross
profit and daily sales totals are not affected when the bottle is sold. Be sure to set up the bottle deposit product in its own category and make it non-taxable.
Overriding the price for the linked item will let you reuse the same item multiple times by setting a new price on each linked item. This practice will avoid duplicate items.
Clone Item
Often items in a same group share a lot of common such as similar name, same category, price, taxes, same options, same auto-prices, etc. After an item is saved, using the "Clone Item" button will allow to create a duplicate
of the current item to save time in creating the item from scratch, so by creating a clone allows you change just the features that are different between the original item and the new one.
Low Stock Alert
When using countable item, you can set a minimum value that will trigger an alert if the item added to the receipt has reached the thresold specified. A pop-up screen will indicate to the user the item been sold is at low stock.
The low stock alert minimum quantity can be set global for all countable items or specific to each item.
After finishing entering all needed fields on a new item, click Save button to save all changes and the item will be automatically added to the selected group. If you need to change the display order on screen or remove an item from a group, click button
Item Options (Modifiers or Choices)
Menu item options include such things as included side dishes, preparation instructions, and recipe modifications. ZeusPOS offers an easy way to handle these options.
Click on "Back Office" button, enter manager or owner password and click on
Option Setup button.
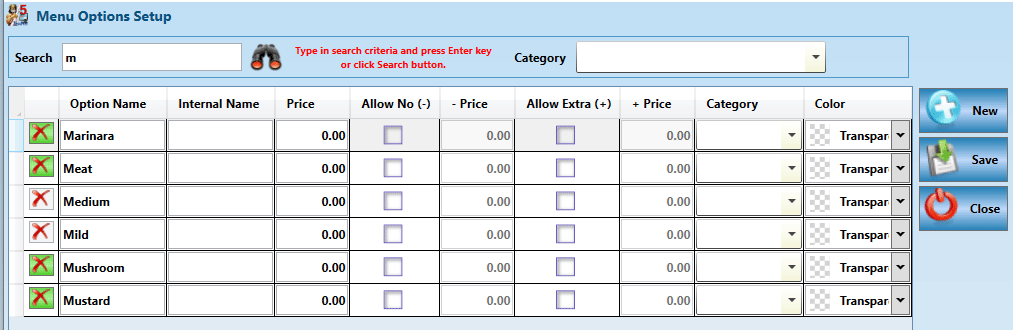
Add to the options list as many options as you want. Just click New button and type the name, for example, Cheese, No Cheese, Hot, Cold, No Sugar, Spicy, Pickles, No pickles, etc. If the options requires a charge or extra charge, set the price for it. Also, if no charge, a negative price can be assigned if you want to reduce the item's price when the option is selected.
If you created categories and selected "Is option category", you can select the category from the drop-down list and those options will be available as a group in the order entry screen and also can be set a option category pop-up in the item setup.
Note: Option prices can be overridden and set new prices when an option is added to an item in item setup screen. There is no need to create duplicate options, since any option can be reused as many times as needed.
Click on "Save" button when finished.
Assigning Options to menu items
Once you have entered "Options" to the system you can assign some of them to the items. Open the "Item Setup" screen, search for an item or select a group and then select an item, click "Options" tab
Default and forced (required) options can be assigned to each item.
Click the add button to show all items list.
Search the desired option and add to the item clicking the button
The option list at the right side will show all options belonging to the current item.
All forced options in the same level will show together on the screen. You can create as many levels you need. This feature will allow you customize your menu items to get exactly what the customer wants to order. You can set levels for sizes, cooking level, sides, etc.
Set the price, extra price, and limit. When using forced options, you can set a limit of how many options of the same level can be selected. For example, when adding an option for size, the limit must be set to 1 since an item cannot be set to small and large at the same time.
In a level to select side items for example, sometimes the customer can choose two or 3 side items; in this case, set the limit for the level to 3, and the system will let choose up to 3 items in the specified level.
Default options: Default options are shown in the Entry screen in the default options bar.
Set the Level number to 0, set Order to the desired display order (sort) and leave Forced unchecked.
Forced Options: Forced options are required options that must be added to the item in the Entry screen when the user is making a sale.
To force an option, check the box "Forced" in the item-option setup screen. All options with the same level number will be displayed on a pop-up screen. The number of options that can be selected per level is set by the limit number specified per level. You can setup as many levels as you want.
Discount and Coupon Setup
You can setup unlimited discounts and coupons to be applied to the orders on the Entry screen.
Go to "Back Office" and click on Discount Setup button
Click "New", enter the description, amount and type. If the "By Percentage" checkbox is selected the discount will be calculated by percentage, otherwise will be a fixed discount amount.
To delete a discount, click on the "Delete" (X) button and then save.
Currency Setup
By default, ten currency denominations are available (U.S.A). These denominations can be changed in Currency Setup. This feature is used mainly by customers in countries other than the United States.
If you need to create your own custom currency denominations, enter the denomination amount and repeat until all denominations are entered. To remove the custom currency denominations, simply click on the button with the red X.
These values are shown in the Cashier In/Out screen for money count and in the settle screen.
Click on "Save" button when finished.
Surcharge Setup
You can setup unlimited surcharges to be applied to the orders on the Entry screen.
Go to "Back Office" and click on Surcharge Setup button.
Click "New", enter the description, amount and type (by percentage or by amount) . If the "By Percentage" checkbox is selected the surcharge will be calculated by percentage, otherwise will be a fixed surcharge amount.
The surcharge can be automatically applied to any order by setting the Auto Apply checkbox. Also, you can set the specific order type to auto apply the surcharge. For example, you can set an automatic charge of $0.50 for packaging for "To Go" orders.
Click on "Save" button when finished.
Tax Setup
ZeusPOS support up four tax rates to apply to your sales.
Tax Name: This is the name of the tax. This name is used throughout the software, including reports.
Rate: Enter the tax rate to apply.
Examples: 7 for 7%, 8.25 for 8.25%
Is Inclusive: If checked, the tax will be calculate included in the item's price. This is commonly used in Australia and Canada. If unchecked, the tax will be added to the item's price. This option is used in the United States.
Click on "Save" button when finished.
Item Quantity Adjust
On this screen, you can adjust the quantity for the items marked as "Countable".
Enabling the checkbox "Show only out of stock items" will show only items that has current quantity on hand zero or less.
When you receive a new inventory, search for the items you want to update the quantity on hand. On the item list, add the new units for each item and then click Save. Repeat the process if needed for more items.
Generate Labels
ZeusPOS can create labels using a Dymo Labelwriter 450.
The label number supported is #30336 (1" x 2 1/8") to print directly from zeuspos. For other sizes, you have to export the data, design your own label and print it using the Dymo Label v.8 software.
To create labels, go to Back Office and click the button Generate Labels to open the label setup screen.
In the top list, all items are displayed. You can search items or use the checkbox to display only stock items, out of stock items, etc.
Select the items you want to print labels and the click "Add selected" button to create the list of labels to be printed. You can set how many labels of each item print or use the current quantity on hand of each item.
When the label list is configured as desired, click "Print Labels" to print directly to the Dymo printer.
Sample using label #30336 (1" x 2 1/8")
If you want to have a different label size and design, you can export the data to CSV file and using the Dymo Label Software you can create your own label design.
This procedure may apply with different printer brands like Zebra printers, Brother, etc., if the propietary software of those printers allow to import external data to print labels.
Store Settings
Use this screen to configure global settings for the store. These settings will be shared across the all stations on a multi-station environment.
Receipt Header Note: Enter here something to print just after store information on the receipt. For example, your web address, e-mail address, store hours, etc.
Receipt foot Note 1 and 2: Enter here something to print just at the bottom of the receipt. For example, your web address, e-mail address, store hours, promotions, surveys, etc.
Current Ticket Number: You can reset ticket numbering just entering a new number here.
Label: When the label field is left blacnk, by default the receipt prints the ticket number as Ticket #. You can set a new name for ticket using the label field. For example, new name can be Invoice, Receipt, etc.
Filling (0)s: The tickent numbering starts as 1, 2, 3... and so.
You can set a number of filling zeros to the left of the ticket number. For example, if the filling zeros is set to 8, the ticket number will print like 00000001 for the first ticket, and 00001567 for the ticket number 1567. This is useful in some countries where the ticket number must meet a specific length of characters.
Append Machine ID to Ticket Number: In station settings, a machine ID can be set to each station. When the "Append machine ID to ticket number" is enabled, the ticket number will print with the machine ID at the beggining. For example, Ticket #: 01-00001234, where 01 is the machine ID.
Rounding: This option will round up or down the total amount of an order to the nearest value. For example, if 0.05 is set, an order with total amount due of 5.33 will be rounded to 5.35 (if rounding up) or to 5.30 (if rounding down).
Foreign Currency Name: Select this option to specify a currency name to print on the customer receipt. For example, CAD$ for Canadian Dollar.
Foreign Currency Rate: Select this option to specify the exchange rate used to calculate the foreign currency amount listed on the customer receipt. This number can be
greater or less than one (for example, 1.29 or 0.37), depending on whether the foreign currency.
Note: The purpose of this feature is only calculate and print the total amount of the receipt in the specified foreign currency. The currency rate needs to be updated manually regularly.
Global Security Settings
In this section, you will find several security settings that affect all stations.
Most of the security settings in this section are self-explained by its name. We will describe the functionality of the ones that requires additional details.
Back office auto logoff: If "Back Office" module is left open it will close automatically after the specified time elapsed in minutes if the system is idle. The default value is 0 and means the auto close feature is disabled.
Requires manager permission to delete items for edited orders: This option will ask for manager or owner authorization to delete (void) an already saved item when an order is been modified.
Requires manager permission to delete items for new orders: This option will ask for manager or owner authorization to delete (void) a new item been added to a new order.
Allow modify other's orders: Enabling this option, any user with security level "Employee" can modify orders belonging to other users.
Use staff bank: Staff Bank is used when employees take care of their own money. It is often considered as their own personal cash drawer without the physical hardware.
An employee using staff bank cannot be also a cashier. Only one option may be used at any time.
To enable staff banking, select the option "Use Staff Bank" in the employee setup screen for each employee that will use this feature.
System Wide Settings
Email Setup: You can configure email to send automatically several reports. Consult with your email provider for the parameters needed to be able to use this feature. There are some default setting for popular services as Gmail, Outlook, Yahoo. However additional settings may need at the user account settings for each provider. For Gmail, is required to allow a security settings called "Less Secure Apps"
For example, for Gmail settings, after you allow Less secure apps in your gmail account follow the steps below to configure ZeusPOS email feature.
Select Gmail from drow-down list Popular Services. This will cofigure automatically the mail server, por and SSL requirements for Gmail.
Enter your user name as your full gmail address
Enter your gmail account password.
Enter your email address (same as user name).
Check the box to send the Cashier closing report after cashier out if needed.
Enter the email address where the reports will be sent.
Set a time to send reports automatically. Requires additional setup in the reports module.
Click Test Email
If the parameters are configured correctly, you should see a message confirming the test email was sent successfully. If a error message is shown, check again the email settings and try again.
Gratuity: You can set automatic gratuities depending of number of guests in a table, or by order type.
Enter a value en the field "Auto gratuity percent" to enable this feature, set the number of guests if apply, a name for the automatic gratuity.
Tax exempt services: Check the corresponding option if any of the services are tax exempt.
Delivery service: Allows to enable the driver dispatch feature, driver batch payment, set delivery charge and delivery compensation values.
Station Settings
Use this screen to configure local settings for each station.
Most of the settings in this section are self-explained by its name. We will describe the functionality of the ones that requires additional details.
Operation Mode: Restaurant or Retail. In restaurant mode, the sale screen shows all groups-items in a button based layout. In retail mode, the items will be selected using a barcode scanner or the quick search screen.
Language: Select English, Spanish, German, French, Italian or Portuguese for the user interface language. Note: The translations for other languages other than English and Spanish have been done using automatic machine translators, so you may find many syntax errors and misstranslations.
Messages Auto Close Seconds: Set the time limit (in seconds) that some messages will remain opened if the user doesn’t close them.
Station Picture: Allows to load a picture from your computer to use in the main screen.
Password Required For Order Entry, Dine In, Recall & Settle: When this setting is set (check marked), the system will ask for employee password each time that someone tries to create a new order from any screen or to open the Recall/Settle screen. This is a security setting that allows control on who is making orders on the system. If this setting is disabled, the system won’t ask for employee password and will record all orders to the specified employee.
Employee password required for each new order: If the station is shared by several employees, this additional setting will force to enter the employee password on each new order.
Select order type for each new order: When this setting is enabled, the system will prompt for the the order type "To Go", "For Here", "Delivery", "Pickup" as soon as you start making a new order. Click on the desired option to continue the new order.
This setting must be enabled in order to use the delivery feature
Printing
ZeusPOS is compatible with most major POS printer brands: Epson, Star, Bixolon and also may work with generic brands.
Printer setup is an easy process; just make sure to install the printer on Windows using the manufacturer driver provided with the printer.
Only POS receipt printers are supported, can be those with 80mm or 58mm paper size.
Select the printers from the list and printer type.
Up to four auxiliary printers can be used for Kitchen, Bar, Salad Bar, Warehouse, etc.
Printer type is related to print emulation mode use by the printer (Generally, ESC/POS or STAR). Consult the printer manual to see which is the default emulation mode for your printer and how to change it if needed.
Special type "TM CUSTOM FONT AUTOCUT", is required when the option "Use Internal Language for Kitchen" is checked. Notice that not all printers support this printing mode. Recommended printers are thermal printers like EPSON TM-T20, EPSON TM-T88IV o V, Star TSP143
If you get incorrect printing when using this type, that means the printer is not compatible and then you should try only set the type EPSON or STAR.
Receipt Printer: Select from the list the printer you want to use to print customer receipts. If receipt printer is not available, from the list select "NONE"
Journal Printer: Select this option to print a duplicate customer receipt on another printer. When you specify a printer here, it creates an exact duplicate of the customer receipt.
Auxiliary Printers 1 to 4: Select from the list the printer you want to use to print orders to the kitchen, bar, warehouse, etc. If auxiliary printer is not available, from the list select "NONE".
Line feed: Adjust the line feed number if your printer cuts off the receipt before it finish printing.
Auto print: If auto print is enabled, the order receipt or kitchen ticket will be printed automatically to the specified printer. When is disabled, the system will show a confirmation window where you can chose to print or just close the order without print.
Receipt Logo: Select an image with your logo from your hard drive. The logo will be printed at the top of the receipts. Notice that not all printers support printing logo. Recommended printers are thermal printers like EPSON TM-T20, EPSON TM-T88IV, V, Star TSP143.
If you get incorrect printing using those types, that means the printer is not compatible and then you should remove the logo to disable the feature.
Use Internal Language for Kitchen: When this option is checked, the system will print the internal name set to the item instead the default name.
Note: If Asian names (Chinese, Korean, Etc,.) are set for internal name, some printers don't support Asian fonts and won't print. Recommended printers for this feature: EPSON TM-T20, EPSON TM-T88IV or TM-T88V, Star TSP-143.
The printer type for the receipt or auxiliary printer must be set to TM CUSTOM FONT AUTOCUT in order to print Asian characters.
Print Options in Red: Some dot matrix printers support two color (black and red) ink cartridge. If this option is selected the items in the auxiliary printer will be printed in red color.
Customize font configuration for kitchen ticket
When the auxiliary printer type is set as "TM CUSTOM FONT AUTOCUT"
A new setting called "Auxiliary printer receipt font configuration" will show up in the printer preferences section:
Click the configuration button to open the ticket properties editor where you can customize
font size, font type, font style and chose with items on the ticket header show or hide on the printed kitchen receipt. A preview of how the receipt will look like is shown on the screen.
Pole Display & Weight Scale
LCD Customer Display
Using a LCD second display as customer display, provides a great advertisement tool to promote your products.
To use a customer display, connect the secondary screen (Customer display or LCD Screen) to the computer. Windows will detect the second screen and will duplicate the main computer screen to the secondary screen.
Right click on any empty space on Windows desktop and select "Display Settings"
Two displays should show
Scroll down to "Multiple displays" section and select "Extend these displays".
Back to ZeusPOS, clic the checkbox "Use LCD second screen as customer display"
The background image will display when an order is been created or when the payment is been processed. When the system is idle a slideshow with the images selected will start changing the image according to the interval set in the slideshow speed.
Add as many images you want and then save. Restart ZeusPOS and the Customer Display Screen will show up on your computer screen.
Selected background image will show on the screen.
Select the Customer Display screen from the top bar and drag it to the second LCD monitor. (See Windows help for multiple monitor configuration and how to extend the desktop).
A new button will appear on the main screen to manage the customer display startup position, slide show start/stop, full screen, etc.
Click "Customer Display" button to open the display controls screen and use the arrow buttons to set the position on the second screen and save it. You can also open the customer display screen in case it was closed, start/stop the slideshow, set in full screen mode.
When a new Order is started, the slideshow will stop and the "Background" image will show. At the right side the customer will see the order details.
When the order is ready for payment, the Customer display will show the order payment details.
Pole Display
Serial Pole Displays are supported (USB Pole Display with serial port emulation may work also).
To use a pole Display select the check box "Use Pole Display" and then select the serial port where the pole display is connected. Default port settings are in red, you may need to change the settings depending of your pole display configuration (consult the user manual).
Enter the desired text on Message Line 1 and Message Line 2.
Click on “Test Display” button. If you see your message displayed properly the display is configured correctly.
Weight Scale
ZeusPOS is compatible with the CAS PD-II Scale that may be configured for OZ or LB readings. Scale readings can be transferred to automatically to ZeusPOS
for items that are sold by weight.
Scale Setup Procedure
Navigation Buttons (3 Buttons on Front of the Scale, used during programming)
A. “#” Button increases numeric selection in calibration mode
B. “lb/oz”Button decreases the numeric selection in calibration mode
C. “ZERO” Button inputs the selected value and moves to the next menu
Connect Cables
Connect Power cable
Connect Serial Cable to Available COM Port. (Serial cable must be a Null Modem cable)
Set Communication Method on the CAS PD-II
A. Switch off scale
B. Hold down “#” button and switch power on
C. Release “#” button when display flashes
D. Display will read “tYPE – X”
E. Press the “lb/oz” button until the display reads “tYPE – 5”
F. Press the “ZERO” button to save the setting
Refer to the CAS PD-II user manual for scale calibration
ZeusPOS configuration to use the weight scale
A. Open ZeusPOS and go to Back Office->Pole Dispaly & Weight Scale
B. Select Tab Weight Scale
C. Check the box "Use Scale"
D. Select scale type: CAS PD-II
E. Select the COM Port where the scale is connected.
F. Default COM Port settings: Baud Rate: 9600, Parity: Even, Stop Bits: 1
G. Save Settings.
Create items to be sold by weight
Testing:
A. Create a new order
B. Place an item on the scale
C. Select the group containing the item by weight (or scan it)
D. A pop-up screen with the weight value transmitted from the scale should appear if the item was already on the scale
E. If the item was not placed on the scale before calling the item or more items were added to the scale, click the button "Get Weight" to read again the weight from the scale.
Credit Card Setup
ZeusPOS teamed up with CAYAN (TSYS)*, Vantiv (Woldpay)* and PC-EFTPOS** Payments to bring leading credit card solutions to your business, providing latest EMV security and PCI Compliance.
* CAYAN and Vantiv (Worldpay) payments service is only available in the Unites States.
** PC-EFTPOS payments service is only available in Australia.
Once your merchant account is approved, you will receive an email from the credit card company you applied for, and then you can enable the credit card services by entering the credentials. Save and Restart ZeusPOS.
CAYAN (TSYS)
ZeusPOS uses CAYAN's Genius platform for credit card processing. With Genius platform, customers can pay how they want, where they want, and be on their way quickly. More details about Genius Platform at
www.cayan.com
ZeusPOS is compatible with Genius Coutertop, Genius Handheld and Genius Mini
Genius Family: Mini, Handheld, Countertop
Once the Genius device of your election is properly set up at your store, perform the network test and get the device's IP address.
Check that the Genius Countertop has received an IP address
On the Genius keypad, press 0 three times to access the Admin screen
Use the keypad to insert the password 9416557 and press Enter
Confirm that the IP address field is populated
* To get Genius Handheld and Genius Mini IP address, tap on the Info or About icon on the screen.
Click "Enable CAYAN credit card services and enter your merchant name, merchant site ID and merchant key exactly as shown in your account confirmation email/letter from CAYAN. If possible, use copy/paste to avoid mistakes entering the values in those fields.
Select default transaction type "PRE-AUTHORIZATION" if your business type is restaurant/fast food and you need to apply gratuities at the end of day. Select transaction type "SALE" is the business type is retail or gratuities are not used.
Enter the Genius device IP address and select the correct device type from the drop-down list.
Leave port as default 8080 and click "Check Status" button to test the device. If the device is setup properly, the status will return "Online", that means everything is correct and your system is ready to process credit cards.
Worldpay
In order to process the credit cards with Worldpay, you need to apply for a merchant account at Worldpay.
PC-EFTPOS Pty Ltd is the leading specialist supplier of Integrated EFTPOS payment solutions in Australia. ZeusPOS and PC-EFTPOSGenius provide integrated EFTPOS payments. More details about PC-EFTPOS at
www.pceftpos.com/
Right clicking the gear icon at the right top corner opens an advanced setup screen for multi-station system setup, database tools for backup/restore database, and tools to import/export system configuration to another computer with ZeusPOS, and import data from CSV files
Multi-Station Setup
For multi-station systems, you can connect several station computers to one main (server) computer.
First, install ZeusPOS on the server computer. When ZeusPOS runs the first time, the Windows firewall will pop up a warning message asking permission to allow Firebird SQL Server communication over the network.
Check the boxes for private and public network to allow connections from other computers in the network.
Install ZeusPOS in a station computer(s), then open the advanced settings screen and enter ZeusPOS server's name. Leave the database path as default and click "Test Server". If the server is found you will get a message: Connection to server successful.
Click the operation mode "Restaurant/Fast Food" or "Retail" to finish the station setup. The new station computer should now access the server database.
Note: If the connection test fails, that means that Windows firewall (same applies to other firewalls like Norton, McAffee, AVG, etc.) is blocking the connections to the Firebird SQL Server. In this case, you need to allow access to Firebird SQL Server manually.
The Firebird SQL Server is located at "C:\ZeusPOS5.0\FirebirdServer\bin\zeusfbserver.exe"
Backup
Backing up the database allows you to create backup copies of your database in case your live database becomes corrupted or unusable, or for a computer crash that may need a software reinstallation. You can only backup the database
at the computer on which the database server is installed. A good practice is to save the backup file to an external usb flash drive or hard drive.
Note: In a multi-station system, the backup utility is available only on the main computer.
To back up the database, click on the “Backup/Restore” button, enter the Owner password. Select the folder where the backup database will be stored. After you have selected the folder for the backup, click the “Backup Now” button.
After the backup is complete, a confirmation message will show up: "Backup is completed!" and the folder containing the backup file will be opened. The database file backed up is called “ZeusPOS-BAK-{DATE}.FBK”. Keep these files safe and always keep a second location for the backup, just in case your primary backup is damaged.
If you want, you can set automatic backup to perform a daily backup at the specified time. To do this, check the "Auto Backup" checkbox, set the time, click "Save" button, and do not turn off the server computer and keep ZeusPOS open in order to perform the backup at the specified time.
Restore
To restore the database from a backup file, click on the “Backup/Restore” button, enter the Owner password and click on “Restore” tab. Make sure to close all stations running ZeusPOS.
Select the folder where the backup file was stored. After you have selected the folder for the restore, click the “Restore Now” button. After the restore is complete, a confirmation message will show up informing that the restore process is completed.
Close ZeusPOS and open it again, the you should have the data that was just restored.
Import/Export
ZeusPOS allows to import/export the setup configuration to transfer it to a new computer. This is useful if you open a new store in other location and want to have the same menu (categories, groups, items) and don't want to enter all that manually again.
Click on the “Import/Export” button and enter the Owner password to access this utility.
Check mark the options you want to export, and select a folder to save the files. Click Export. This will create a set of XML files with all data exported.
Do not modify the content of the files or delete anything from them, otherwise the data will be corrupted.
To import the same data in another computer, transfer the folder with all the XML files the new computer and then check mark the options you want to import. Then select the folder to import from and click import.
Note: The exported data only contains configuration data (groups, items, options, discounts, employees, etc.). Orders and payments are not exported using this method.
Importing data will delete all orders and payments and the system will reset.
Import from CSV files
ZeusPOS allows to import data from CSV files. You can import items, options, and customers.
As precautionary measure, make a database backup before using the import tool, so in case something goes wrong, you can restore the database to the state that was before the import operation.
Click on the “Import/Export” button and enter the Owner password, select CSV File tab to access this utility.
After download the import template file, open it on Excel and add your data according to the columns on the template.
The import tool will use the group and category names to find the corresponding groups and category to add the imported items. If not matching groups and categories are found they will be created.
To import options, make sure to match the parent item name for options that are related with the item.
Y means Yes, N means No. For example, if the item been imported is countable mark the corresponding column with Y
Note: Do not delete columns. If a column is not needed, leave it blank or with the default value.
Click "Items"
Click "Import from file..." button and locate the import items CSV template file.
Click "Load"
The data to import will be loaded on the screen
The import tool can be used also for inventory updates. If an item already exists in the database, the tool can update the quantity on hand by adding the new imported units, update its price or cost. Use the corresponding check boxes that apply if needed.
The loaded data can be modified and new items can be added if needed.
Click "Import" button to start the process.
Follow same process to import customers and options from CVS file
If you just finished testing the software and want to create your own setup from scratch, you can use this tool to delete all information and start with a blank database.
Also, if after couple years using the software, the database is too big with many transactions and you don't need to keep the historic data, then you can wipe out the database by deleting all unwanted data to improve performance. Or if you sell the store and don't want to leave the historic data in the database for the new owner, then you can delete it using this tool.
Click "Clean Database" button, enter the Owner password to open the clean database screen.
You can select a specific date on the calendar control and all transactions prior to the selected date will be deleted. If no date is specified, all transaction will be deleted.
Select the desired options and click "Clean Database".
If menu is selected, it will also delete all orders and payments.
ZeusPOS Operation
In this section will be explained the operation of ZeusPOS in general. You will learn basic operations such as starting the day/shift, creating new orders, receive payments, split orders, combine orders, void operations, making delivery orders and assign them to drivers, staff banking and many more features available in ZeusPOS.
Cashier In
Before taking payments from customers, you must tell the system a cash drawer is available to receive money.
Click the "Cashier In" button in the Main ZeusPOS screen, enter your access code. The Money Count screen will display where you can enter the starting amount of the cash drawer.
Eleven denominations are available. These denominations can be changed in Back Office->Currency Setup. This feature is used mainly by customers in countries other than the United States.
Enter the currency you start with. Make sure this information is correct or your drawer will show a discrepancy at the end of the shift.
When you finished with your money count, Click "Log In"
Time Card
ZeusPOS can record total hours worked by each employee that use the clock-in clock-out function. There is a report available that shows the time card for all employees.
Clocking In
To clock in, follow the steps below.
Click on the "Time Card" button in the main ZeusPOS screen and enter your access code. You should have already created an employee file for each employee that works in the store.
Click on the "Clock In" button. This displays your clock in time.
At the end of day, each employee that clocked in must clock out.
Note: Manager or owner can edit the time card for each employee if they forget to clock in or clock out sometime.
Clocking Out
To clock out, follow the steps below.
Click on the "Time Card" button in the main ZeusPOS screen and enter your access code
The time when the previous clocking in was made is displayed on the screen.
Click on the "Clock Out" button. This displays your clock out time.
If the employee is required to report cash tips, a keypad will pop up where the employee can enter the gratuities collected during the time worked.
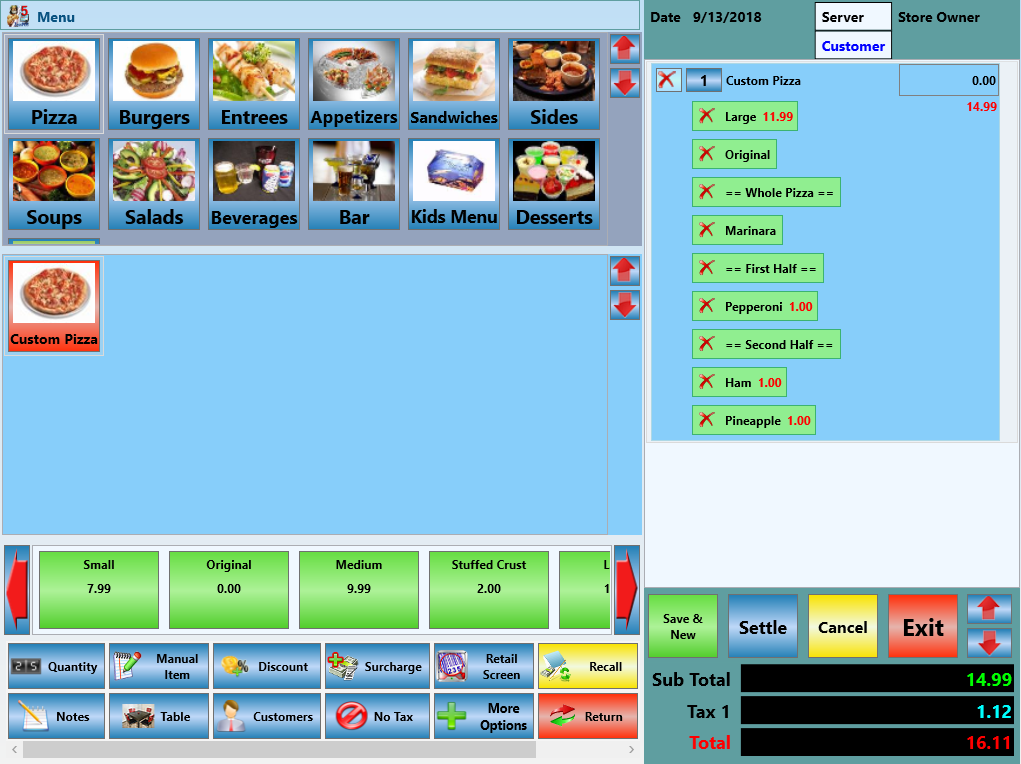
Order Entry (Restaurant/Fast Food Mode)
Click the "Menu" button on the main ZeusPOS screen. You are prompted for your access code. The only time you are not be prompted for your access code is if you disable the option called "Password Required For Order Entry, Dine In, Recall & Settle". This option is located Back Office->Station Settings.
Once in the Order Entry screen, you have many functions to choose from. The Order Entry screen is arranged to provide the fastest operations possible. All commonly used buttons are located on this screen for easy access. Menu groups are located on the top left side and the menu items below groups, and default options below menu items.
As you click on each menu group, the menu items change to what is in the currently selected group. Action buttons are located below the menu items and are used to perform various tasks with the order such as Quantity, Manual Item, Discount, Surcharge, Retail Screen, Notes, Table, Customers, No Tax and More Options.
To add an item to the ticket, follow the steps below.
Click on the Menu Group where the item is located. This shows all the menu items for this group.
Click on the Menu Item you wish to add to the ticket. To enter two or more quantities of the same item, click the button "Quantity", enter the desired quantity and then select the menu item.
If needed, add default options or go to “More Options” to see all options available. Also you can add special notes to the order just clicking the “Notes” button and type something you want.
Click "Save & New" to confirm the order and send the items to the kitchen and the system will be ready for a new order. Or
If you want to settle the order right away, click "Settle" button. This will confirm the order, send it to the kitchen and automatically jump to the settle screen to receive the payment. (see settle section).
Other actions available on Entry screen are:
Manual Item: Use it to add an inexistent item to the current order. The item will not be added to the menu.
Discount: Opens the discount list to apply a discount or coupon to the order or to an specific item.
Surcharge: Opens the surcharge list to apply a surcharge the order.
Retail Screen: Changes the button interface screen to a quick search / barcode enabled screen.
Notes: Allows specify any note to the ticket, special preparation instructions for the kitchen, etc.
Table: Opens the "Dine In" screen to assign a table to the current order.
Customers: Opens the "Customers" screen to assign a customer to the current order.
No Tax: Use it to cancel the tax to the current order. (Tax exempt)
More Options: Shows all options available to add to the items.
Order Details
To remove an item from the order, click the button
To remove an option from the item, click on the option
To change the item quantity click the quantity button
To change the item price click on the item price and enter the new price
New Sale (Retail Mode)
Click the "New Sale" button on the main ZeusPOS screen. You are prompted for your access code. The only time you are not be prompted for your access code is if you disable the option called “Password Required For New Sale, Recall & Settle”. This option is located Back Office->Station Settings.
The quick search screen in retail mode allows you to scan barcodes to find quickly the item and add it automatically to the order. If the barcode scanner is not available you can search the item by code, or by description. Simple type in the search textbox the item code or part of the description (item's name) and the list of matching items will appear.
Click the button to add manually the selected item to the order if scanner is not available.
If needed, click "More Options" to see all options available. Also you can add special notes to the order just clicking the "Notes" button and type something you want.
Click "Save & New [F4]" button or press key F4 to confirm the order and the system will be ready for a new order.
If you want to settle the order right away, click "Settle [F8]" button or press key F8. This will confirm the order and automatically jump to the settle screen to receive the payment. (see settle section).
Dine In Orders
To create a new order for the dining room, follow the steps below.
From the main screen, click on "Dine In" button.
Table groups will open, then click on the desired table.
A new order is created and assigned to the selected table.
Add items as you learned in Order Entry section.
If there is an order assigned to a table, it shows in green, the table name, order number and the server name. If you click on it, the recall screen will open for additional actions, for example, you can modify the order to add more items, print the ticket, split the order or receive the payment.
Change Table
Sometimes customers move from one table to another one, and then is necessary to change to table assigned to the order.
To do this, click the button and you will be asked to select the original table you need to change. Select the original table and then the new table
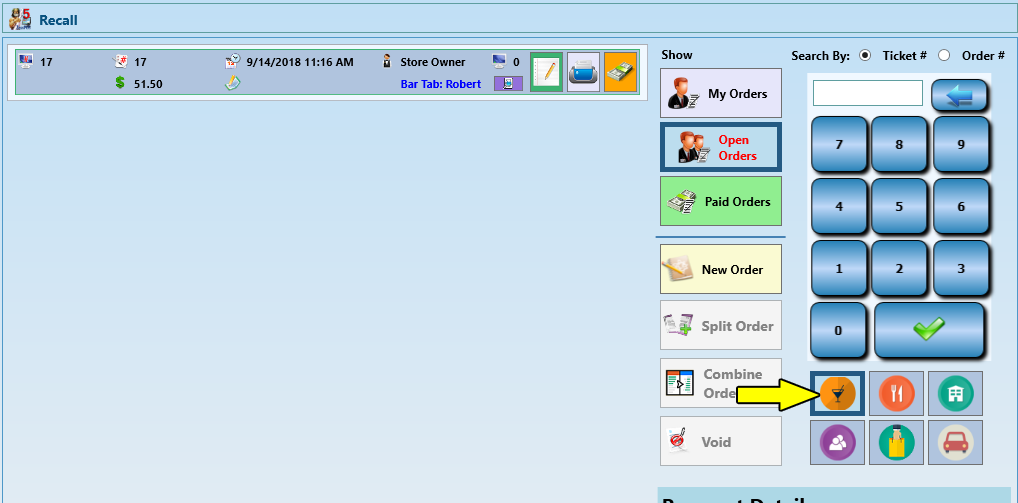
Recall/Settle
In Recall screen, the user can see all open orders to do some additional actions. Is possible print the ticket, modify the order, void orders (only manager or owner), create a new order, split an order, combine orders. Open the settle screen to post a payment for the selected order.
To modify an order, click on "Modify Order" button to reopen the order. Then you can add more items, apply discount, add notes, etc.
To reprint a ticket, search by order number or ticket number for the desired ticket, then click on the printer button
To search for paid orders by date, click the button "Paid Orders"
Select "Today", "Yesterday" or "Other" and click the button . Paid orders for the selected date will show on the screen.
To see the order details without reopen the order, click the button
Click back button or on any part of the order details preview to close the order preview.
Settle
To settle the order, click on the payment button
When your employee security level is "Cashier" or higher ("Manager", "Owner"), you can settle orders to your cash drawer. If you are not the cashier, a cashier must settle your orders for you.
Select payment method: Cash, Credit/Debit Card, Check, Gift Card
Cash
For cash payment types, click on the “Cash” button. Enter the amount tendered. On the right side of this window are some typical amounts that may be tendered. To use one of these, click on the button corresponding to the amount tendered. If you do not see the exact amount tendered, enter it manually.
Once you have entered the amount tendered, click button to finish the settlement.
Credit Card
If you are not using the credit card integration with Mercury Payments or Merchant Warehouse, when a customer pays by credit card, the order is treated as though the processing is done on bank terminal.
The software assumes that the transaction has been successfully processed and simply asks the user how much the transaction was for. Optional you can enter the reference number generated by your terminal.
Optional you can select if the payment is Credit or Debit and specify the card type. If no selection is made, the payment will default to credit card without specific card type.
Check
If the customer is paying by check, click the “Check” button. Click on the button corresponding to the amount tendered or enter the amount manually. Optional you can enter the check number.
Gift Card
If the customer is paying with a Gift Card, click the “Gift Card” button. Scan the barcode, swipe the gift card or enter the number manually. If the card is found the current card's balance will be displayed.
Click the button to complete the payment.
Partial Payments
You can apply partial payments to an order. For example, the total amount for an order is $50 and the customer wants to pay $30 with credit card and $20 with cash.
To do this, apply first the cash payment for $20 and pay the $30 balance with the credit card.
Void Payments
To void a payment, from the settle screen search an order that has been paid. You can search by ticket number, order number.
Select the order and click button "Reopen Order"
The order will be reopened for modification, then click the payment button
Click the red "X" button on the payment you want to void.
Void Order
Only manager or owner can void orders.
To void an order, click the “Recall” button on the main ZeusPOS screen.
Select the order to be voided or enter the order number or ticket number in the search field.
Click the button "Void"
Enter the reason for voiding this order and click on "Done"
Only open orders can be voided. If you need to void an order that has been paid, you have to reopen the order, void the payment first, and then void the order.
All voided orders are recorded and the owner can generate a report that shows all details for the voided orders.
Split Order
Customers sometimes want to split their tickets. If the customer mentions they would like to split the check after items have already been ordered, you can split the items into separate tickets by using the "Split Order" button in the Recall screen.
The "Split Order" screen will open
To split items onto separate tickets, follow the steps below.
Click Add button for each new order you want to split the ticket
Select the items to split from the original ticket (left side) drag and drop it to the new order at the right side. The selected item will be removed from the original ticket and added to the new ticket (right side).
You can drag back an item to item to the original ticket or to another new ticket.
Repeat step 2 until you have assigned the items to split from the original ticket to the new ticket(s). The remaining items are left on the original check.
Click Process button when be ready. The new orders will be created and shown in the screen.
There are options to print the new reduced original ticket as well the new tickets and you can click the "Pay Now" if the orders are ready for payment
Combine Orders
Customers sometimes may want to pick up a tab for a friend or change their minds on having
separate checks. You can combine multiple orders into one single order by using the "Combine Orders" button in the Recall screen.
To combine checks, follow the steps below. These steps assume you have multiple orders created
and are in the Order Entry screen.
Select one order as target order where all other selected orders will combine .
Click Combine Orders button
The combine screen will open. At the left side appears the selected order where all other orders will combine.
Check mark each order you want to combine. The items will be added to the target order at the left side of the screen.
Click Process button.
Order type filters
The recall screen shows all open orders by default. You can filter the orders by type such as "Here", "To go", "Delivery", "Bar tabs", etc., for easy handling.
Click button to show only Bar Tab orders
Click button to show only Dine In orders
Click button to show only Here orders
Click button to show only To go orders
Click button to show only Pick up orders
Click button to show only Delivery orders
Transfer Orders
While in the Recall Order Selection screen, you can transfer all of your assigned orders to
another server. This is useful when ending a shift and you have open orders still assigned to you.
Click the Transfer orders button
Have the new server enter his or her access code. All orders transfer to the new server automatically.
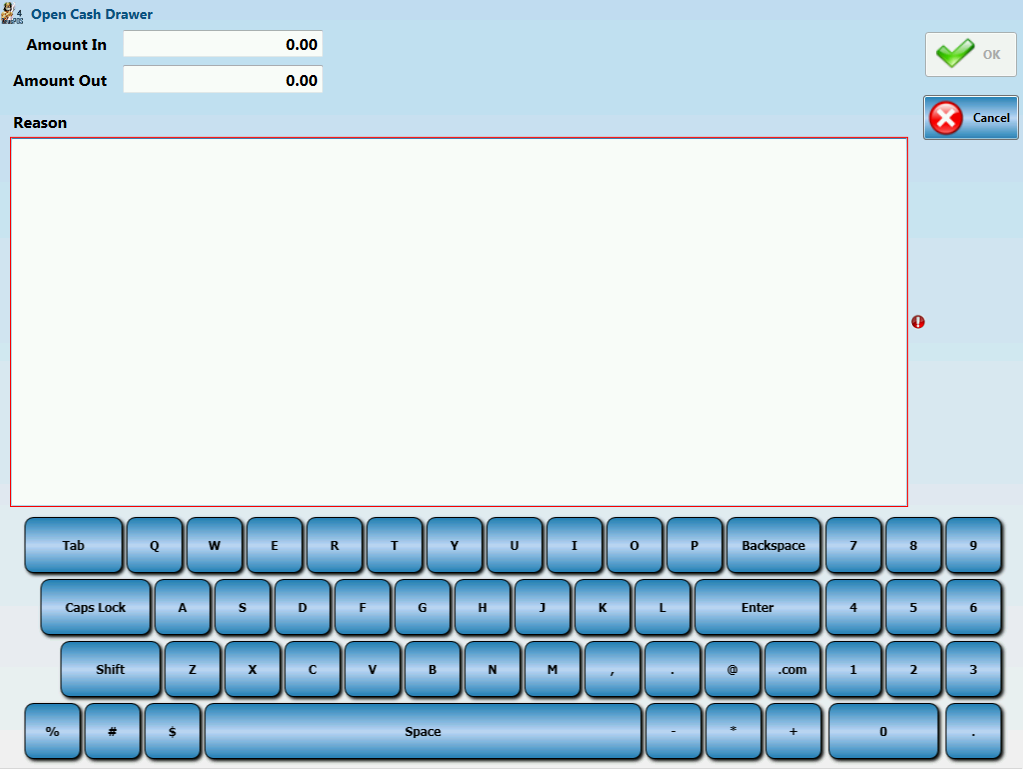
Open Cash Drawer
From the main screen, click "Open Cash Drawer". A reason must be entered to justify why the cash drawer is been opened without doing a sale.
Enter the reason and then click "Ok" button. The cash drawer will be opened.
Note: The requirement of entering a reason to open the cash drawer manually can be turned off if desired. To disable it go to Back Office -> Store settings and uncheck the box Enable open cash drawer reason
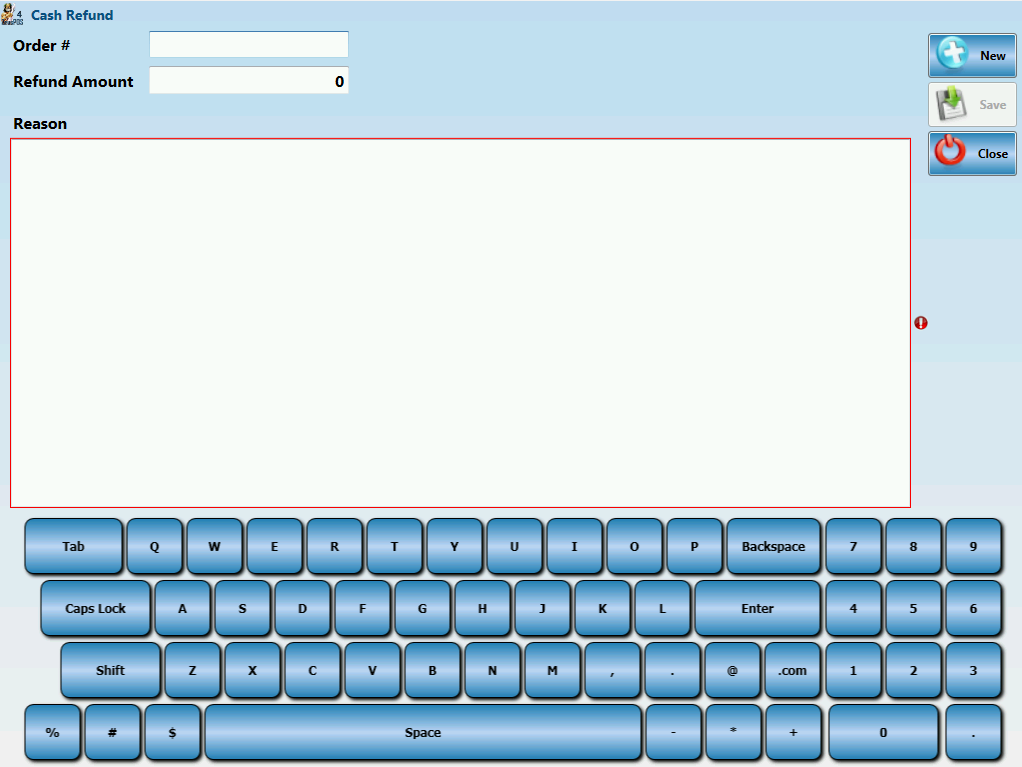
Refund
From the main screen, click "Refund". From this screen you can issue a cash refund.
Enter order number, amount to refund and a reason. If order number is not available leave the field blank. Click "Save" to complete the refund.
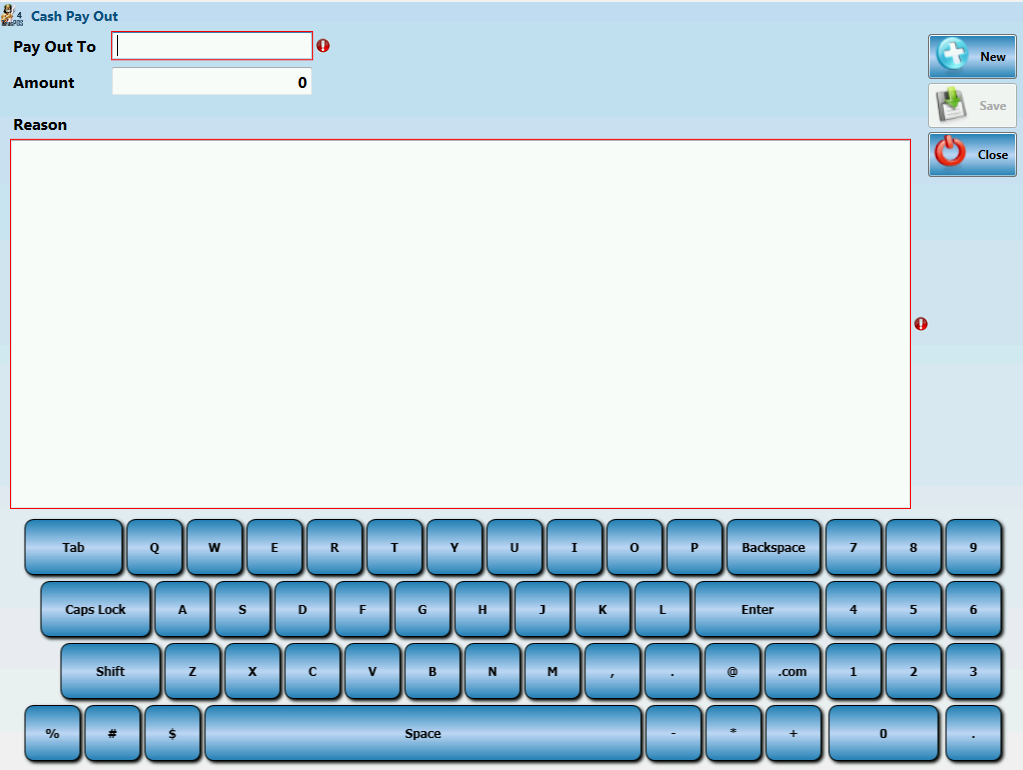
Pay Out
From the main screen, click "Pay Out". From this screen you can issue a cash pay out.
Payouts are used for situations such as paying for items purchased at a store when an
inventory item runs out and must be replaced immediately, when a vendor wants to be paid cash or paying for a service such a repair in your store, etc.
Enter the "Pay out to" name, amount and a reason. Click "Save" to complete the pay out.
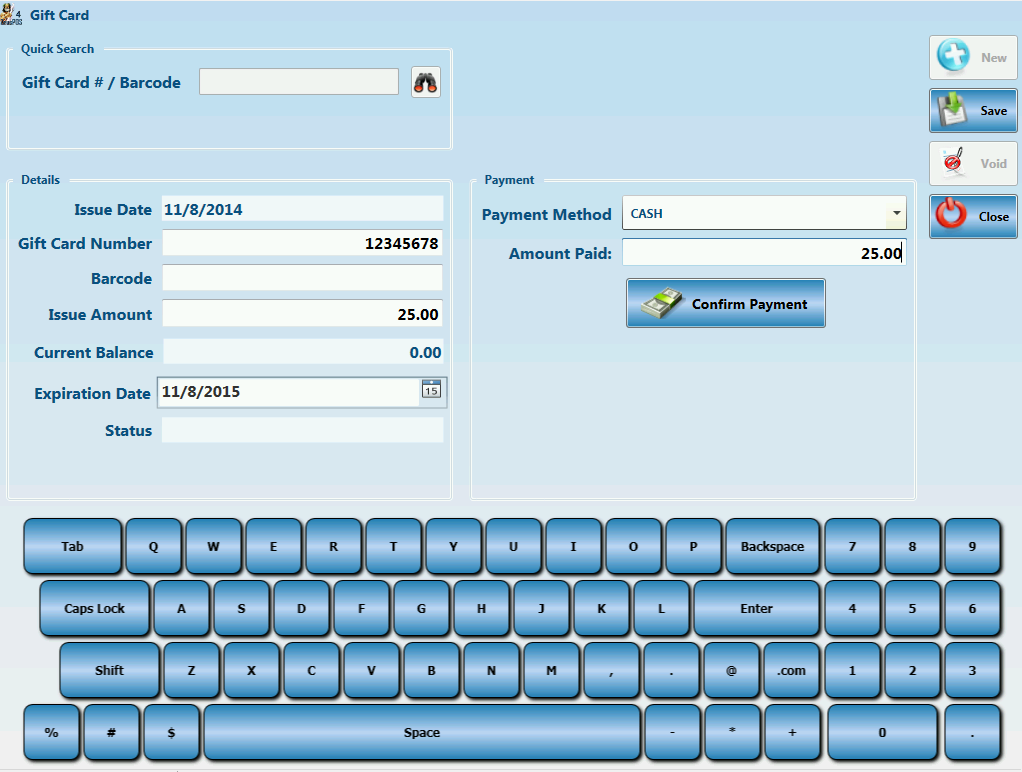
Gift Cards
From the main screen, click "Gift Card". From this screen you can issue gift cards, add balance and void gift cards.
Click "New" to create a new gift card.
Enter the gift card number scanning the barcode or swiping the card.
Enter the issue amount. By default the expiration date is set to 1 year. Change the expiration date if needed.
Select the payment method and confirm the payment to create the gift card. Click "Save"
Note: Gift cards expiration can be turned off if needed. Go to Back office ->Station Settings uncheck the box Gift cards do not expire.
To add balance or void a gift card, search by gift card number or scanning the barcode. Then perform the desired operation.
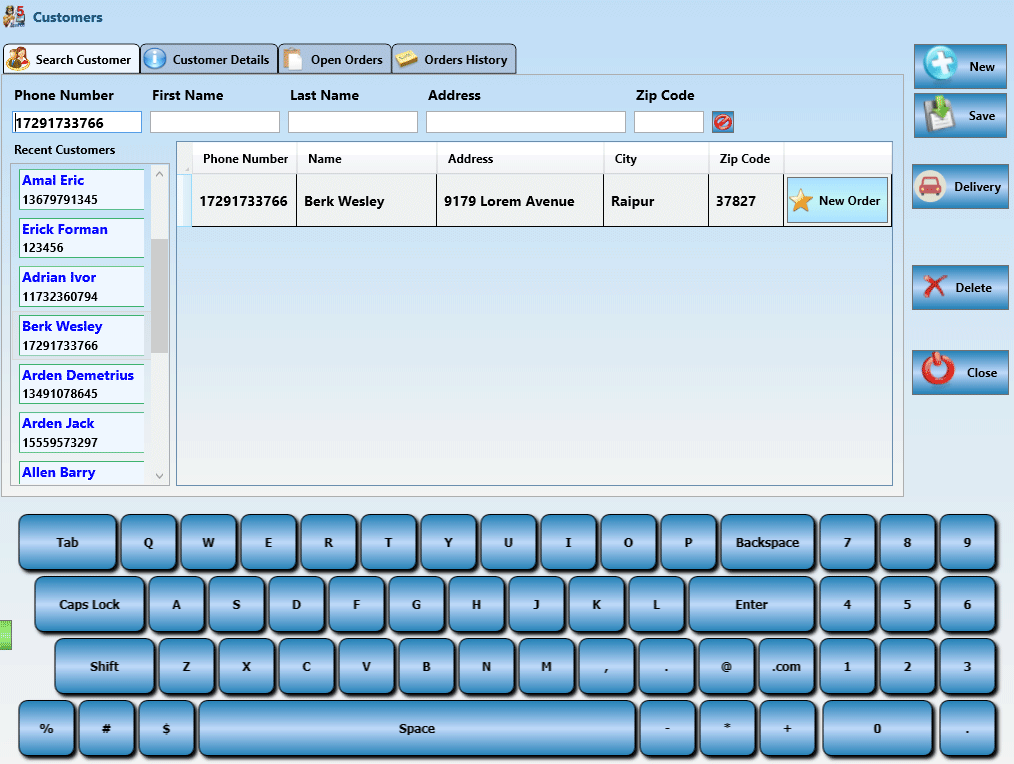
Customers
From the main screen, click "Customers". From this screen you can create new customers and create orders assigned to the selected customer.
To create a new customer click "New", enter the customer information and "Save".
In the Search Customer tab you can quickly search a customer by phone number, first name, last name or address.
A list of the most recent customers will show at the left side.
To create a new order for a customer, search and select it from the list and click New Order
To create a new delivery order for a customer, search and select it from the list and click Delivery
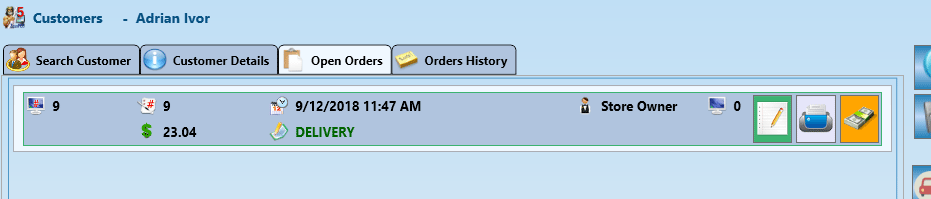
If there are open orders for the selected customer click the "Open Orders" tab to see them.
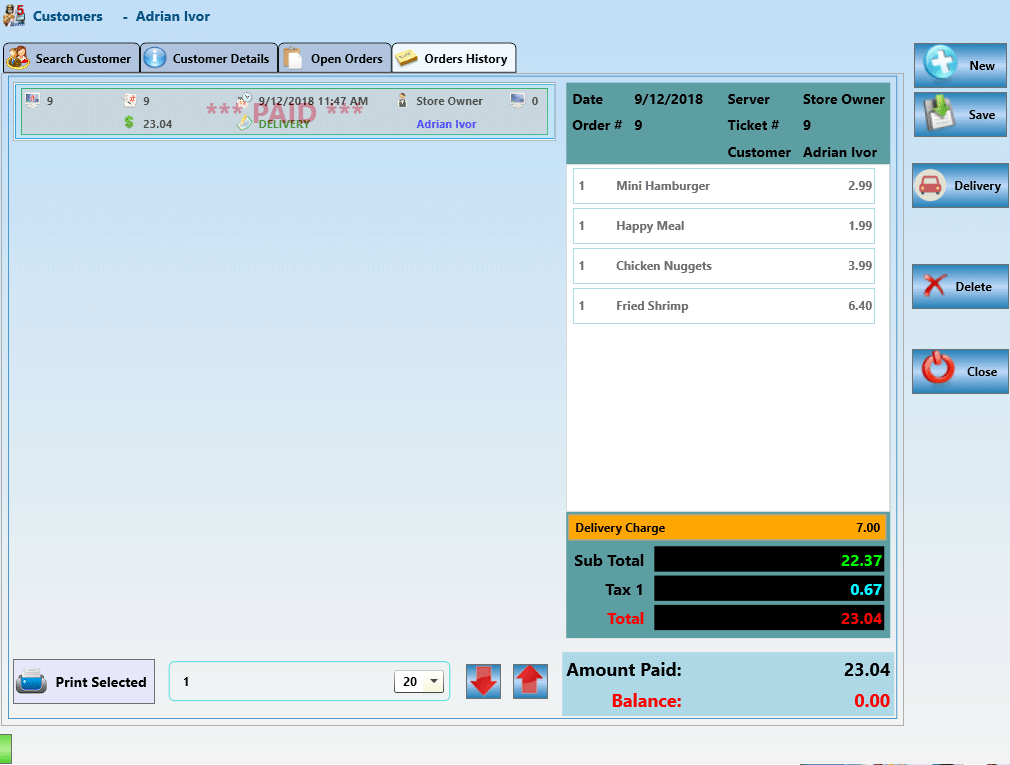
In the orders history tab, you can see all previous orders for the selected customer.
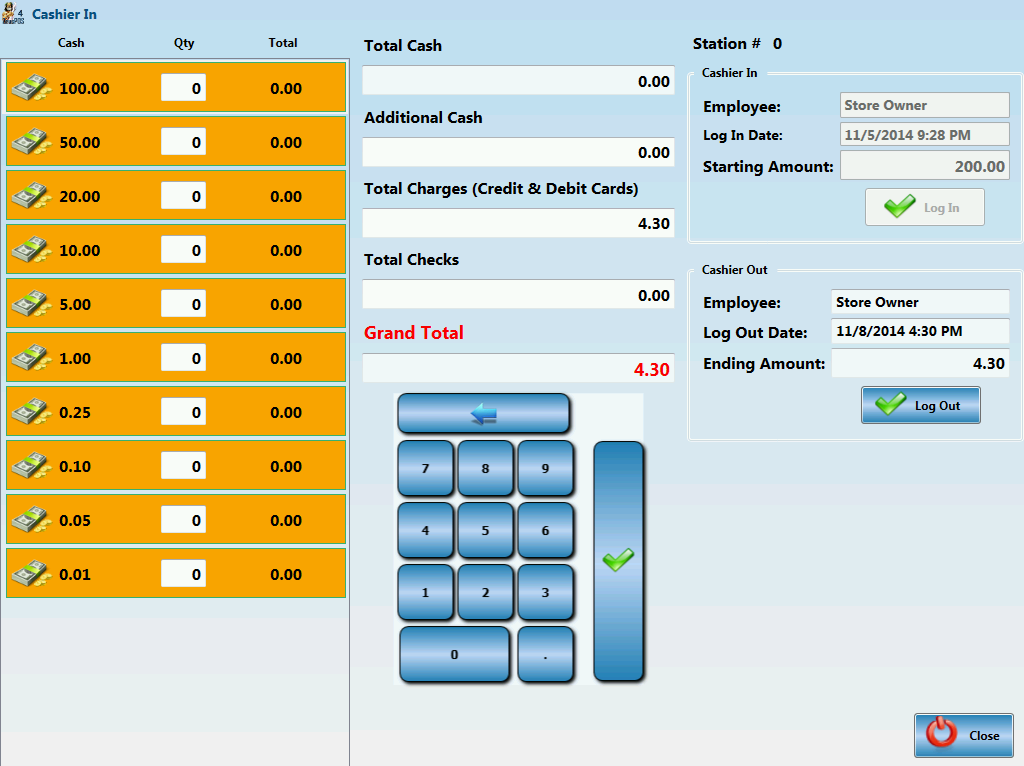
Cashier Out
When all orders are settled, the cash drawer must be counted and closed from the system.
To sign out a cashier, follow the steps below. These steps assume you have closed all orders.
Click the "Cashier Out" button on the main ZeusPOS screen and enter your access code.
The money count screen appears with all of the charges and checks received.
Count and enter all of the cash that is in the drawer.
Click the "Log Out" button.
If there is a discrepancy in the drawer, the Register Discrepancy screen appears and shows the discrepancy amount. Enter the reason for the discrepancy and click the button Done. This deactivates the cash register features for this station.
Advanced Features
ZeusPOS includes advanced features such as pizza builder, driver dispatch for delivery services, bar tabs and staff banking. These set of features will be described in this section of the user's manual.
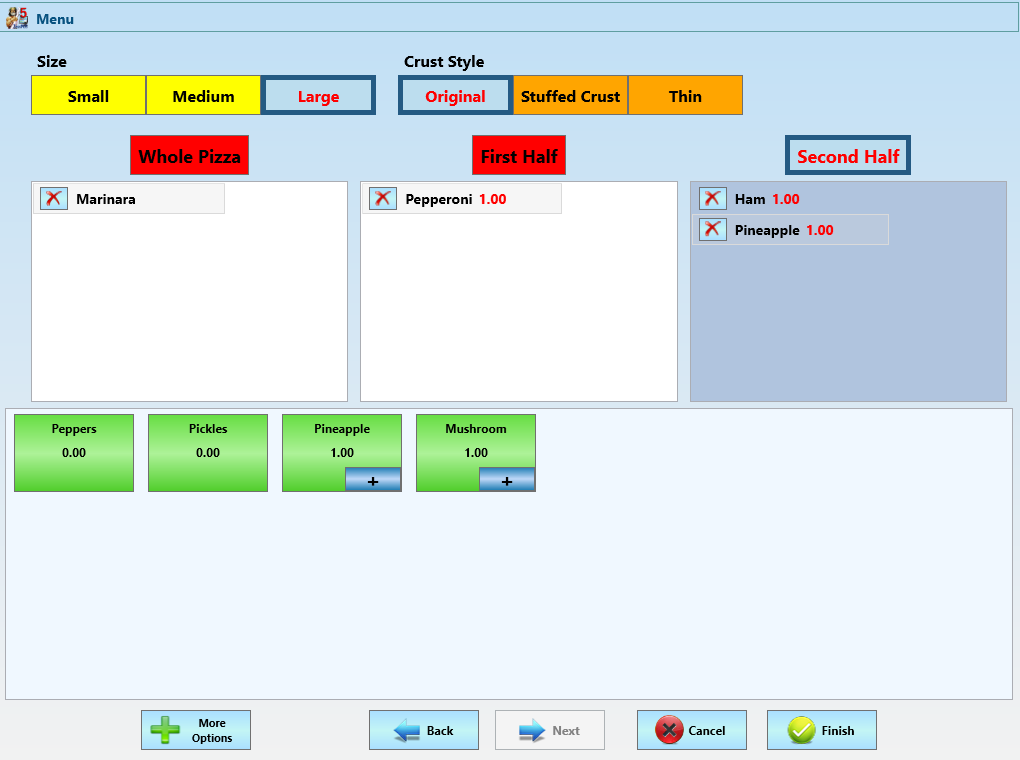
Pizza Builder
Pizza restaurants have special requirements when creating an order for a pizza. Since pizzas are so flexible in their design, ZeusPOS offers flexible way to create a pizza in the order entry screen.
With the pizza builder screen, creating a custom pizza is simple. Toppings can be divided among the whole pizza or halves. Crusts may be selected as well variety of toppings.
Before we can use the pizza builder, it is necessary configure the pizzas using item setup and option setup modules.
Open Option Setup and create options for all pizza sizes, crust style and toppings. For instance, Large, Medium, Small, Thin, Stuffed Crust, Classic Marinara, Pepperoni, Ham, Meat, Chicken, Peppers, Mushroom, Onion, etc.
Open Item Setup screen and select a group, click New. Enter item name, for example Custom Pizza. Select a category. You can leave the price as $0.00 since the final price will be calculated based on the size, crust style and toppings added. Fill in all required fields and other fields as yuo need. In order to show the pizza builder in the order entry screen you need to check the box Show pizza builder.
Save
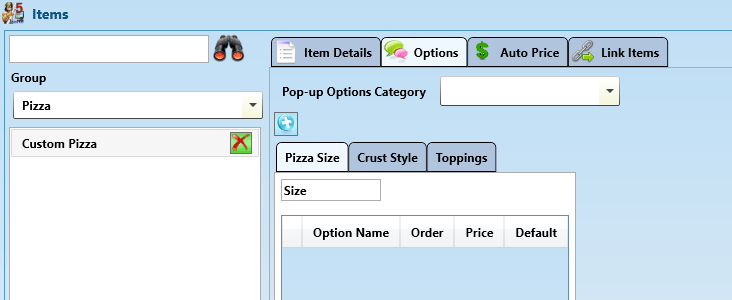
Click Options tab
Click the add button to select the possible pizza sizes, crust styles and toppings.
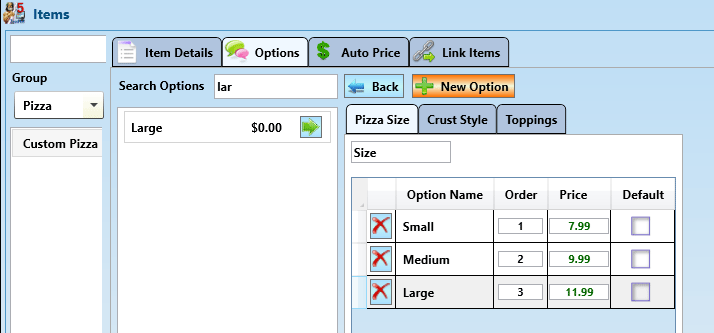
Search for the sizes you created previously and add them to the pizza size section. Set the order (position) that you want them appear on the screen and set the price for each size.
If desired, a size can be set as default
New options can be added by clicking button
Click Crust Style tab
Search for the crust styles you created previously and add them to the pizza crust style section. Set the order (position) that you want them appear on the screen and set the price for each crust style.
If desired, a crust style can be set as default
Click Toppings tab
Search for the toppings you created previously and add them to the pizza toppings section. Use the level number to group toppings by category. For example, level 0 for sauces, level 1 for meats, level 2 for vegetables, etc.
Save all your work
The pizza item is ready to be added to new orders using the pizza builder.
Go to main ZeusPOS screen and click in Menu to start a new order. Select the group containing the pizza
Click on the Custom Pizza item. The pizza builder will show up.
Select Size and Crust Style
Build the custom pizza by adding toppings to the pizza part needed, Whole, First Half or Second Half
Use the buttons Next and Back to navigate through the toppings levels created in the item setup to select sauce, meat, vegetables. The More Options button will allow to add toppings that were not included in the item setup.
Click button Finish to add the pizza to the current order.
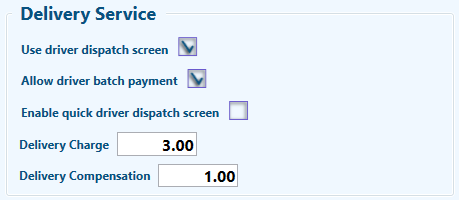
Delivery Service
If your restaurant makes deliveries, the delivery features of ZeusPOS will allow quickly create delivery orders. These features automate the assignment of orders to employees for delivery and the tracking of those deliveries. Some of the features available for delivery orders are:
Go to Back Office -> Store Settings -> System Wide Setting and set few settings for the delivery service
Use driver dispatch screen: Enables the driver dispatch module where delivery orders can be assigned to employees who are drivers. The employee must enter his or her password to access the module.
Allow driver batch payment: This feature allows an employee to settle all cash delivery orders in one transaction from the driver dispatch screen when the employee arrives. Settle all credit cards and checks separately before performing batch payment.
Enable quick driver dispatch screen: Select this option to show a list of all your drivers when you click Driver Dispatch on the main ZeusPOS screen. There is no need to enter employee password. This feature helps speed up your driver departures and arrivals. However, this allows employees to assign orders to other drivers, and should be used with caution.
Delivery Charge: Set the global default amount for the delivery charge. When a new customer is created, the delivery charge specified here will be added automatically.
Delivery Compensation: Set the global default amount for the delivery compensation. When a new customer is created, the delivery compensation specified here will be added automatically.
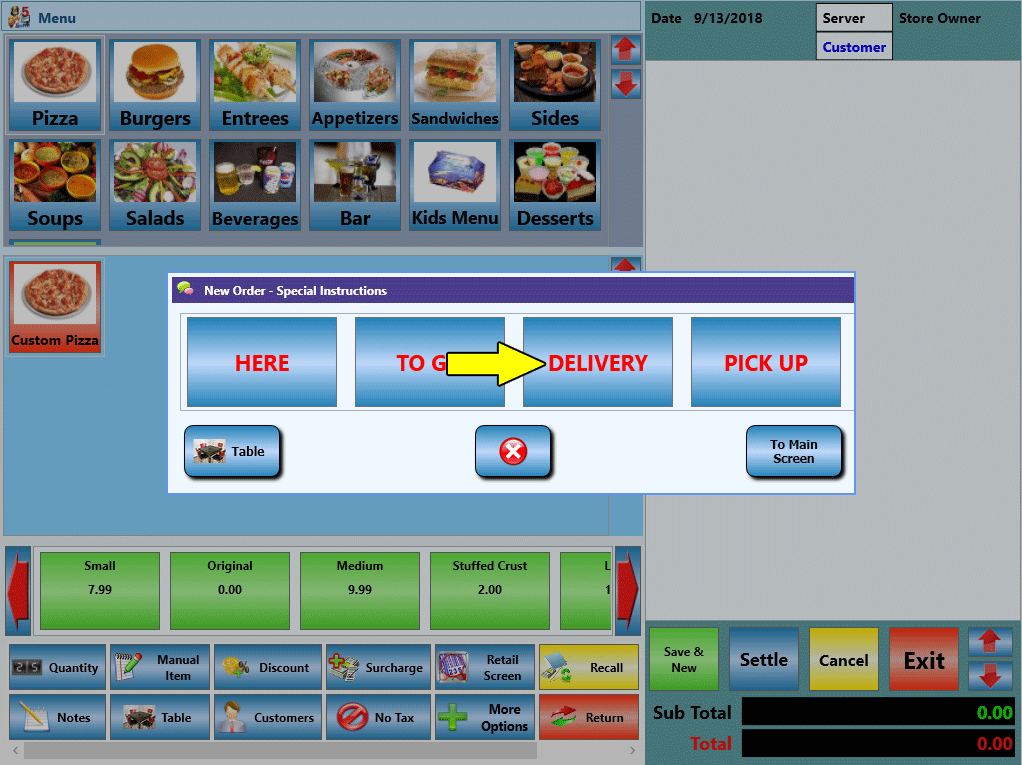
Creating a Delivery Order
To create a delivery order, you can have enable the setting Select order type for each new order or directly from the customer screen by clicking the delivery button after customer is created or searched.
Click Menu from main ZeusPOS Screen. The special instructions screen will show up to select the order type. Select Delivery
The customers module will open so you can search an existing customer by phone, name or address or create a new customer.
Click New Order
The new delivery order will be assigned to the selected customer. Enter the items to complete the order.
Customer's address will be printed on the receipt and a note indicating that the order is for delivery will be added to the order.
Driver Dispatch Module
There are two ways in ZeusPOS to assign a delivery to a driver. The default method requires each driver to enter his own password to assign a delivery order to himself. The other method is by using the quick driver dispatch screen, which does not require entering an employee password, to show all the drivers and orders, allowing quick assignment.
The quick driver dispatch screen is normally used when the station is dedicated to assigning orders to drivers who are coming and going.
Click Driver Dispatch in the main ZeusPOS screen
If the quick driver dispatch screen is not enabled, the employee password must be entered.
The driver dispatch screen will show up.
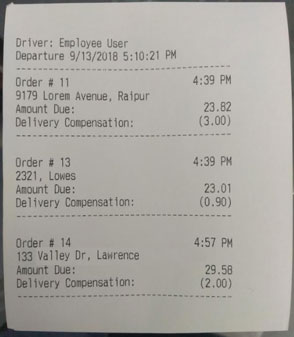
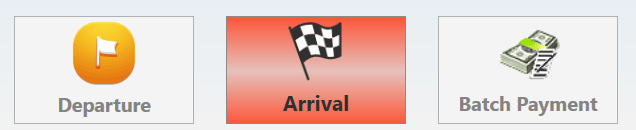
Select the orders you are taking and click Departure
The departure time is displayed on screen and you can print a summary of the orders selected for delivery.
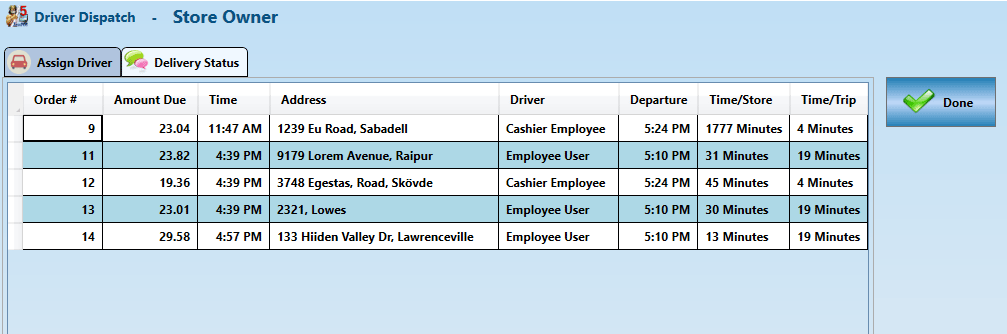
Viewing Delivery Order Status
Use the Delivery Status screen to keep an eye on the progress of all delivery orders. The screen is
accessed from the Driver Dispatch screen, selecting the Delivery Status tab. This screen is used by managers to keep track of drivers.
The following information can be viewed on this screen: the order number, the time the
order was created, the address to be delivered to, the driver, the departure time, the time the
order came in, and the time it has taken up to this point to deliver the order.
Arrival
Once the driver comes back to the restaurant, open the driver dispatch screen. The arrival button will be highlighted and blinking if the selected employee wants to finish the delivery.
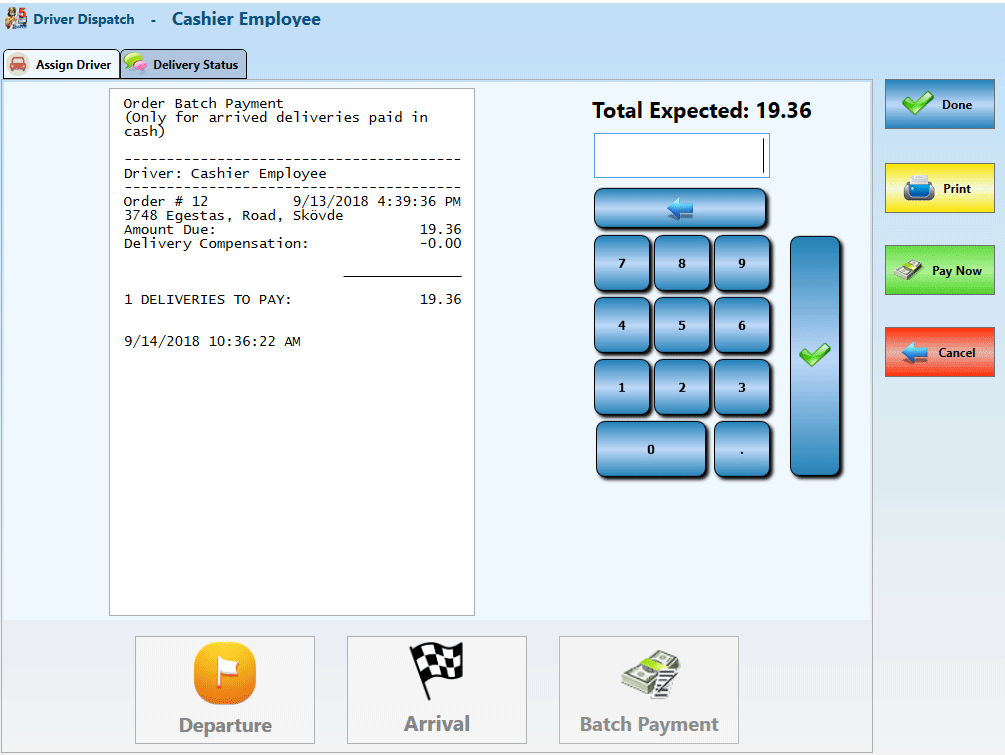
If batch payment is enabled, the button Batch Payment will be enabled to allow the employee pay for the delivered orders to the cashier.
Click Batch Payment to pay for all cash orders delivered. The screen will show a summary with the total deliveries to pay. Click Pay Now
Enter the total payment amount and click button to finish the payment
Note: Settle all credit cards and checks separately using the settle screen before performing batch payment.
Bar Tab Orders
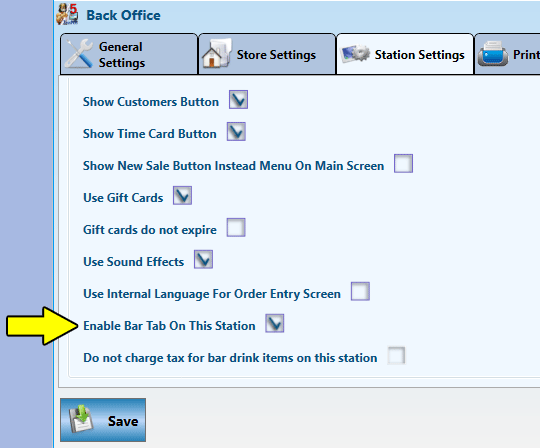
To use the Bar Tab functions in ZeusPOS, you must enable two settings in the station that will take the bar orders.
These settings are found in the Back Office under Station Settings.
The setting Do not charge tax for bar drink items on this station is optional. This won't charge tax to items marked as bar drinks on this station.
Using the bar tab feature will show the bar tab screen, allowing you to create orders based on a customer's name instead of a table number. Bar Tabs are
kept separately from the table orders and are considered their own order type, in most cases.
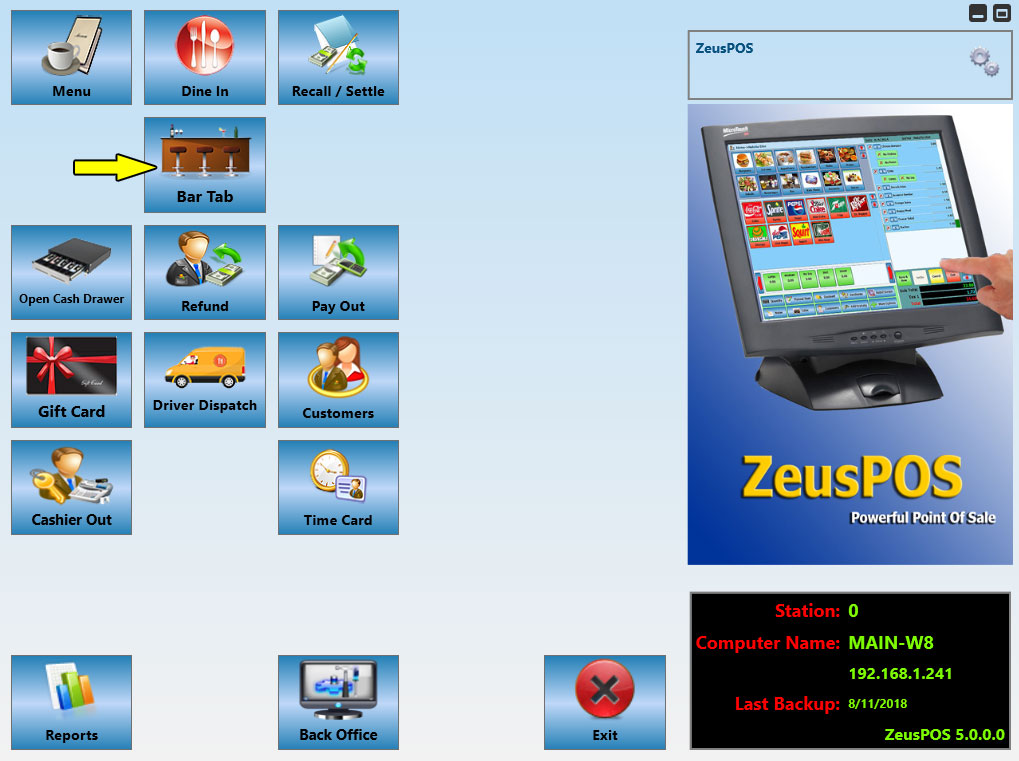
Once you enable using bar tab for the specific station, click Save and restart ZeusPOS. A new button Bar Tab will show in the main screen
Create a New Bar Tab
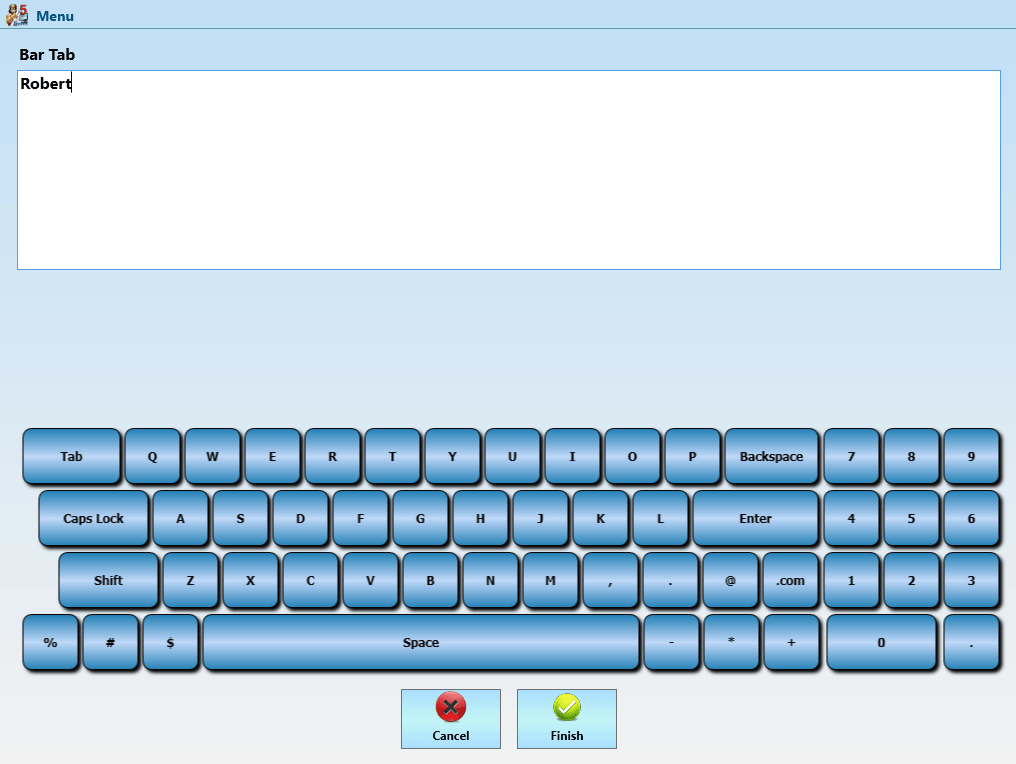
To create a new order for a bar tab customer, follow the steps below.
Click on Bar Tab in the main ZeusPOS screen.
Enter your employee password
Enter a name for this bar tab
Click Finish
The guest check shows the Bar Tab Caption as well as the customer name instead of the table number.
From Recall screen you can use the order type filter to see all bar tabs orders
Staff Bank
There are two options in ZeusPOS for managing settlement transactions: Cash Drawer
and Staff Bank. Staff Bank is used when employees take care of their own money and a cash drawer
is not assigned to them. It is often considered as their own personal cash drawer without the physical
hardware. Money pouches are often used to carry the cash and change. The one limitation
employees encounter when using Staff Bank is that they may not also be a cashier. Only one option
may be used at any time.
To enable staff banking, two required options need to be checked.
Check the Use Staff Bank checkbox located in Store Settings > Global Security Settings
Check the Use Staff checkbox located in Employee Setup. This must be enabled for every employee using staff bank.
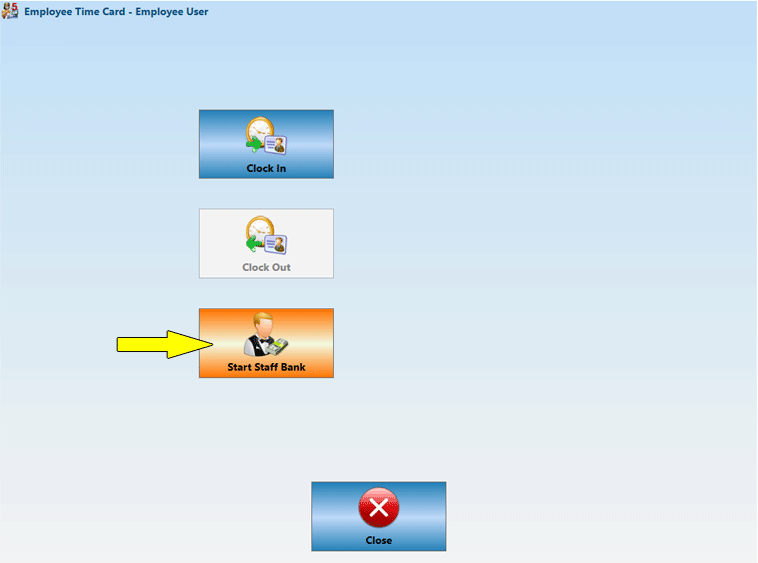
Starting Staff Bank
Once Staff Bank is enabled for an employee, a Start Staff Bank button appears on the Time Card
screen. To start staff bank, click on Start Staff Bank. This will show up a screen to enter the starting amount of money. The procedure is the similar to the Cashier In procedure.
Settling Using Staff Bank
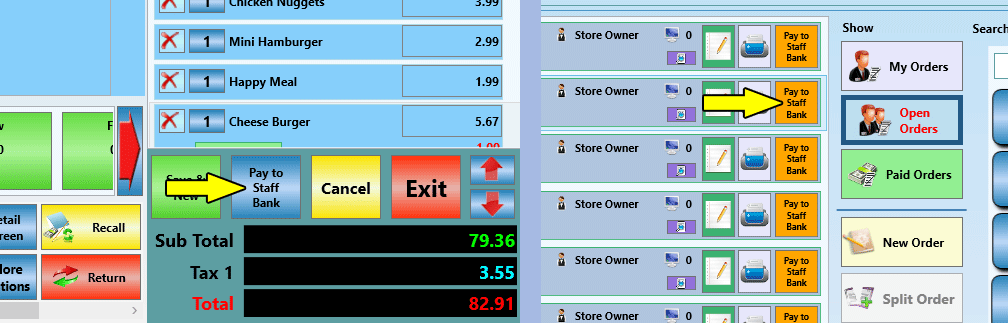
When an employee uses Staff Bank, their settlement options change a bit. In the Order Entry screen,
the Settle buttons become a Pay Staff Bank button. When this button is clicked,
the Settle screen displays, allowing you to settle the order to your staff bank. You also have the
option to Pay to Staff Bank in the Recalled Order screen.
The payment process is exactly the same as when is done by a cashier. The only difference when using staff bank, is that the money will not be deposited in the cash drawer but in the employee money pouch.
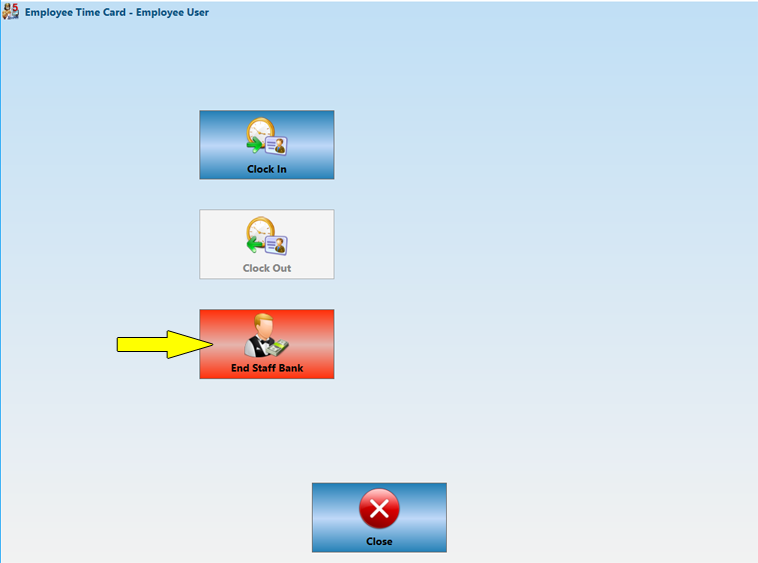
Closing Your Staff Bank
If you used Staff Bank during the day instead of a cash drawer, you must close your staff bank. To
be able to close your staff bank, you must have already closed all your orders or transferred them to
another employee.
To end your staff bank, follow the steps below. These steps assume you have closed all your orders
and do not have any open orders outstanding.
Click Time Card on the main ZeusPOS screen
Enter your employee password.
Click on End Staff Bank. The Staff Bank Liability Report will be printed.
The Money Count screen displays. Count the money and click Log Out
Once you have closed your staff bank, check with the shift manager to go over the Staff Bank
Closing Report to make sure your amounts are correct.
Random Weight Items
Random weight items are those items that get wighted on scales at the deli, meat or fruit and vegetable sections, and the scale
prints a label with the price. The price is embedded in the barcode. For example, you have a meat priced at $3.99/lb. The customer
gets a piece weighing 1.89lb. The item is worth $7.54. The scale will produce a label with a barcode. When the item is scanned at the
front-end POS, the meat will be added to the sale at $7.54.
Two types of random weight/price bar codes are supported:
· UPC-A codes which start with 2 and are twelve digits in length
· EAN-13 codes which start with 2 or 02 and are thirteen digits in length.
Enable the function to support random weight items in ZeusPOS
Go to Back Office->Store Settings->System Wide Settings.
Scroll down to the bottom and set random weight/price type according to the barcode type generated by the scale.
2 = All items codes start with 2 or 02 for Random Weight or Price Barcode
X = 5 digit unique item number. Must be same on scale and POS
S = Checksum for price o weight. Not used when price or weight is 5 digits
P = Price
W = Weight
C = Checksum. (This field is generated by the scale)
UPC-A codes which start with 2 and are twelve digits in length.
EAN-13 codes which start with 02 or 2 and are thirteen digits in length.
For EAN-13 codes starting with 02, the 0 is discarded and treated as UPC-A.
Creating random weight item in ZeusPOS
Go to Item Setup and create a new item. Enter all required and needed fields as usual and then enable the setting "Embedded Weight or Price"
The barcode field must be 6 digit length, starting with 2 and followed by the 5 digit product number configured in the scale
Configure barcode field using 2XXXXX, where XXXXX must match the code
entered in the scale for each product.
Reports
There are several built-in reports available to the owner. These reports can be generated by navigating to "Reports" from the main ZeusPOS screen.
The reports are designed to be printed on letter size paper or you can see them on the screen and also export them to Excel or PDF format.
Here you find the reports grouped by category. Simply click on a category and select the desired report.
Specify Date from and Date To parameter from the calendar tools at the top of the screen and click on Refresh to generate a report for a range of time.
From the report tool bar, you can print the reports, navigate to any page of the report, zoom in, zoom out. To export the report, click on the floppy disk icon and select Excel or PDF format.
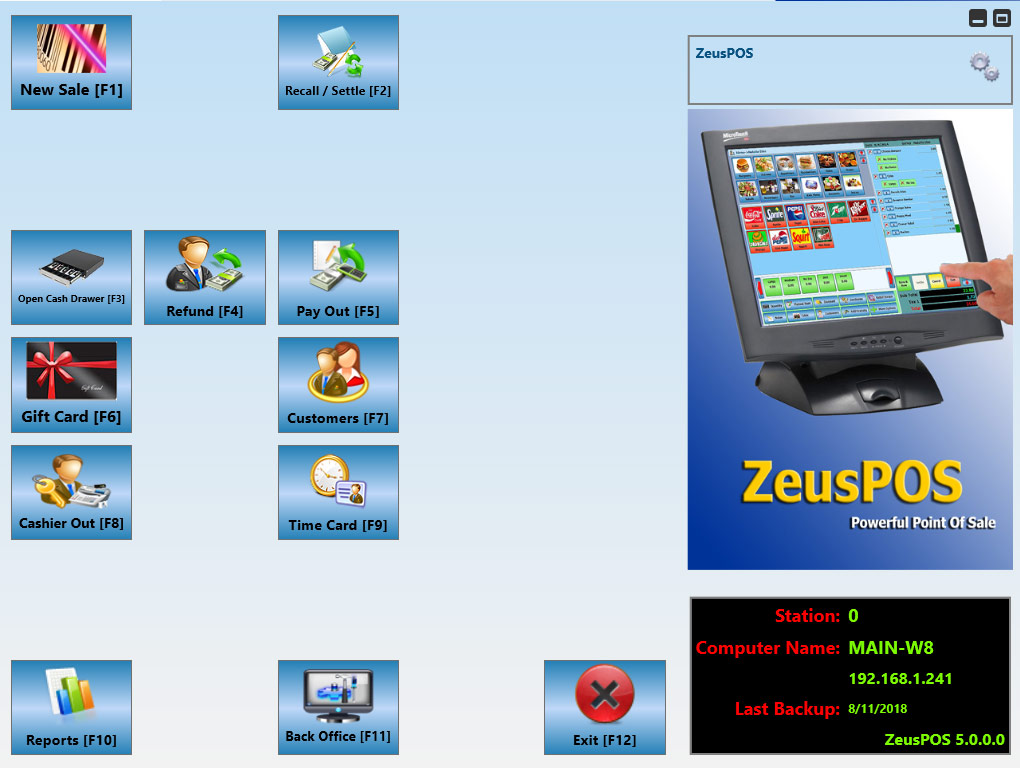
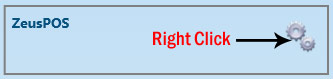
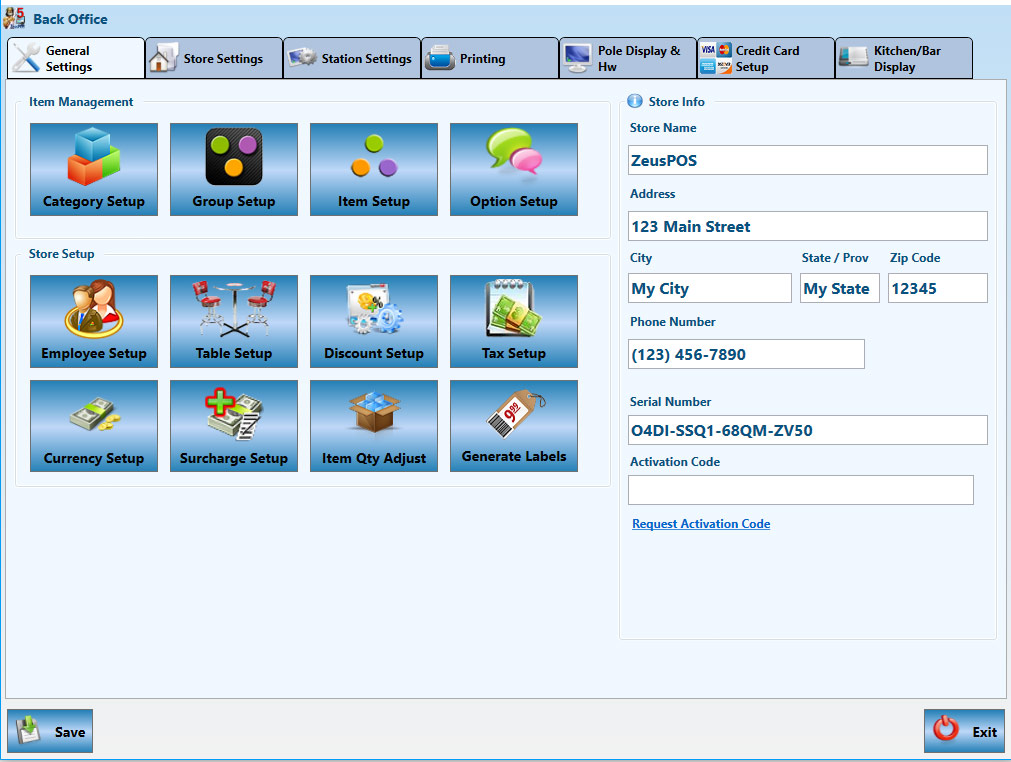
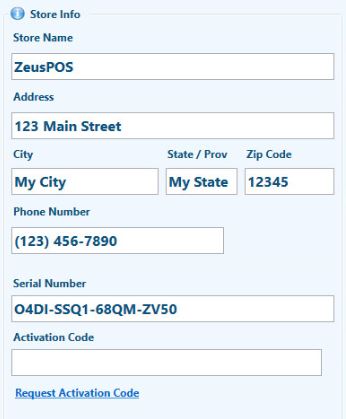
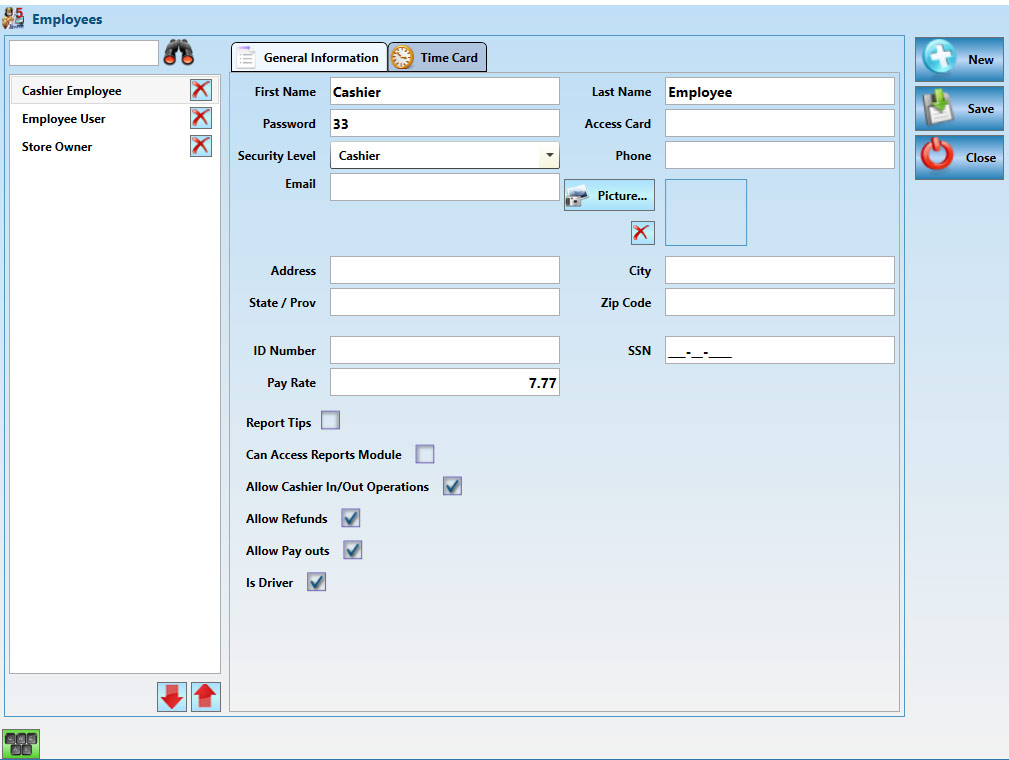
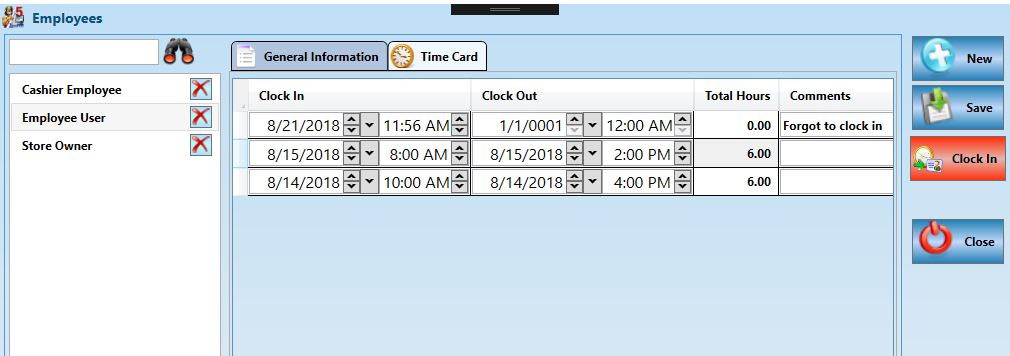
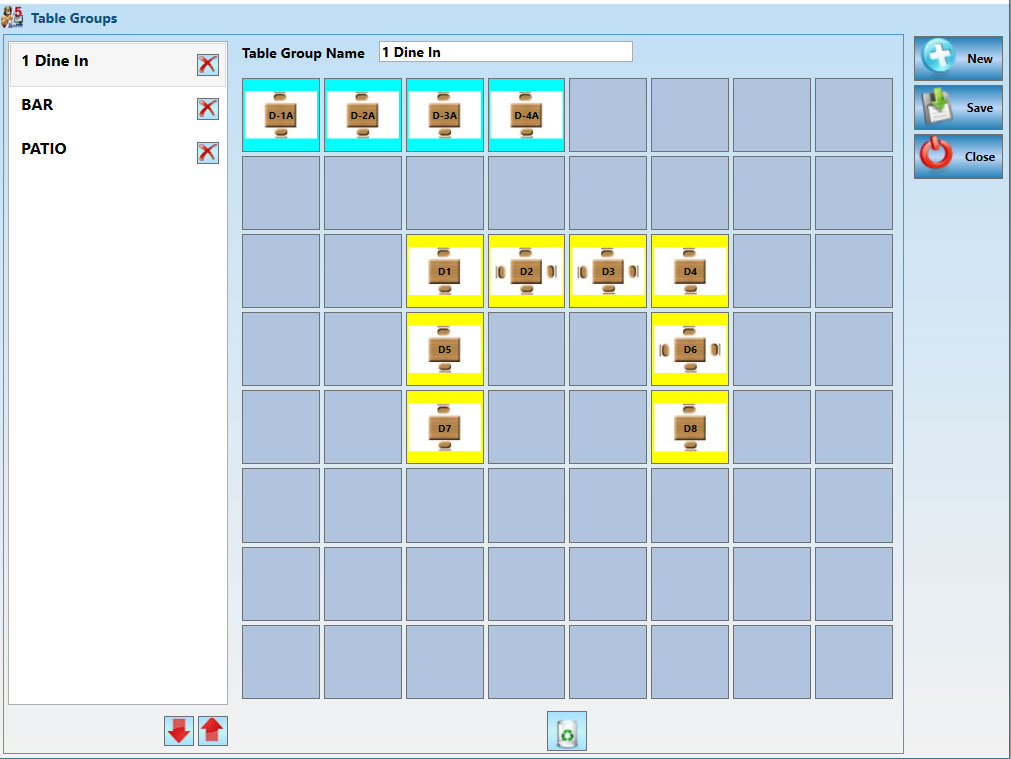
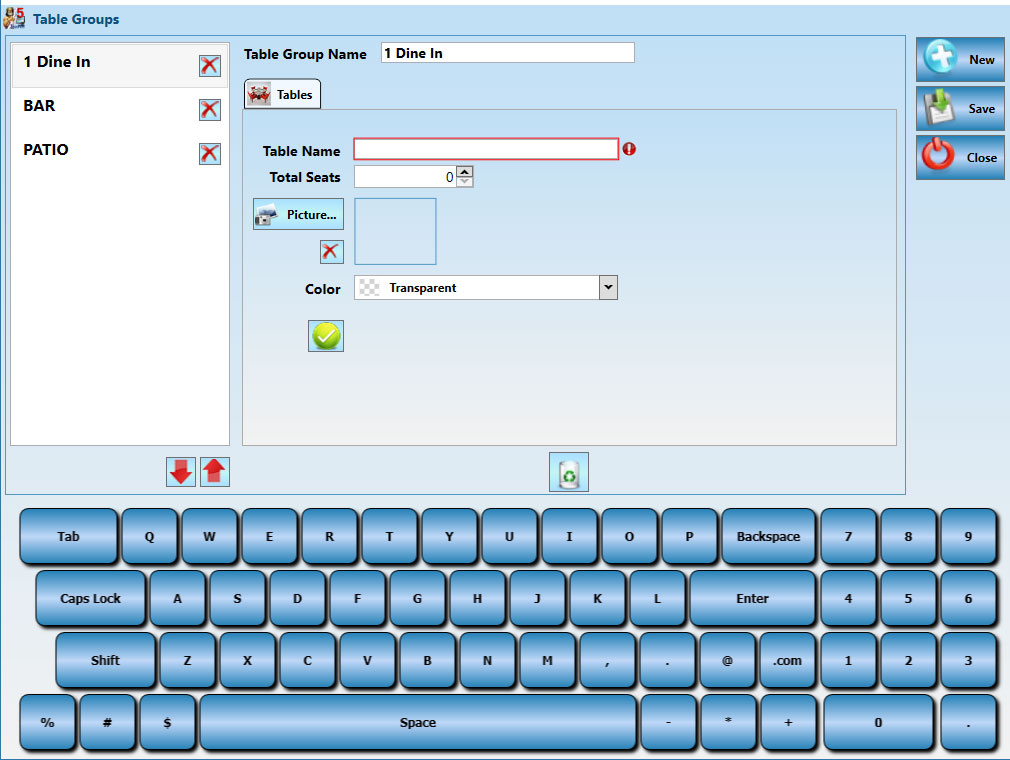
 to finish the current table and add more tables if needed.
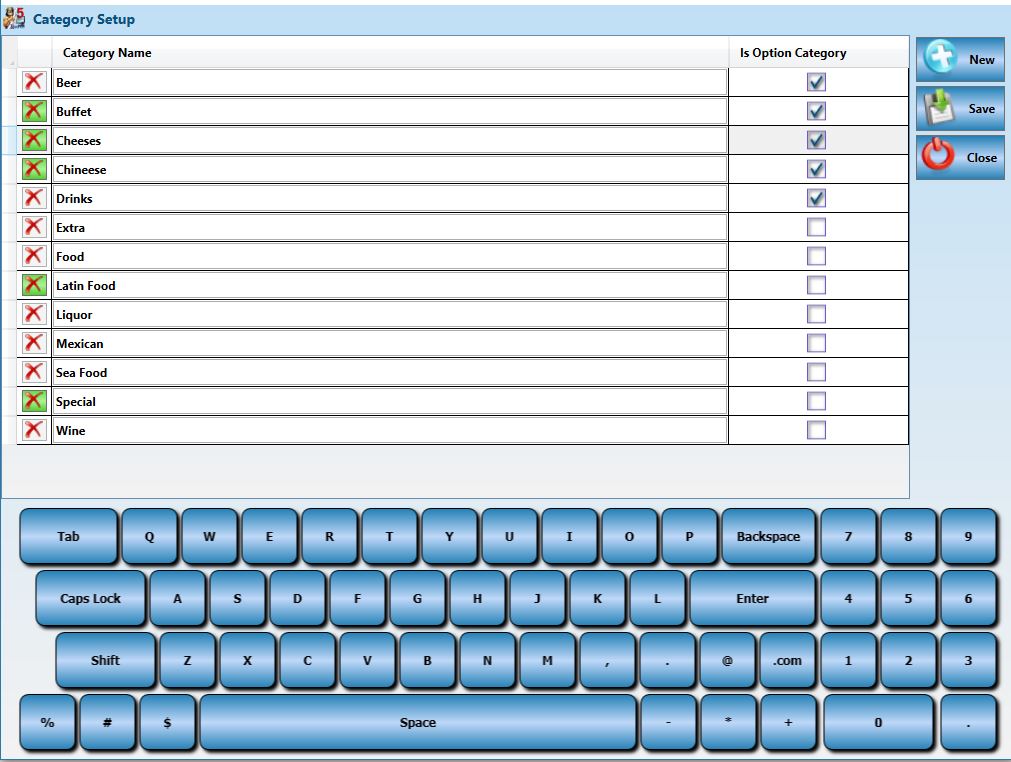
 button.
 button will appear disabled.
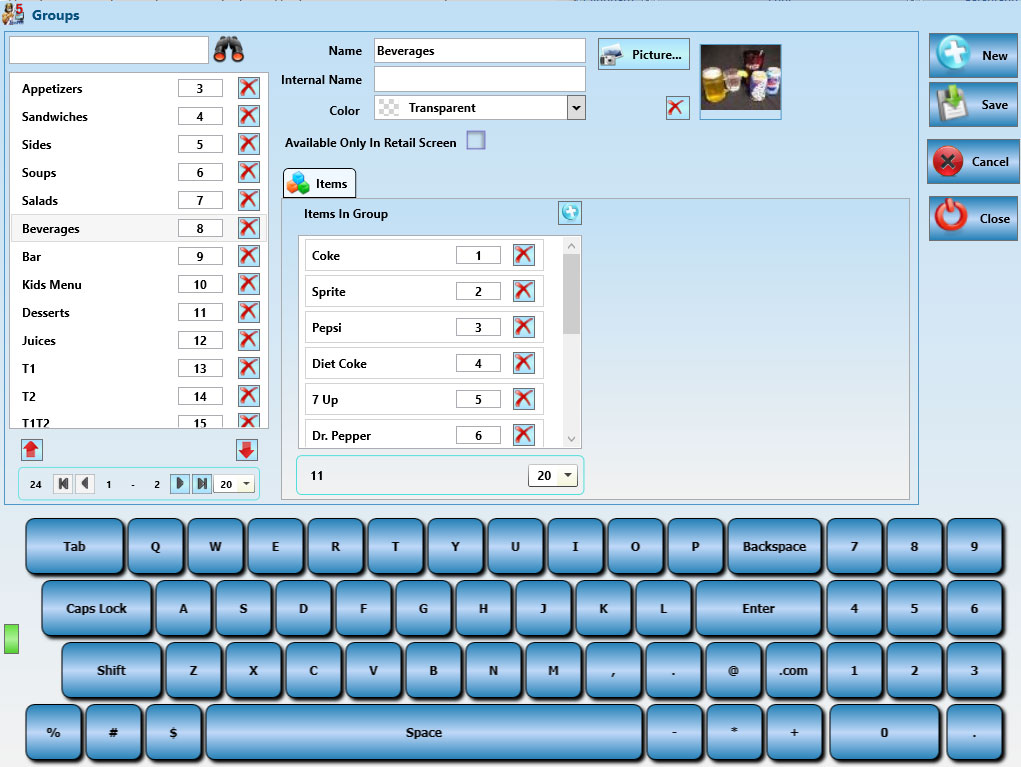
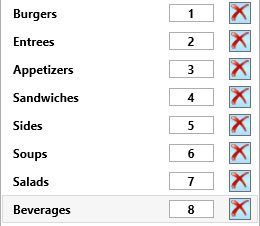
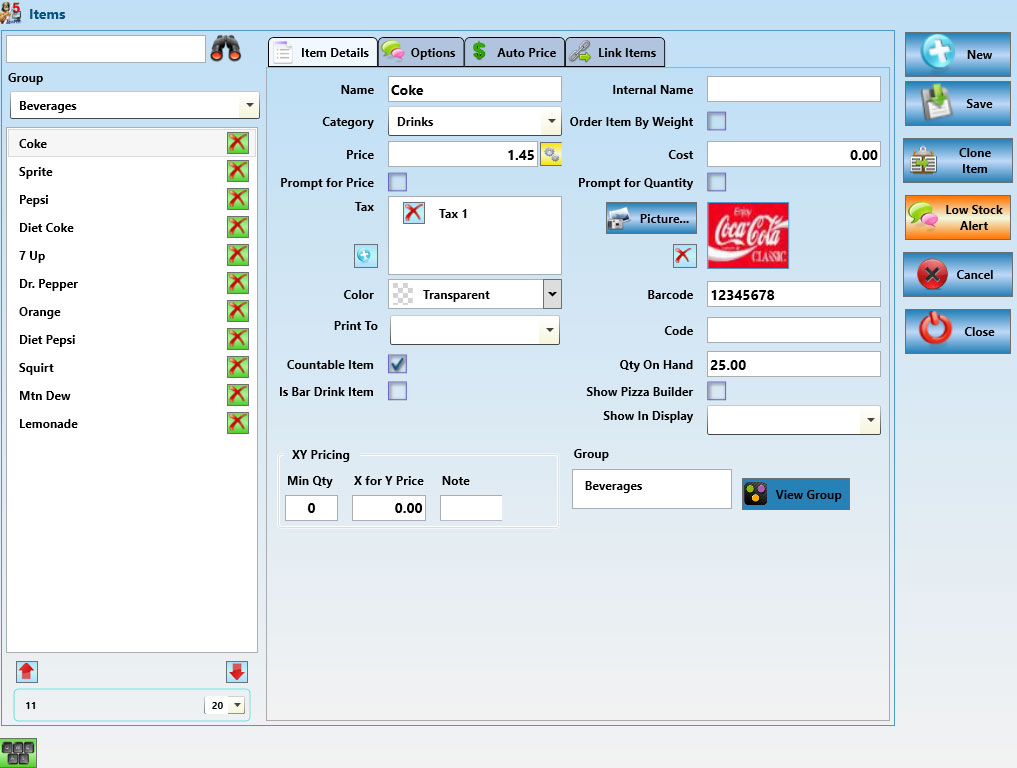
 to enable the multi-price control and enter each price for each order type.
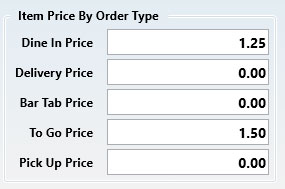
 to open the tax list and add another tax to the item.
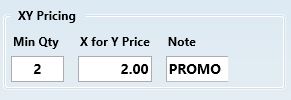

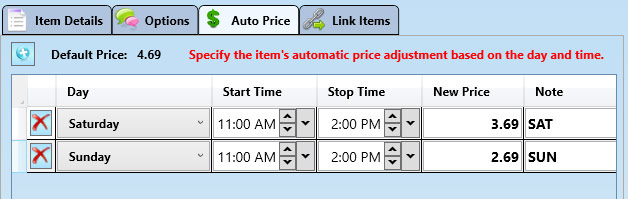
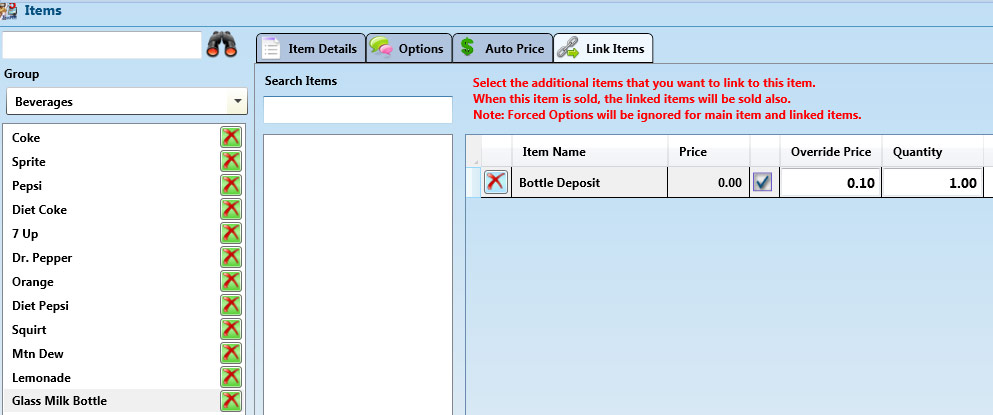

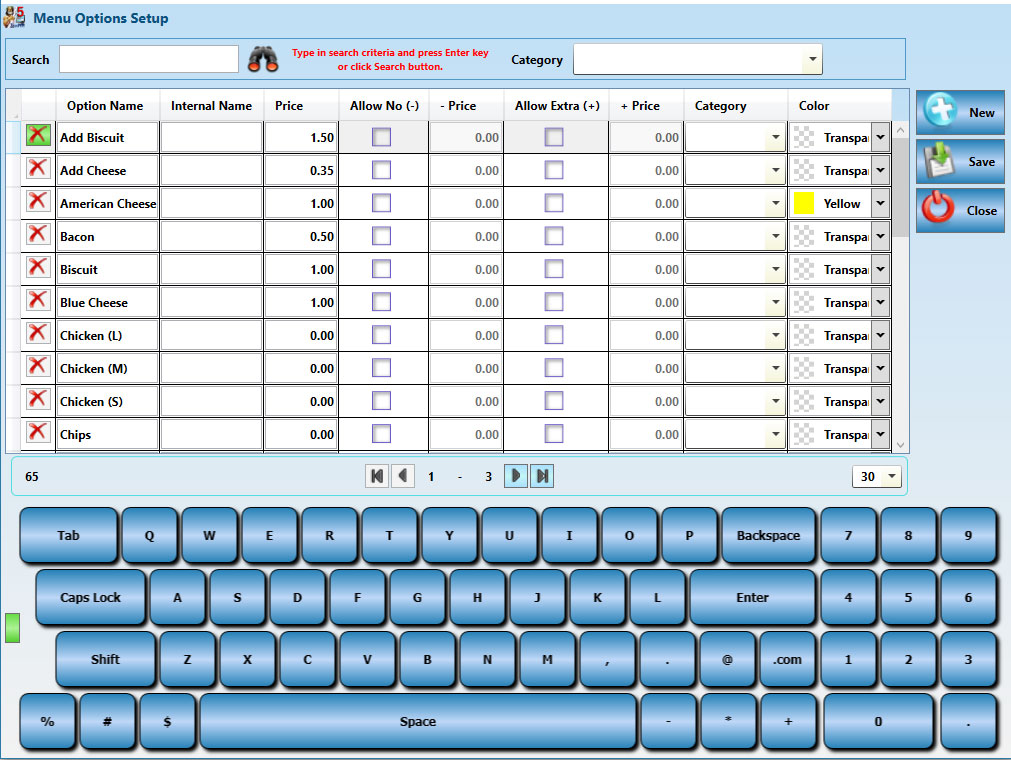
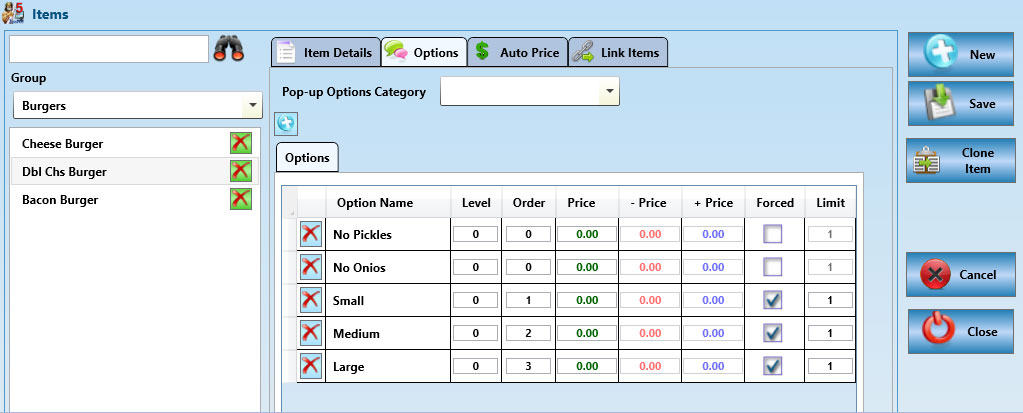

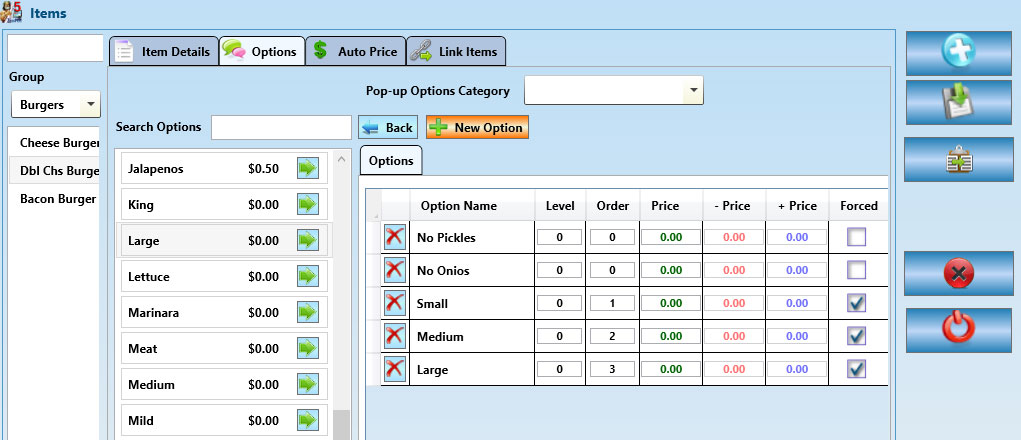
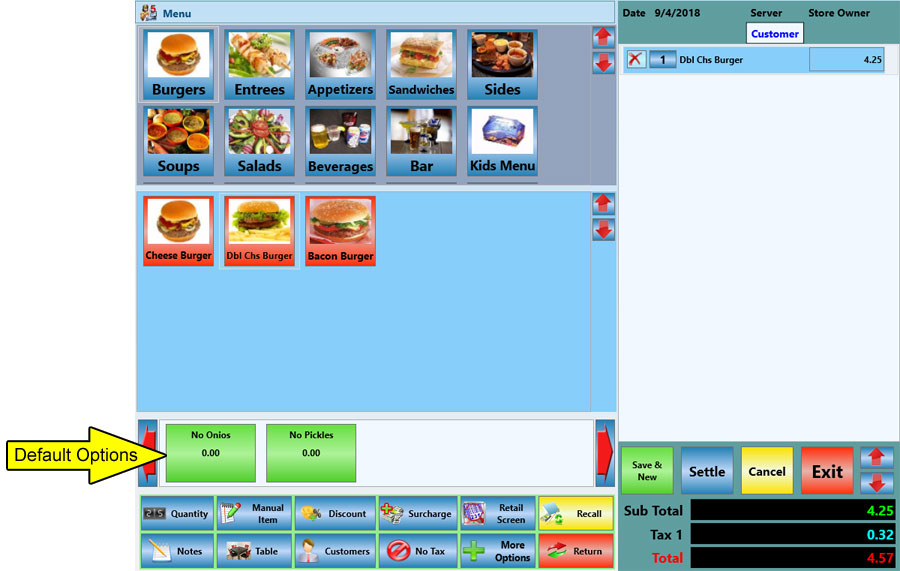
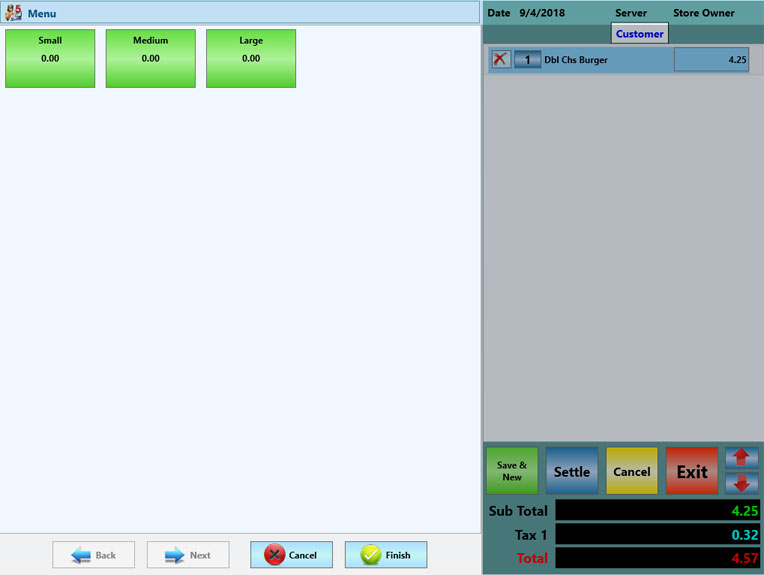
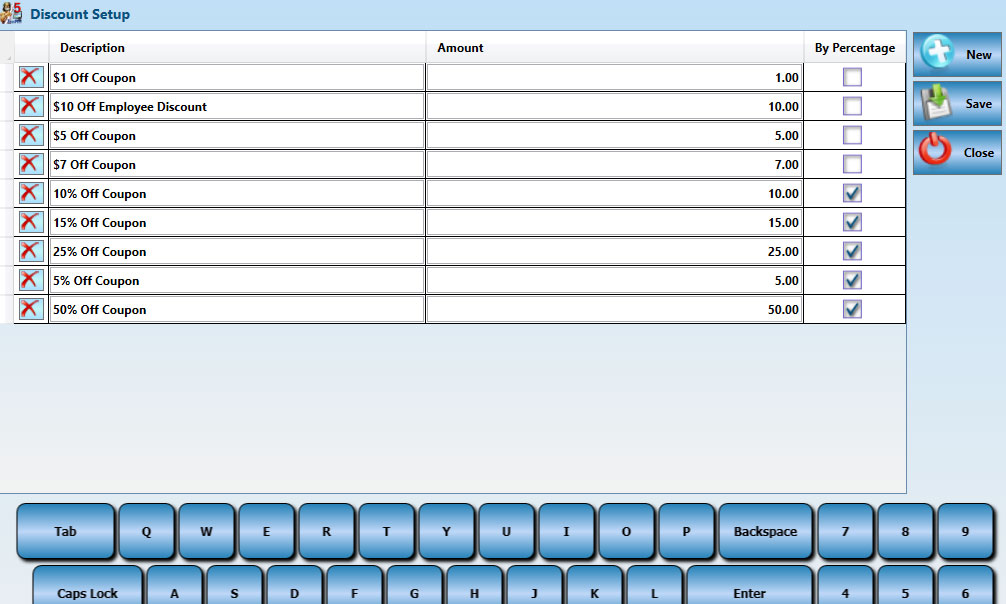
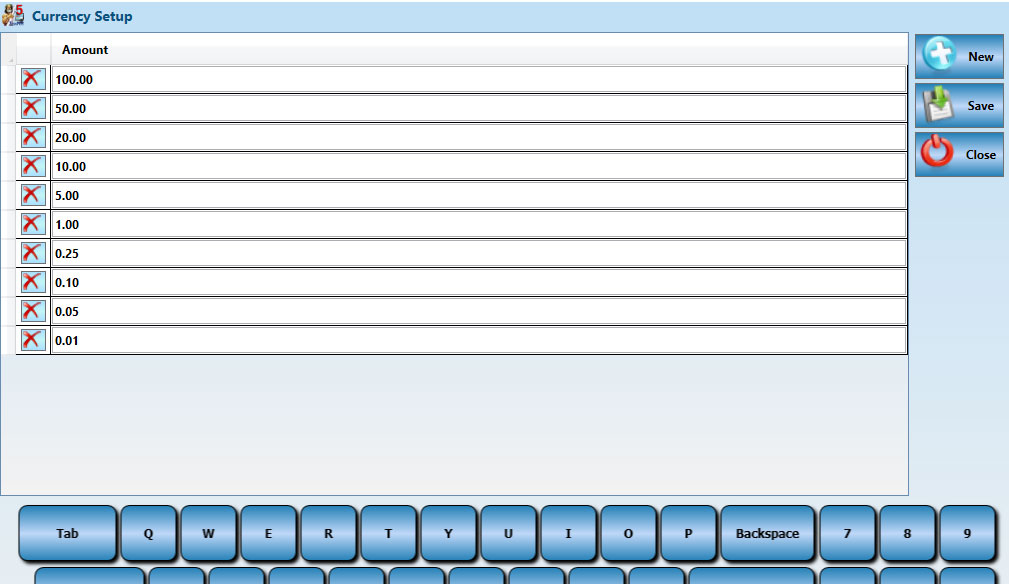
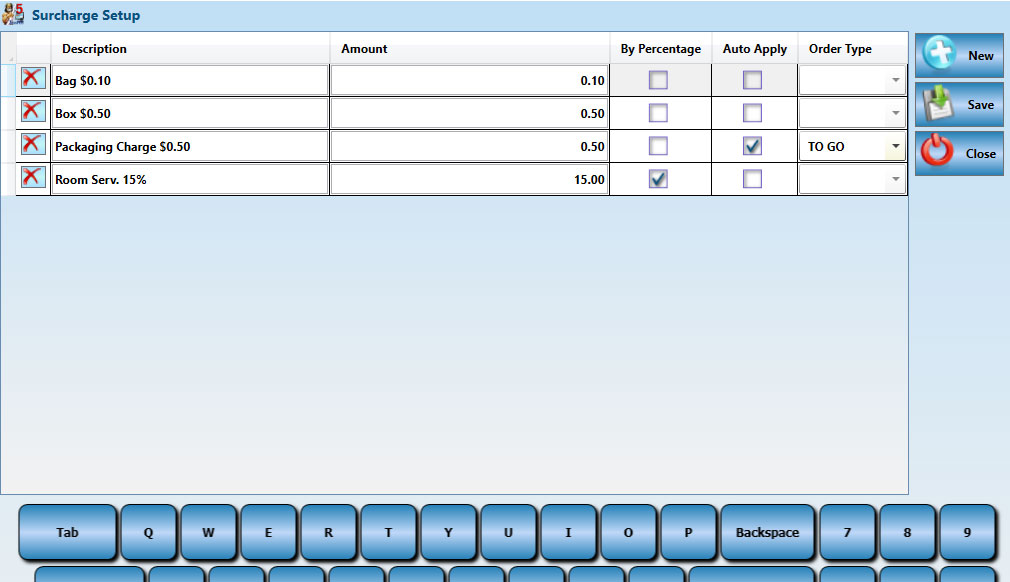
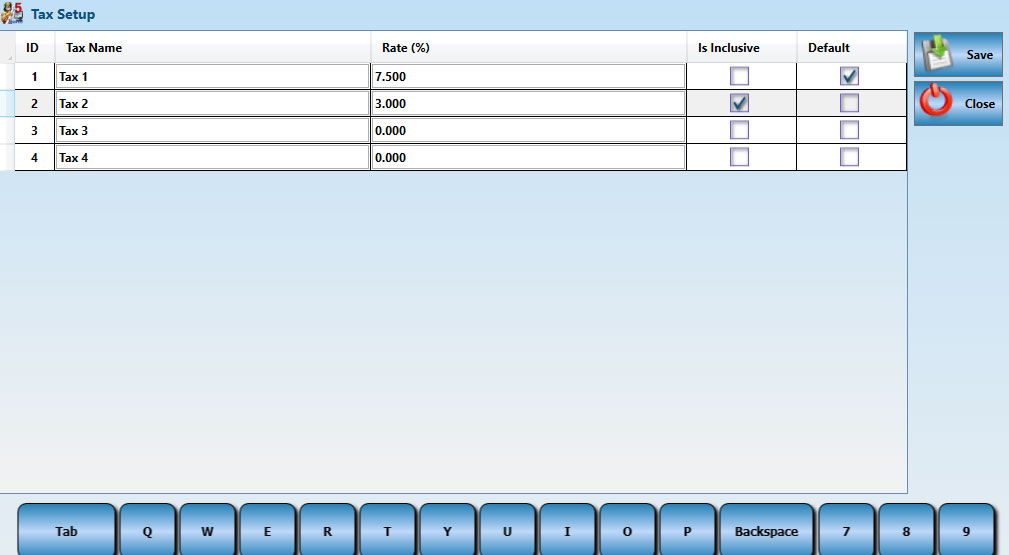
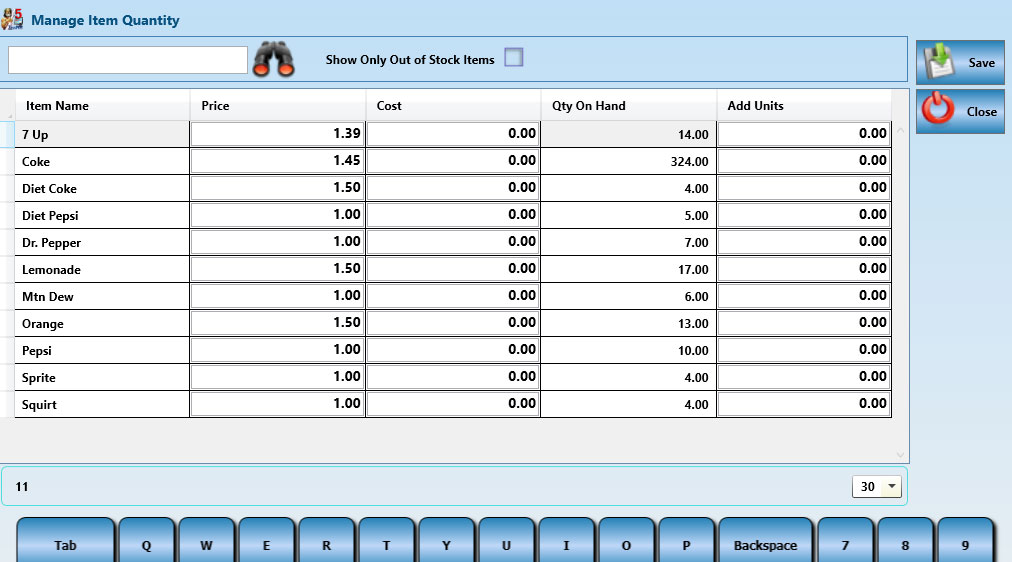
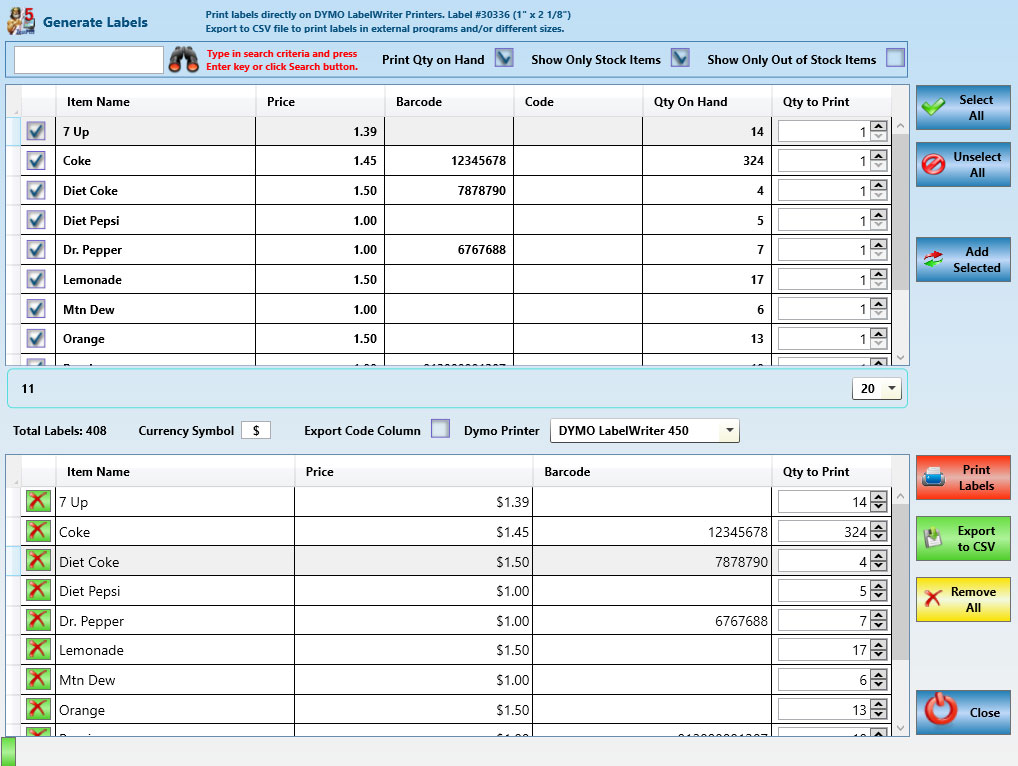
 Sample using label #30336 (1" x 2 1/8")
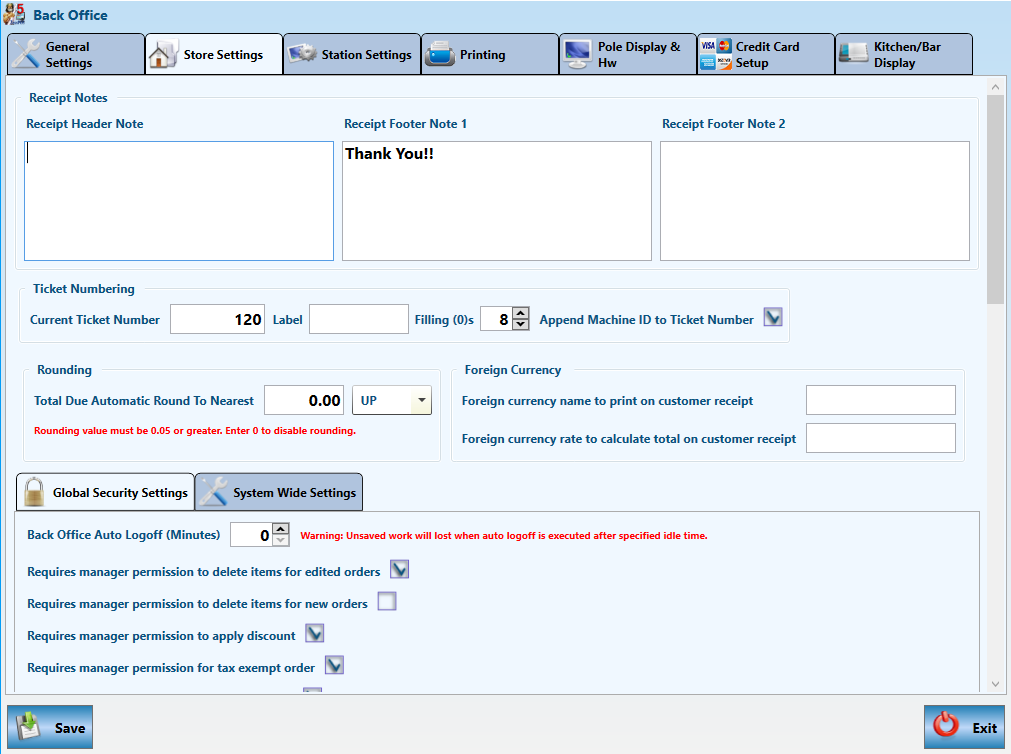
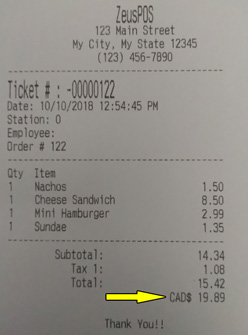
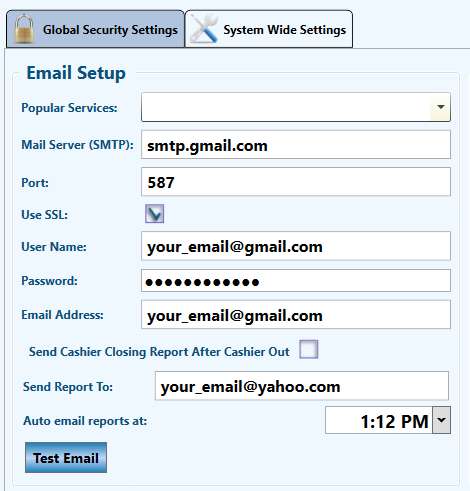
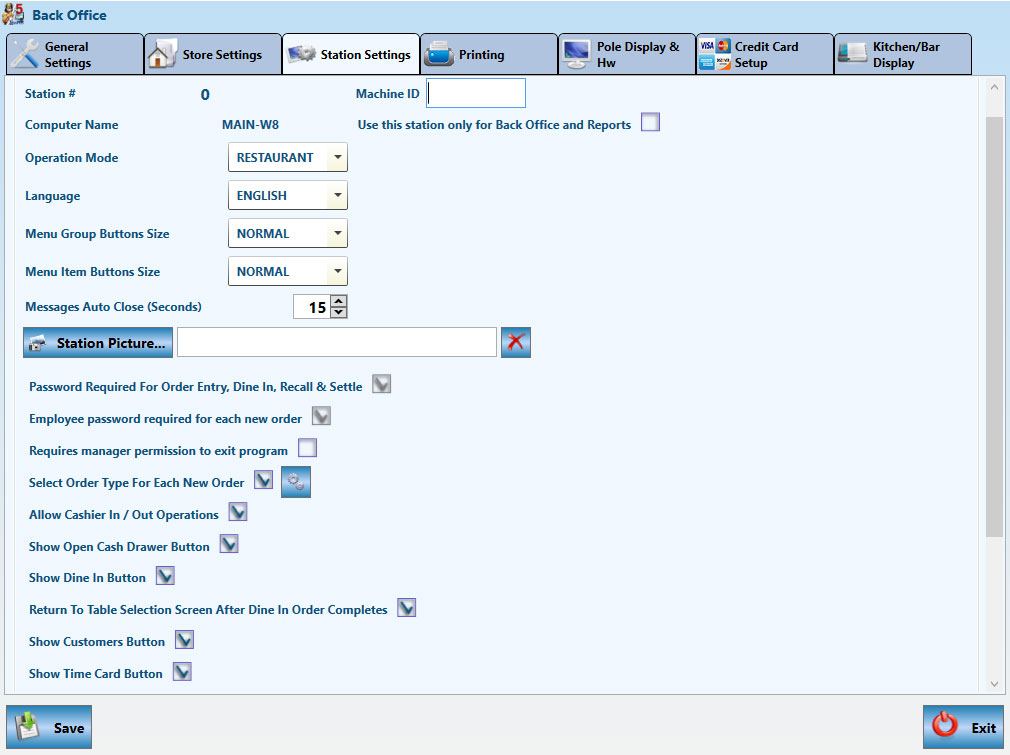
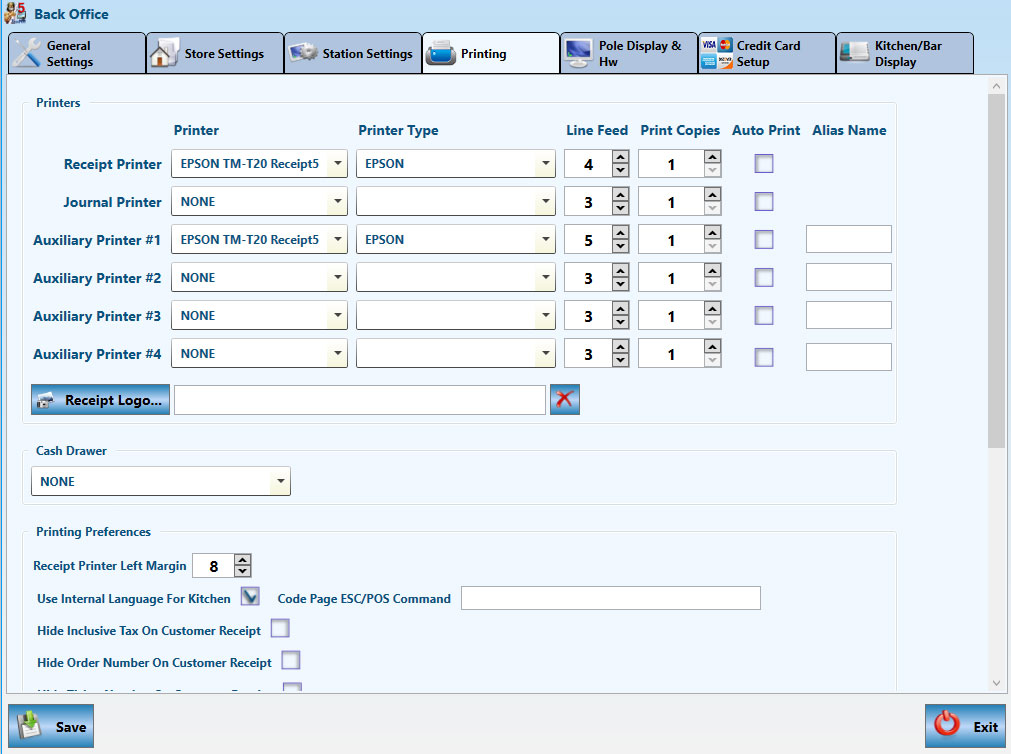

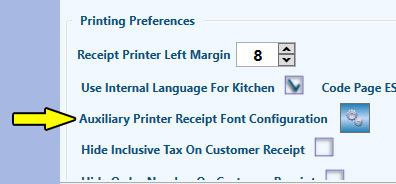
 to open the ticket properties editor where you can customize
font size, font type, font style and chose with items on the ticket header show or hide on the printed kitchen receipt. A preview of how the receipt will look like is shown on the screen.
to open the ticket properties editor where you can customize
font size, font type, font style and chose with items on the ticket header show or hide on the printed kitchen receipt. A preview of how the receipt will look like is shown on the screen.
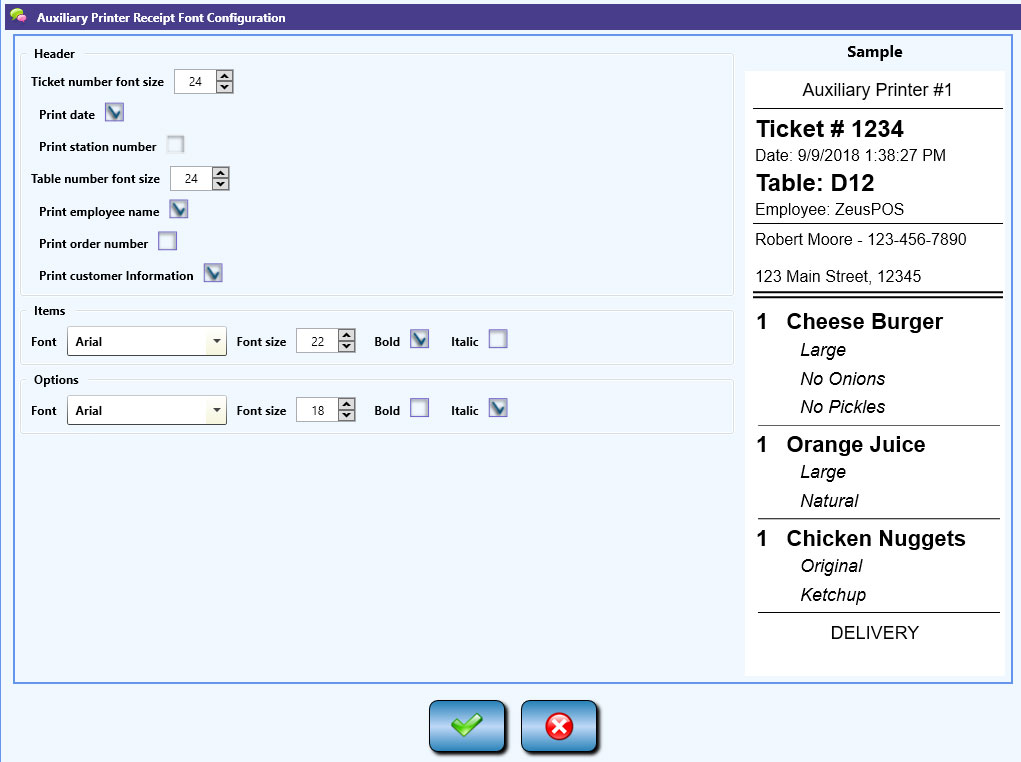
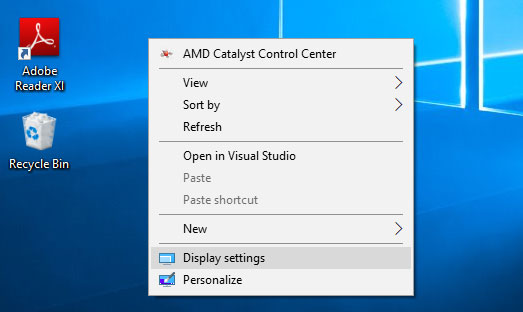
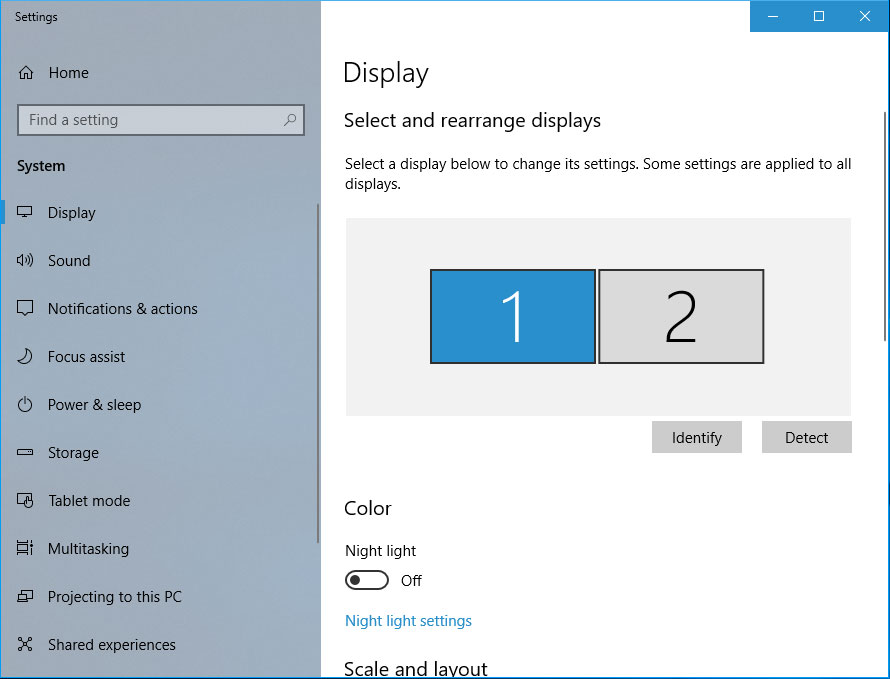
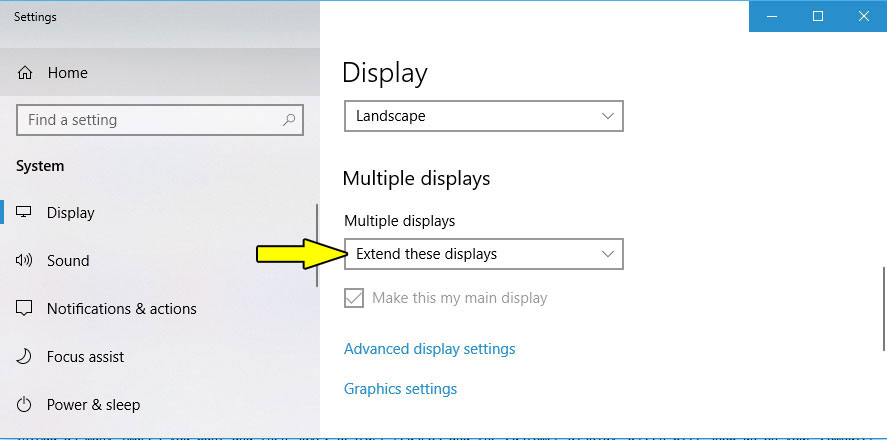
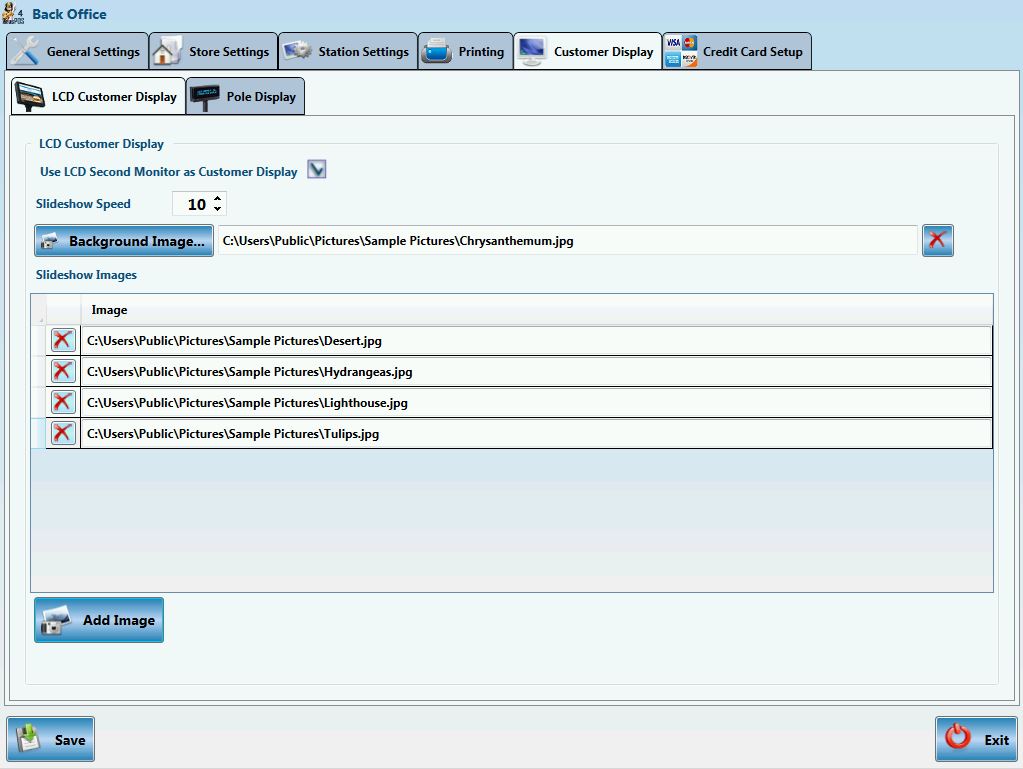
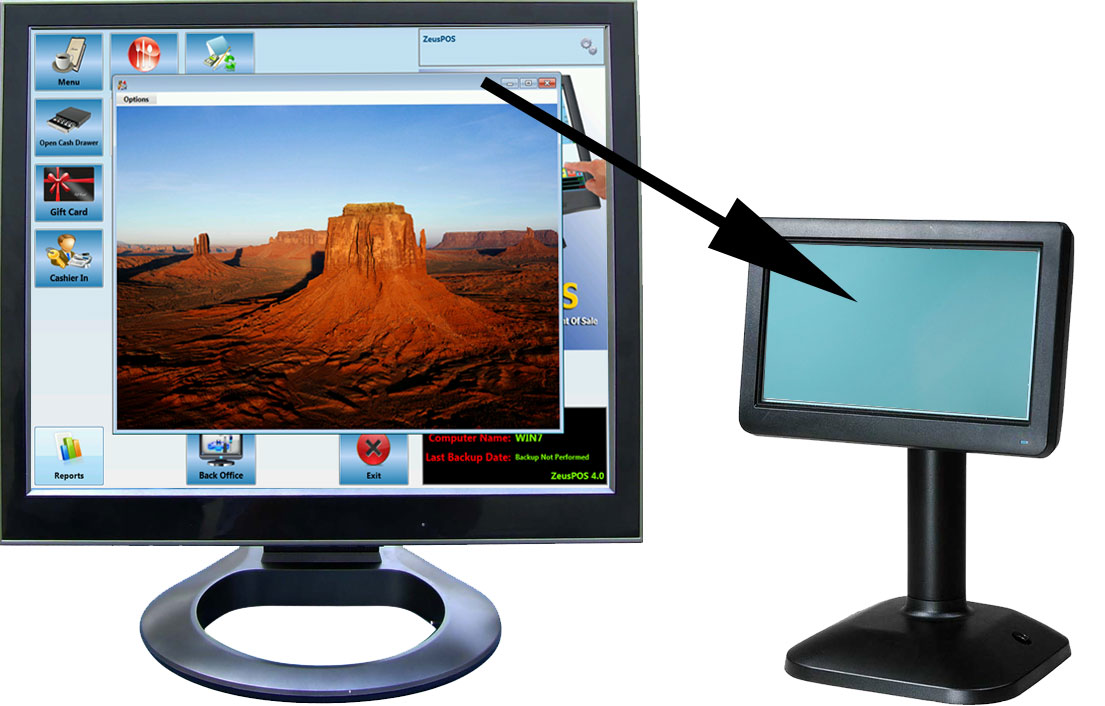
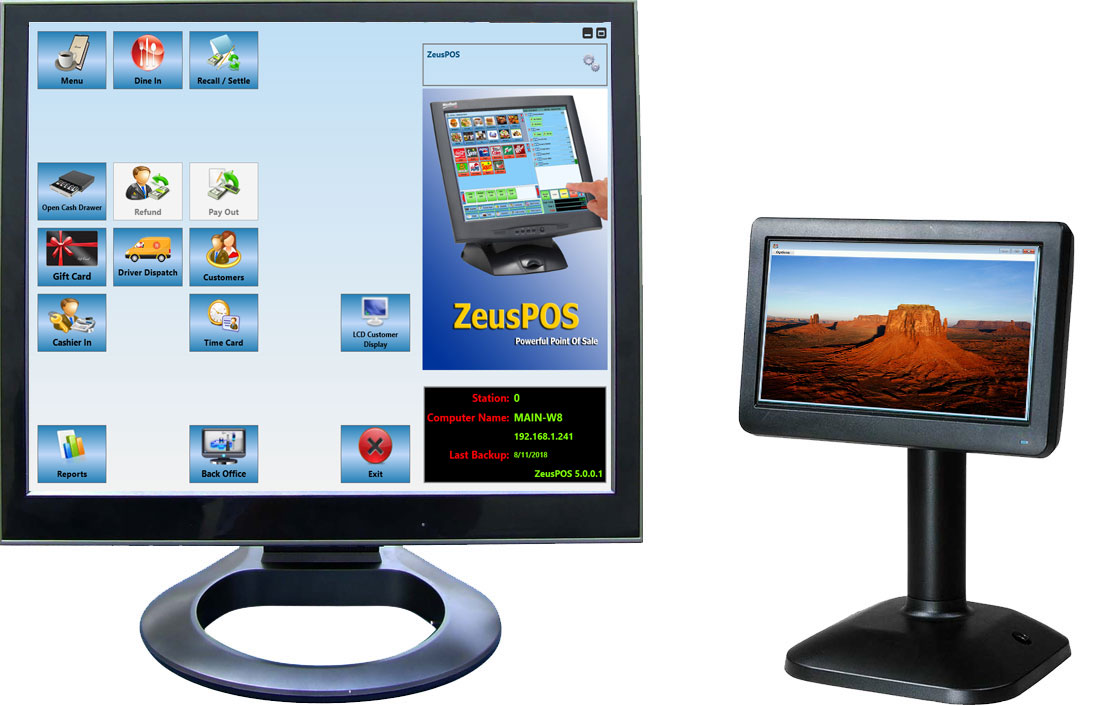
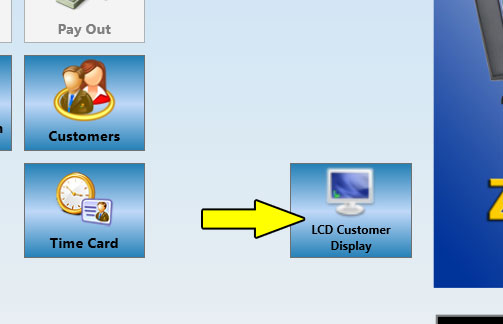
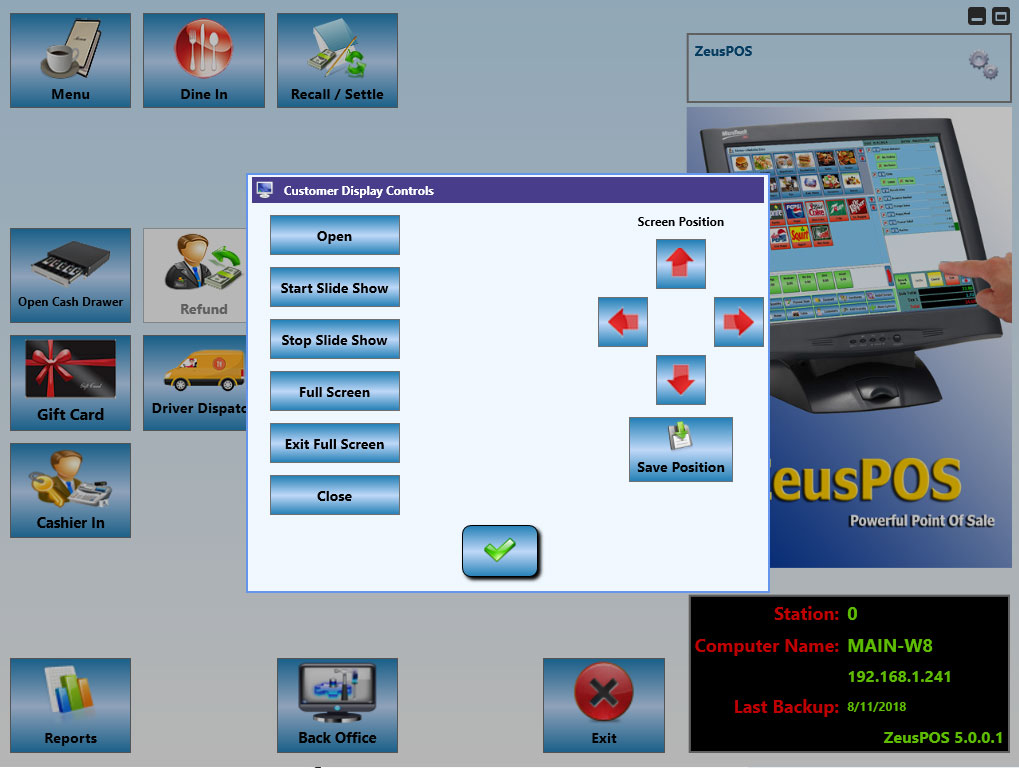
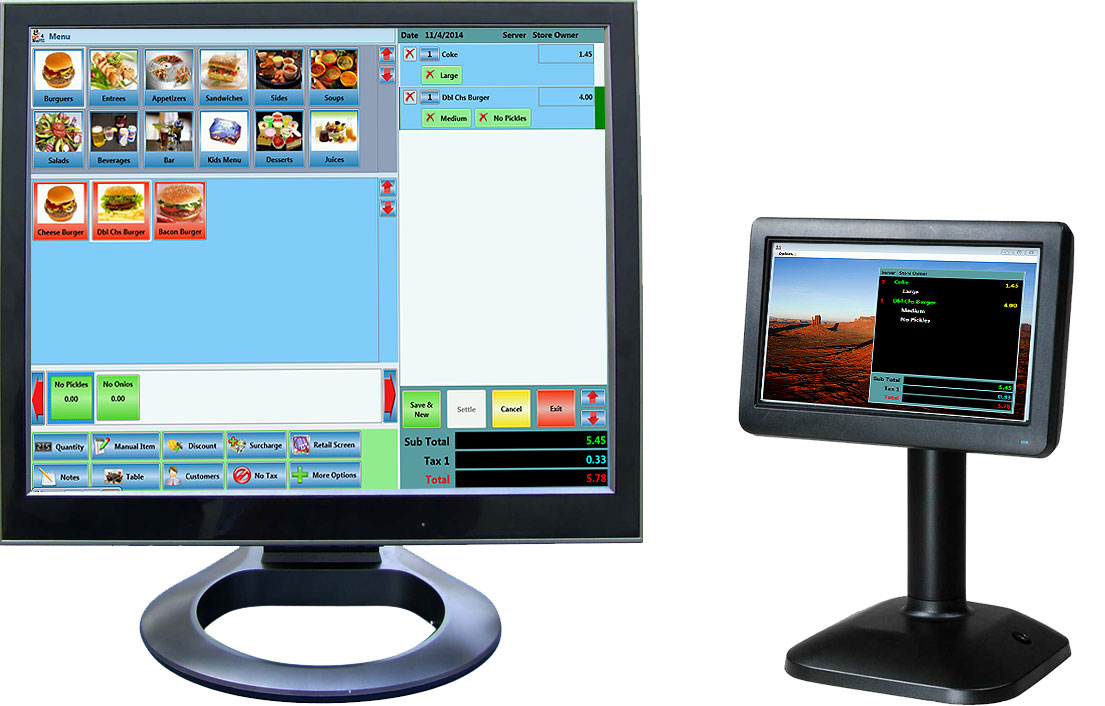

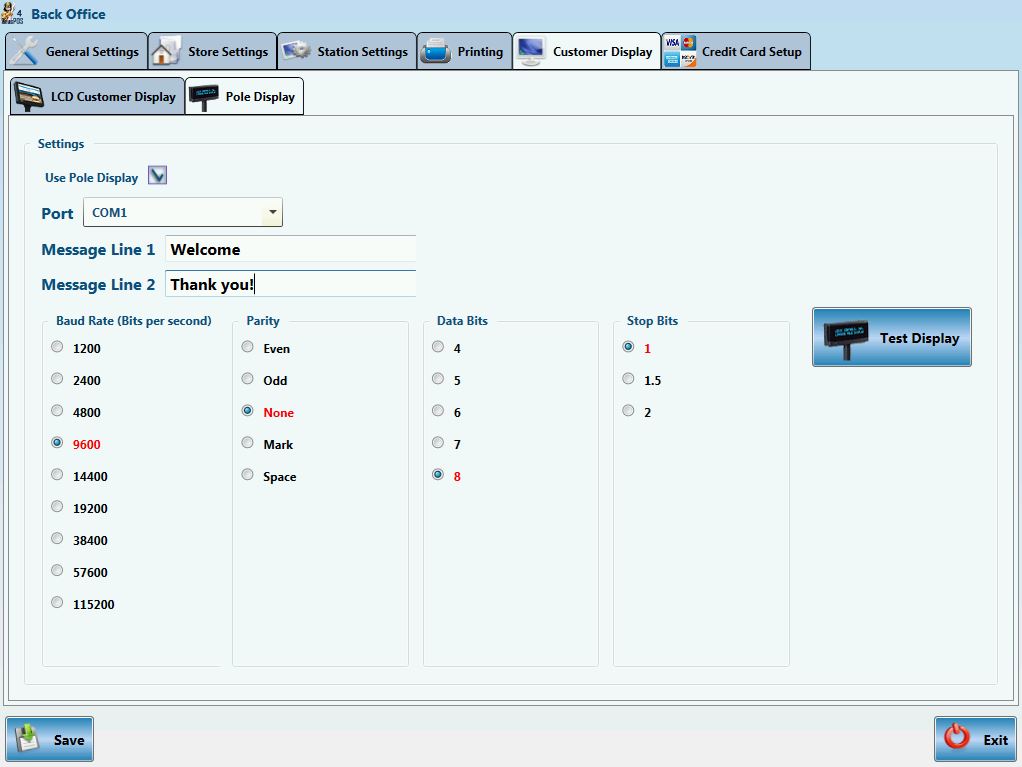
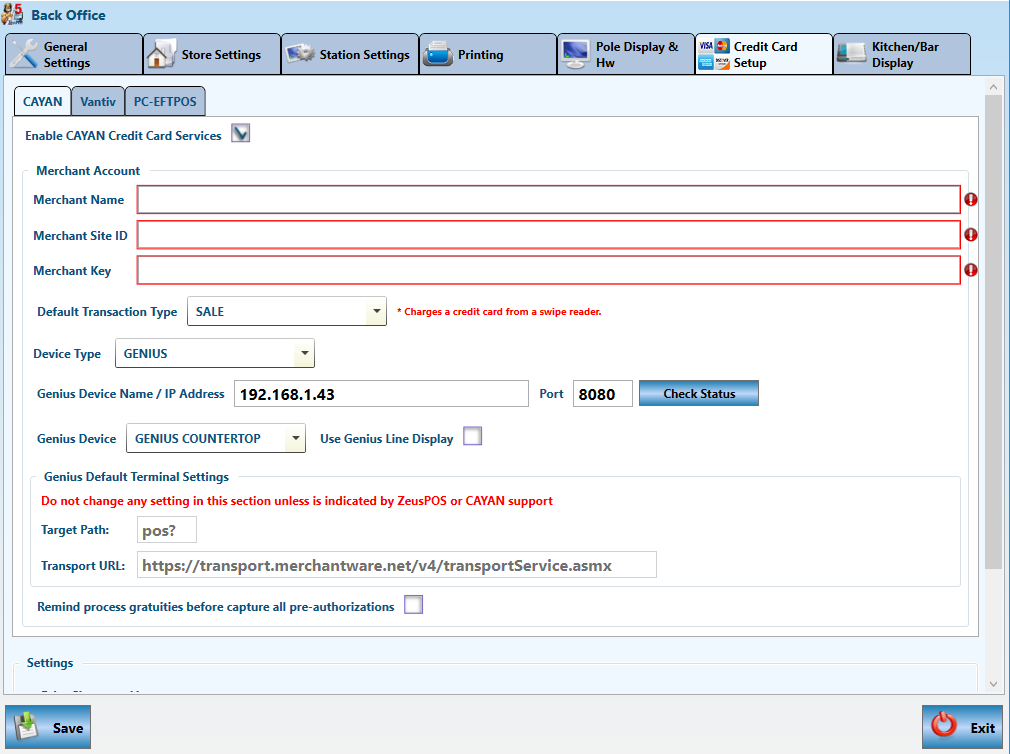
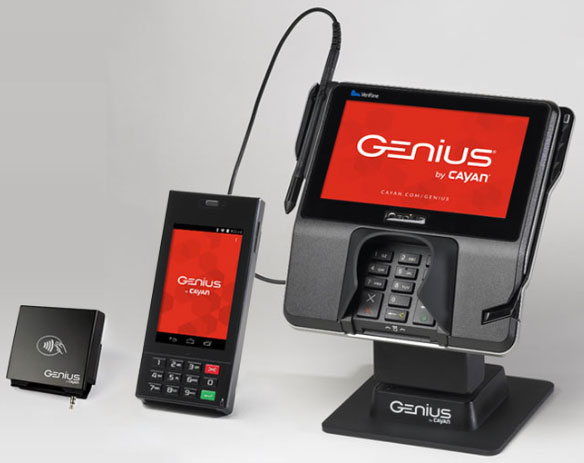 Genius Family: Mini, Handheld, Countertop
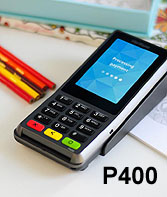 Verifone P400 (USB)

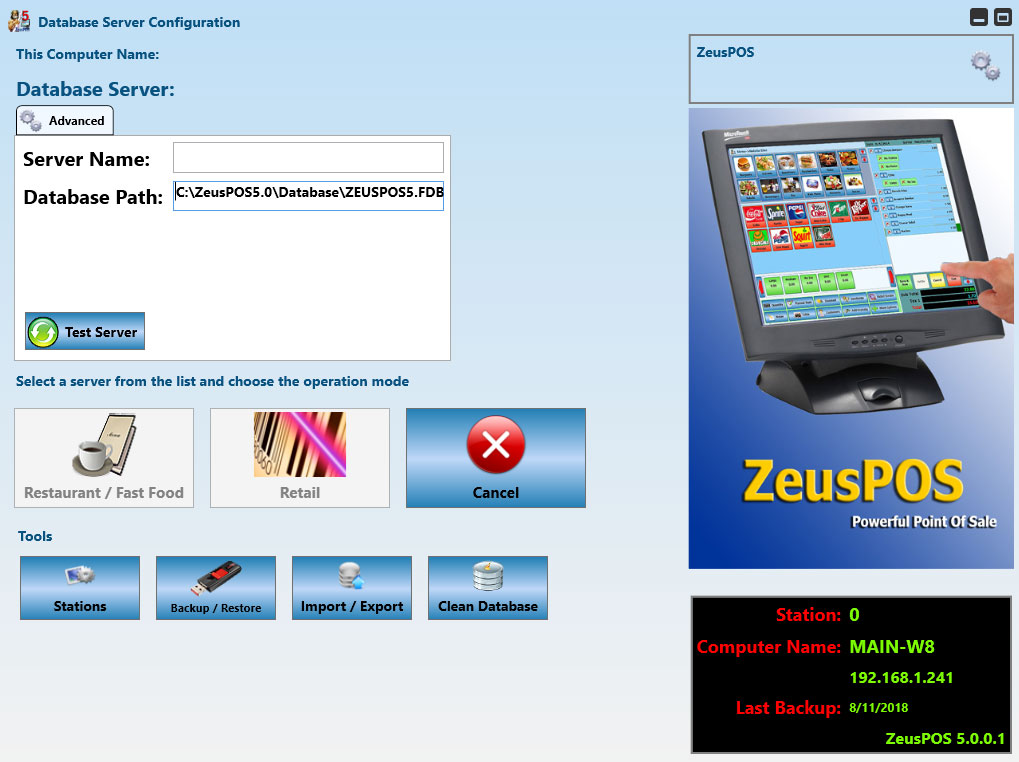
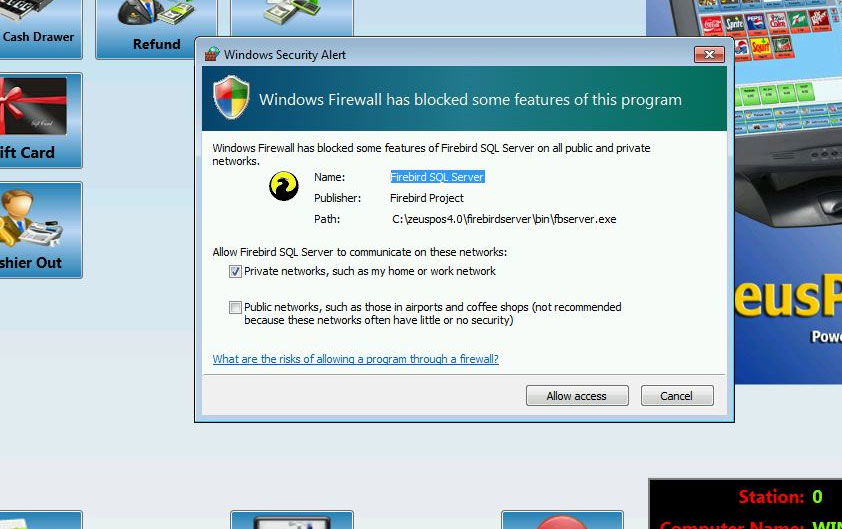
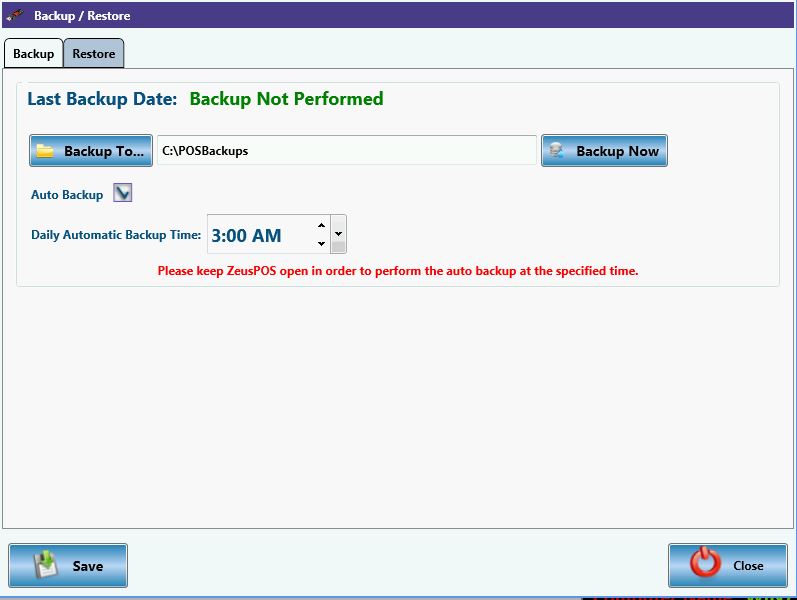
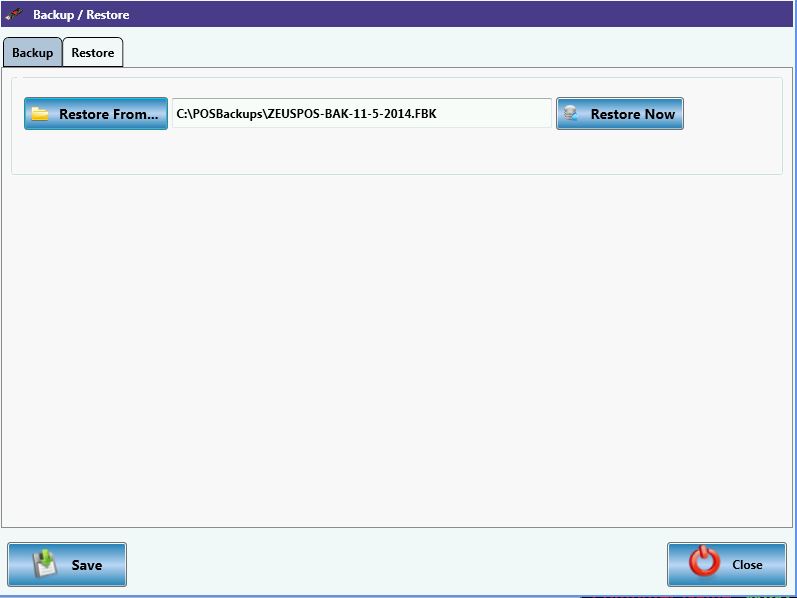
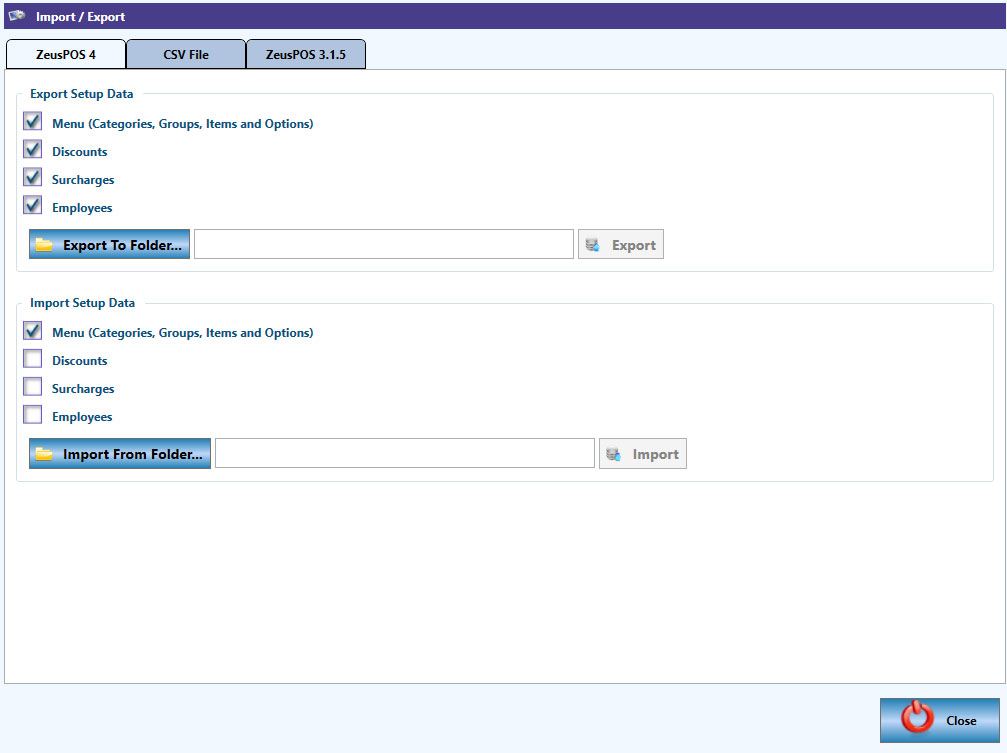
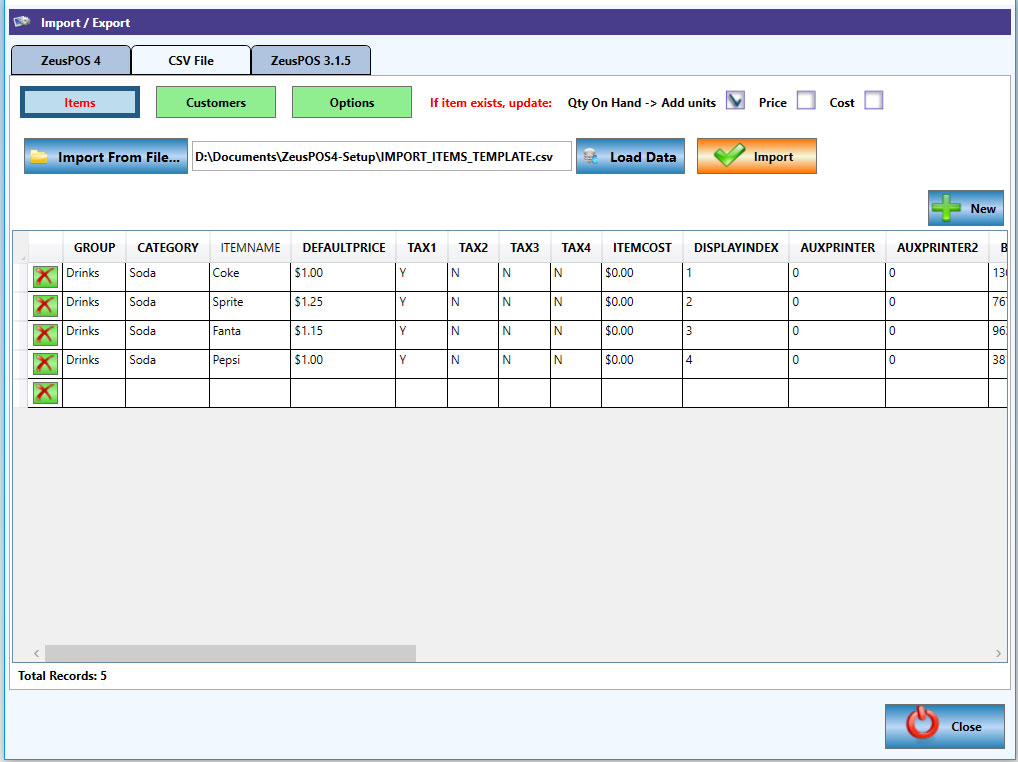
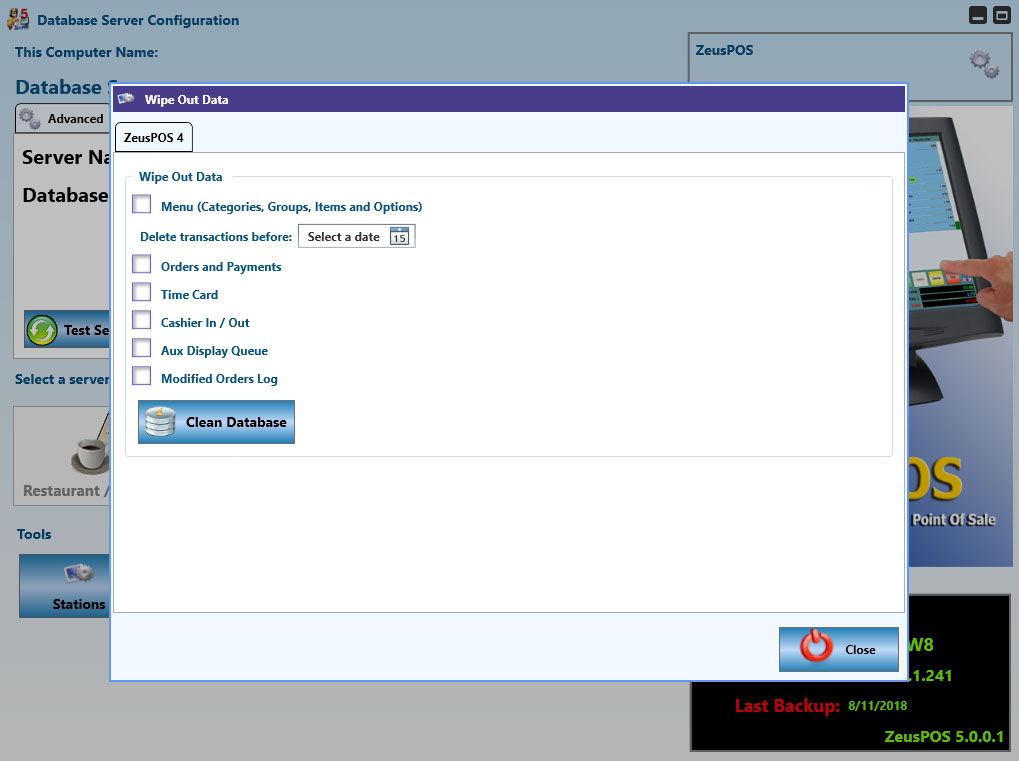
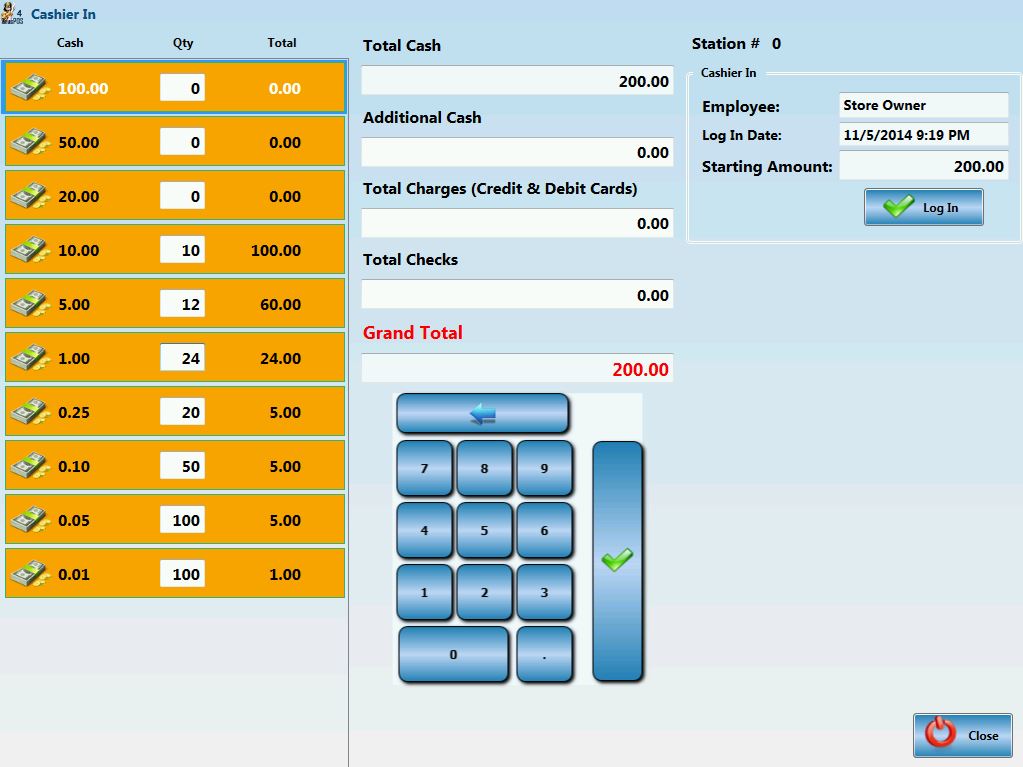
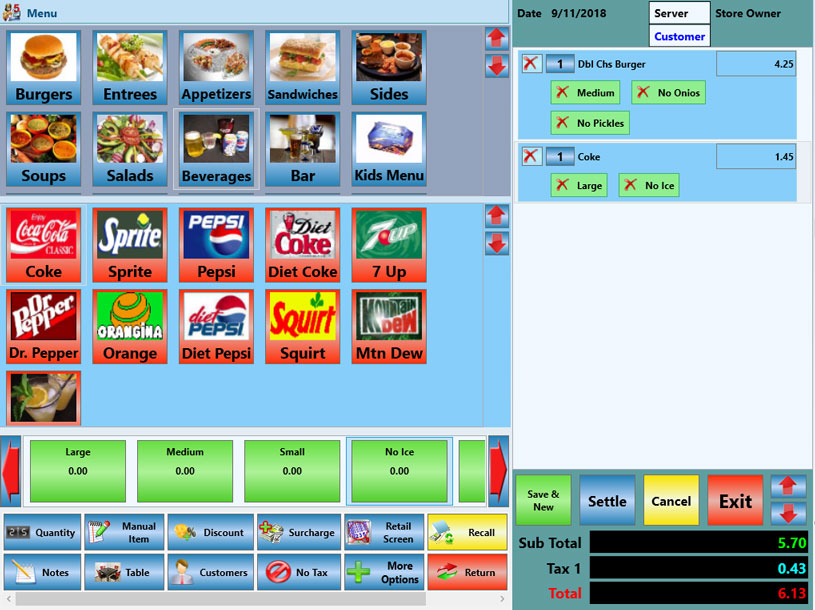
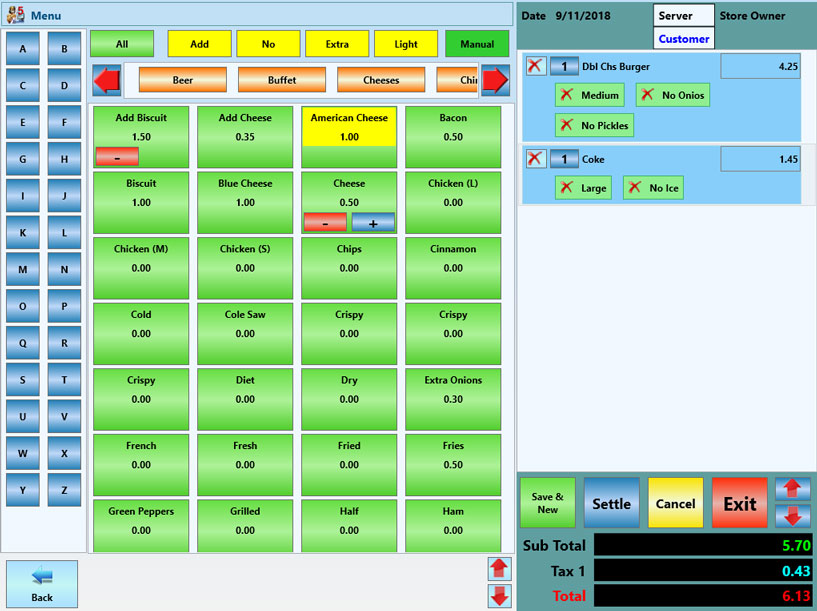
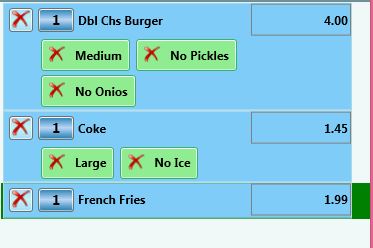


 and enter the new price
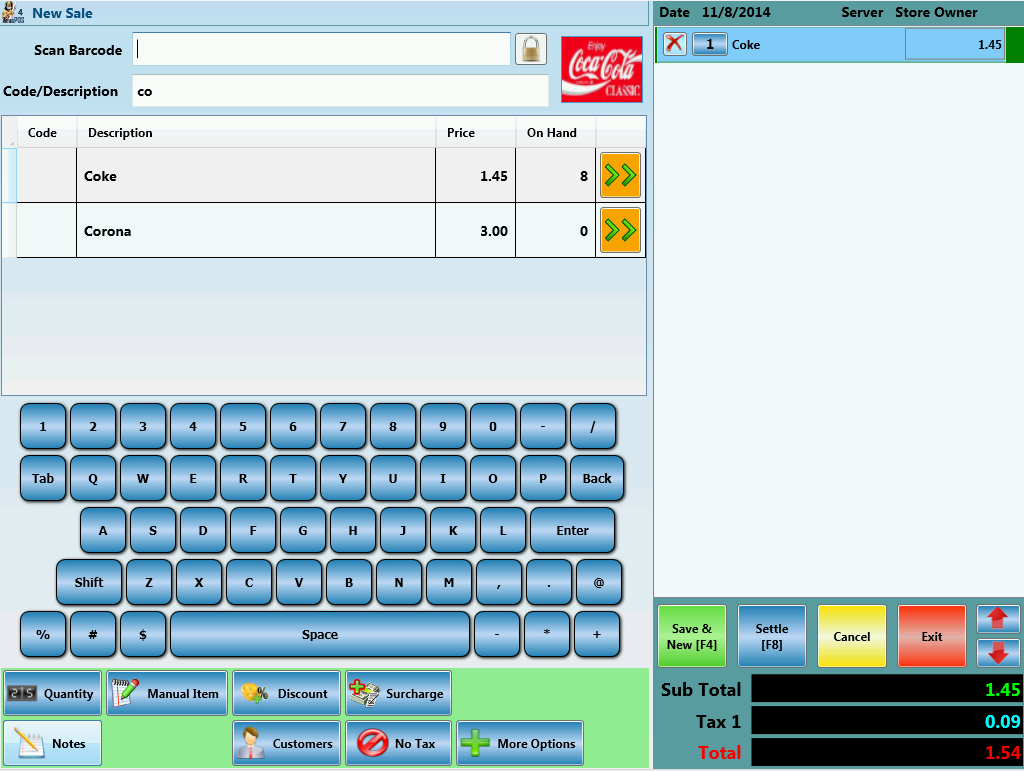
 to add manually the selected item to the order if scanner is not available.
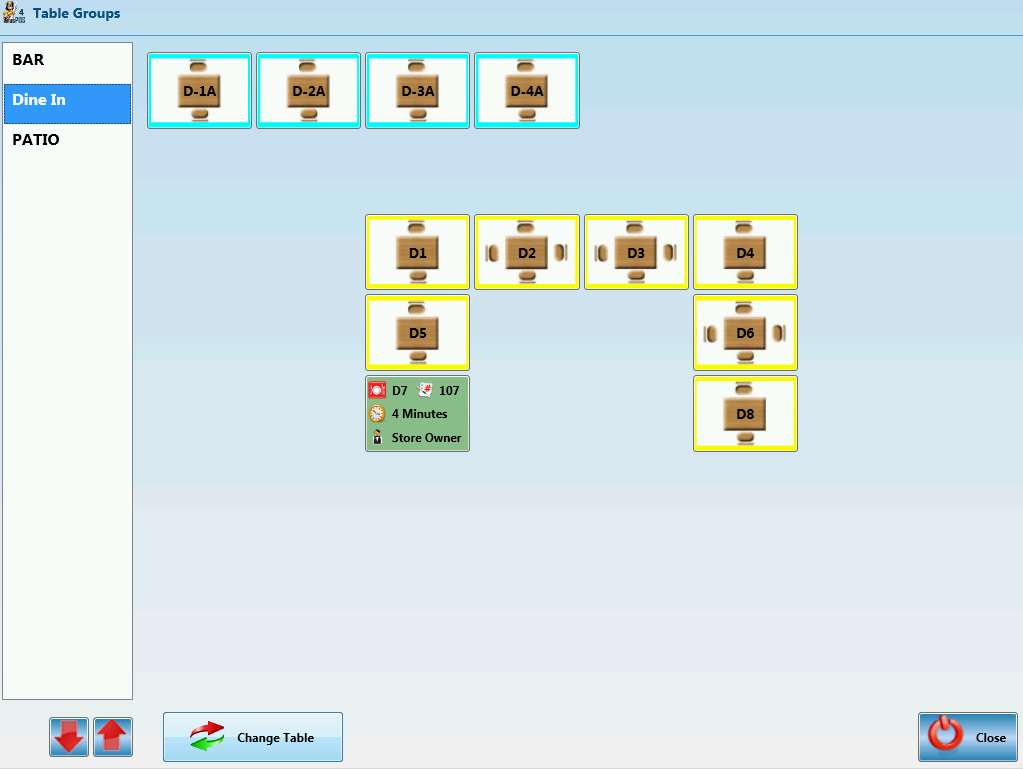
 and you will be asked to select the original table you need to change. Select the original table and then the new table
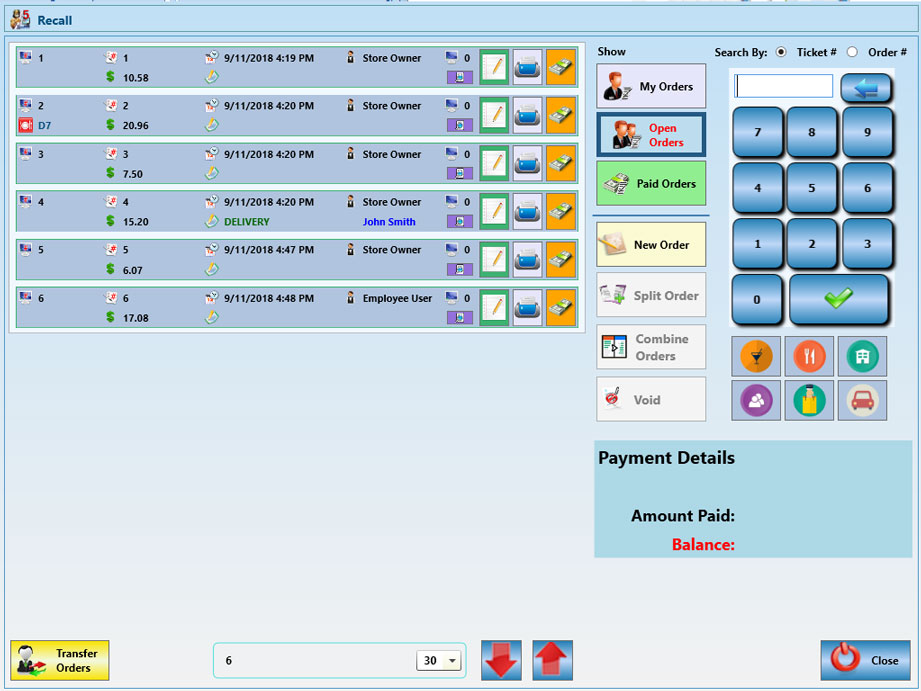
 button to reopen the order. Then you can add more items, apply discount, add notes, etc.

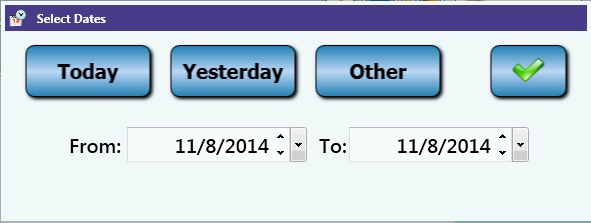
 . Paid orders for the selected date will show on the screen.

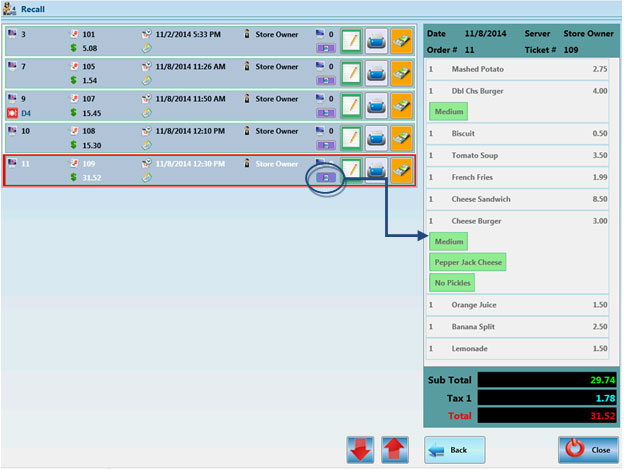
 or on any part of the order details preview to close the order preview.


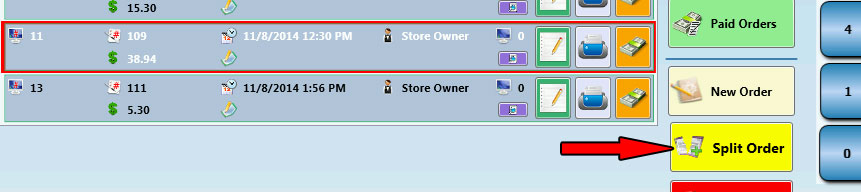
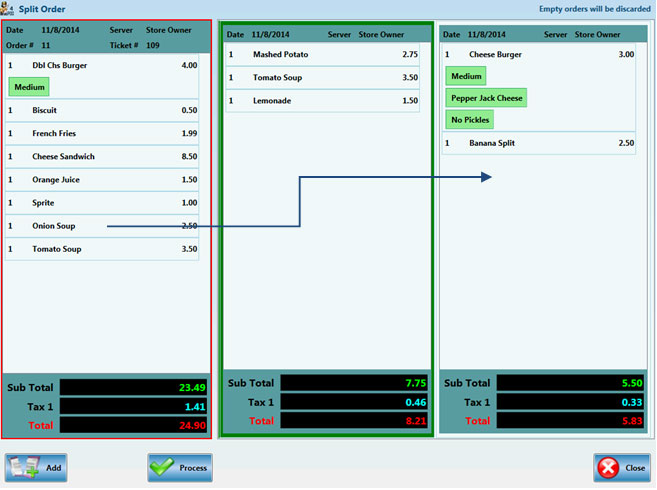
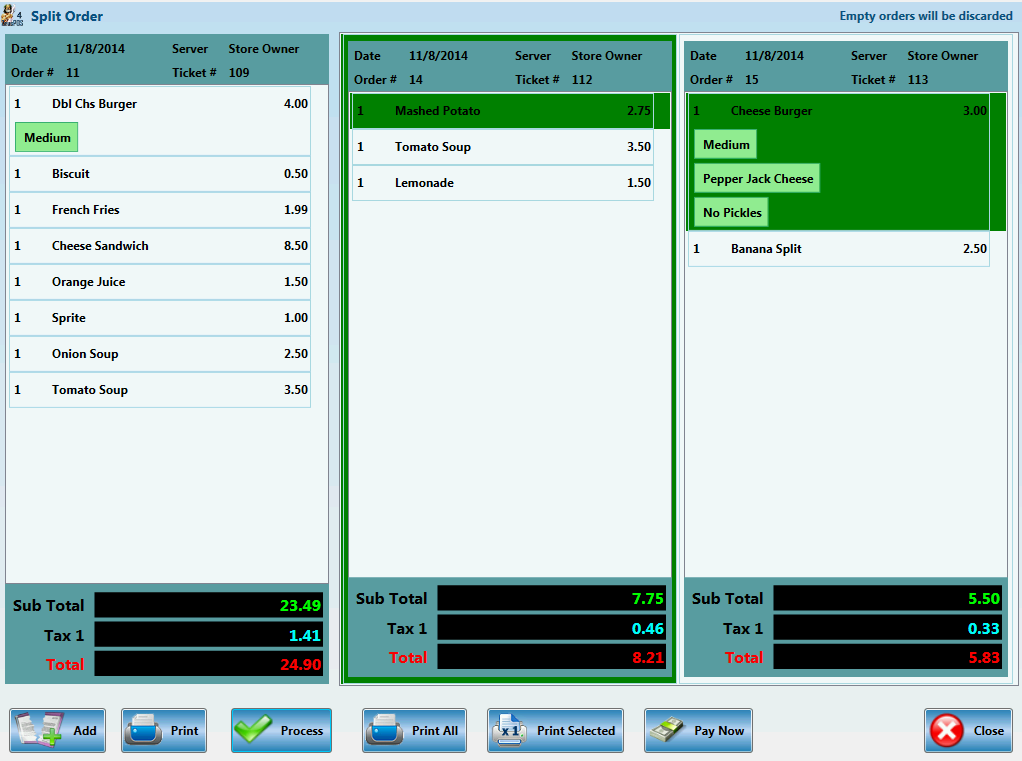

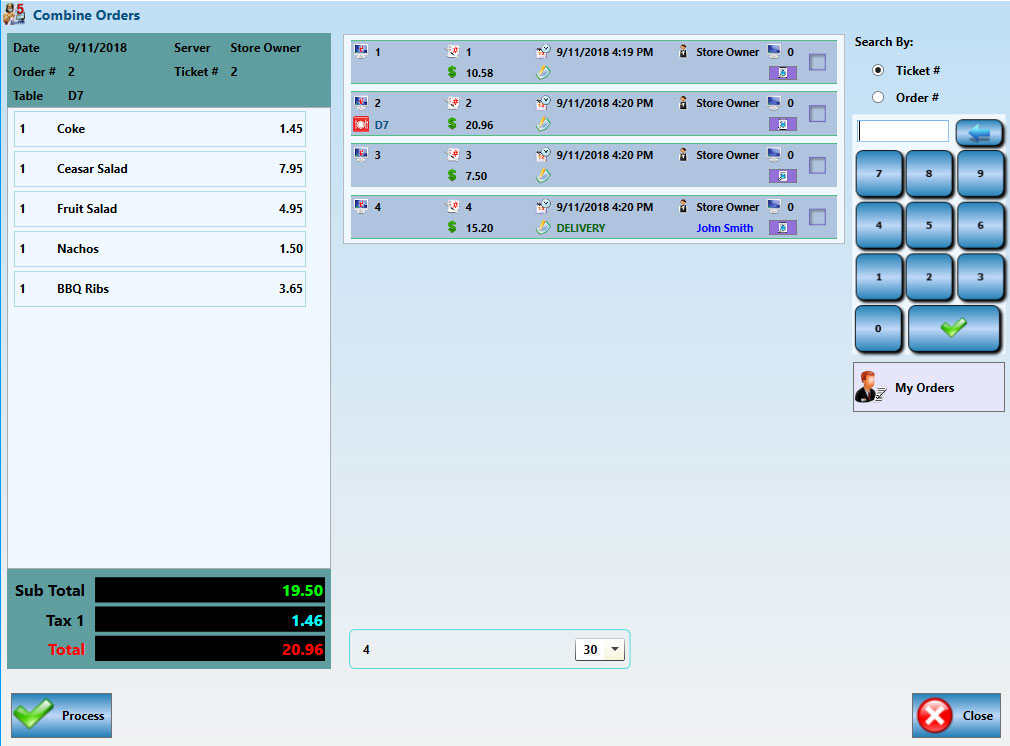
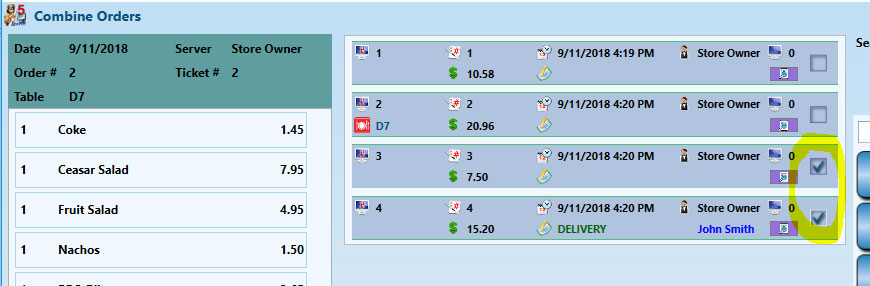
 to show only Bar Tab orders
 to show only Dine In orders
 to show only Here orders
 to show only To go orders
 to show only Pick up orders
 to show only Delivery orders